Today, we’re looking at how to write files with Mongosh. This is new as previously writing files with the legacy Mongo shell was simply not possible.
As we mentioned in the first part of this series, with the new Mongosh and its Nodejs underpinnings now default in Studio 3T, that’s no longer a challenge. It opens the way to creating custom reports, web pages and more without leaving Studio 3T.
Why Should Mongosh Write Files?
In Studio 3T, you have at your fingertips, an extensive selection of export tooling, able to save collections in JSON, CSV, BSON dumps and more. But if you are faced with a system which can’t consume any of these formats, how can you export data to it without writing an app? Or you may want to create some output to go directly to the web. With no HTML export, you may think you have no option but to export in one format and write an application to generate the HTML.
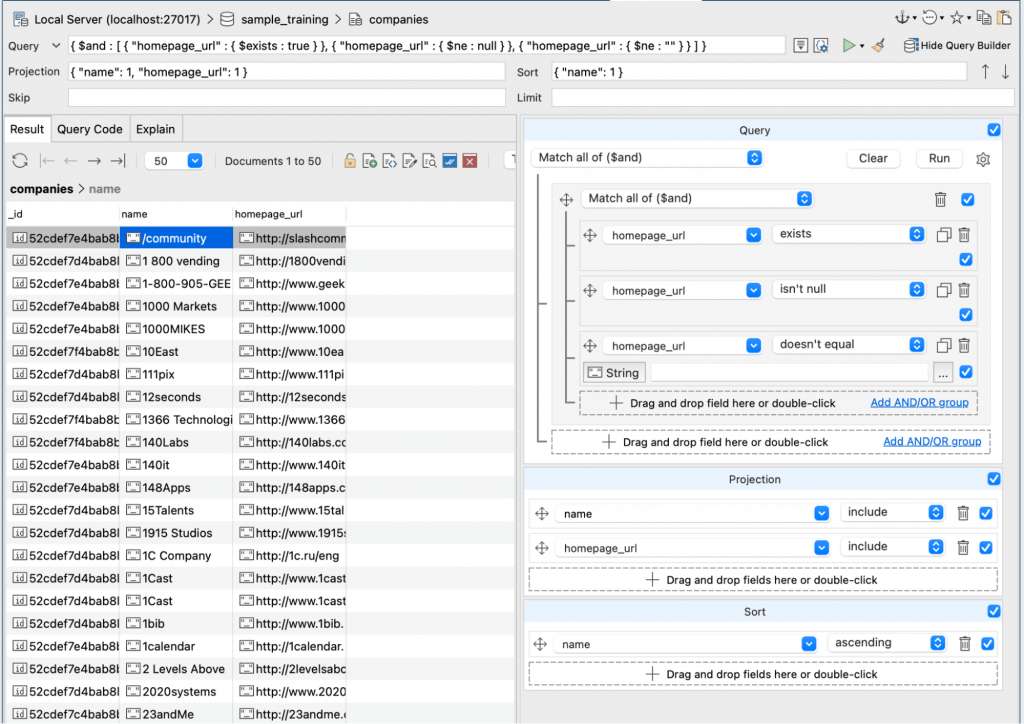
Let’s look at a practical example. Say you’ve been asked to create a web page of companies and their websites from a collection – we’re going to use the MongoDB sample data and its sample_training/companies collection here. We only need the name and homepage_url where the url exists and isn’t null or empty. We’ll create a query for that using Studio 3T’s Visual Query Builder:

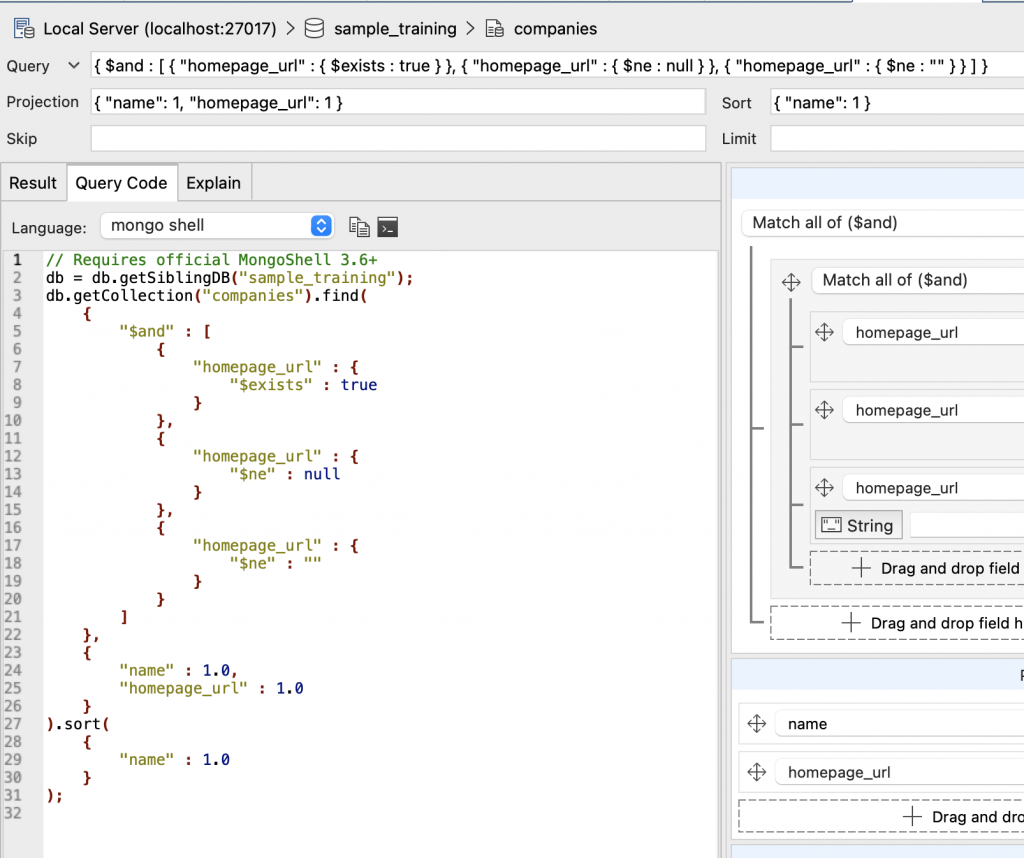
We are projecting the fields we need and sorting by the name field. The next step is to turn that into a script. Click on Query Code and you’ll see a Mongo shell version of the query.

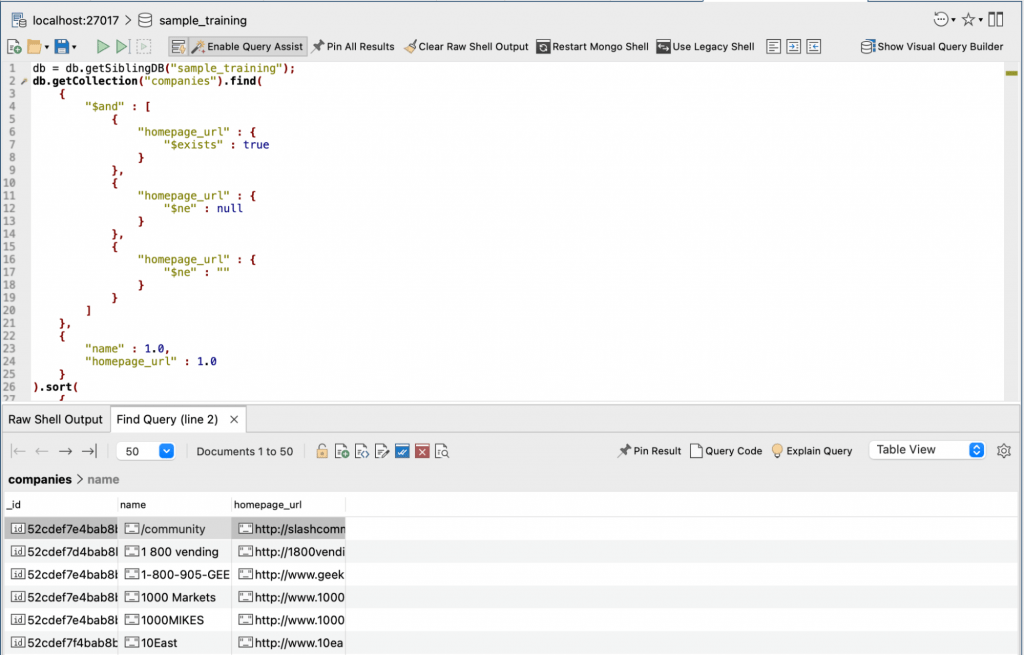
Make sure the Language is set to mongo shell and then click on the shell prompt icon to open IntelliShell with this query.

We’re now in IntelliShell. The query runs and returns results, but we want to step through all the results ourselves. So, what we want to do is get what’s known as a cursor, a pointer into the results so that we can step through the data. Head up to the db.getCollection line and prefix it with var cursor= like so:

Now scroll to the end of the script where we can continue.
Getting Mongosh to Write Files
Before we can write to a file, we need to set which directory we want our file written to by setting the current working directory.
process.chdir("/Users/dj/");Now we can open a file to write to. In the previous article on reading files, we used the fs package in Nodejs and we’re going to do that again here, but this time we’re going to get a file handle so we can keep writing to the file as we process each name and URL. For this we call up the fs.openSync() function.
var out = fs.openSync('page.html', 'w');The first parameter to this is the name of the file we want to create, the second parameter says what we want to do with this file handle. In this case, it’s w for write.
The next step is writing out some HTML prologue to the file. We’re doing the bare-minimum here for the page to appear and we are using the fs.writeSync() function to do it.
fs.writeSync(out,"<html><body><table>\n");The first parameter of writeSync is the handle of the file we want to write to. The second parameter is what we want to write. There’s no automatic line endings added, so we include “\n” at the end to add a new line in.
And now we are ready to start processing our results.
Stepping through the Results
The cursor we got earlier has a function which tells you if it has any more data to return – hasNext() – and a Next() function which gives you that data. That means that in JavaScript/Mongosh all you need is a simple while loop that tests if there’s any more data:
while (cursor.hasNext()) {Now we know there’s a document to be read from the results we can use Next() to get it:
var r = cursor.next();And now we can write that document out to our file using fs.writeSync() again.
fs.writeSync(out,`<tr><td><a href='${r.homepage_url}'>${r.name}</a></td></tr>\n`);There’s a bit to unpack here with the string being passed to writeSync. It’s what’s called a JavaScript Template Literal string. These are denoted by the back quotes surrounding them. The magic with template literal strings is that you can directly embed variable names in them, surrounded by ${ and }. The values of those variables will appear in the string. It saves a lot of fiddly string appending and formatting. So, in our example, we are printing out a HTML table row “<tr>” and then table item “<td>” and then an anchor “<a href='“. We then embed ${r.homepage_url} which will be the URL for the company and close up the anchor with a “'>“. The text for the link is embedded as ${r.name} and finally we close the anchor, the table data and the row “</a></td></tr>\n“. Write that and it makes a row in a table with a linked name in it.
Now we just need to close the while loop we started earlier.
}And now, we finish and tidy up. We close the cursor to release any resources:
cursor.close();Write the last of the HTML closing the table, the body and the html tag to our output file and wrap it all up closing the output file handle.
fs.writeSync(out,"</table></body></html>\n")
fs.closeSync(out);
Run this script and you’ll have a page.html file ready to open in your browser or copy to a website.
Other Ways for Mongosh to Write Files
There are other ways to write to a file. For example, fs.writeFileSync() will write a string straight to a file in one operation. The problem with that is the more data you have, the more memory you use. By using a cursor and writing each line to file, we get to be able to process much bigger files, bigger than your system’s memory. The important thing is that you have the option to pick which one is right for your task.
So that’s writing files, a completely customisable way of getting data out of your database, using Studio 3T’s Visual Query Builder (and this works with Aggregation Editor too) and IntelliShell. Enjoy your new freedom. In the next part, we’ll look at networking with Mongosh inside Studio 3T.
Code Complete
Here’s all the code from the example if you want an easier to read reference:
db = db.getSiblingDB("sample_training");
var cursor=db.getCollection("companies").find(
    {
        "$and" : [
            {
                "homepage_url" : {
                    "$exists" : true
                }
            },
            {
                "homepage_url" : {
                    "$ne" : null
                }
            },
            {
                "homepage_url" : {
                    "$ne" : ""
                }
            }
        ]
    },
    {
        "name" : 1.0,
        "homepage_url" : 1.0
    }
).sort(
    {
        "name" : 1.0
    }
);

process.chdir("/Users/dj/");
var out = fs.openSync('page.html', 'w')
fs.writeSync(out,"<html><body><table>\n")
while (cursor.hasNext()) {
    var r = cursor.next();
    fs.writeSync(out,`<tr><td><a href='${r.homepage_url}'>${r.name}</a></td></tr>\n`);
}
cursor.close();
fs.writeSync(out,"</table></body></html>\n")
fs.closeSync(out);


