With Studio 3T’s Export Wizard, you can export MongoDB collections, views, queries, query results, or specific documents to CSV, Excel, JSON, BSON/mongodump, SQL, or another collection.
Download Studio 3T and then jump ahead to the relevant section:
- Export MongoDB to CSV
- Export MongoDB to Excel
- Export MongoDB to JSON
- Export MongoDB to SQL (Oracle, Microsoft SQL Server, MySQL, and PostgreSQL)
- Export MongoDB to BSON/mongodump
- Export to another MongoDB collection
Open the Export Wizard
Connect to a MongoDB database and open the Export Wizard by clicking on Export in the Global Toolbar.
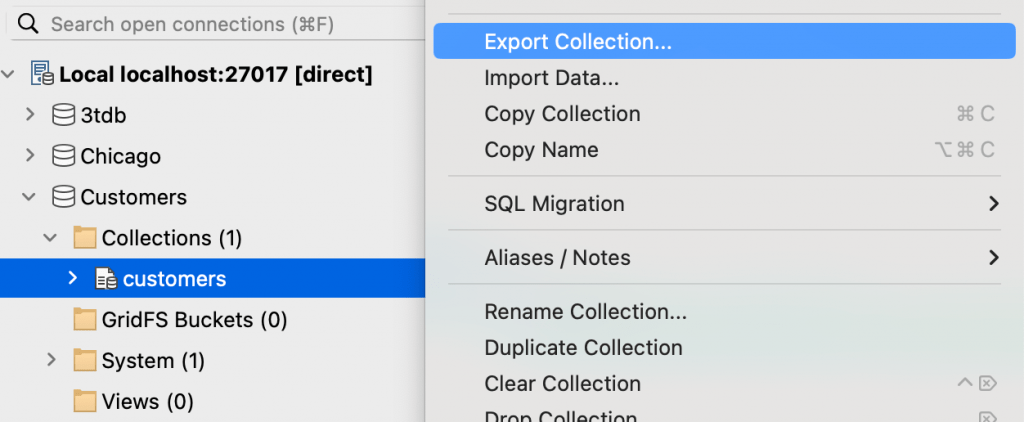
Alternatively, you can right-click on any server, database, or collection in the Connection Tree and choose Export (Export Collections, Export Collection).
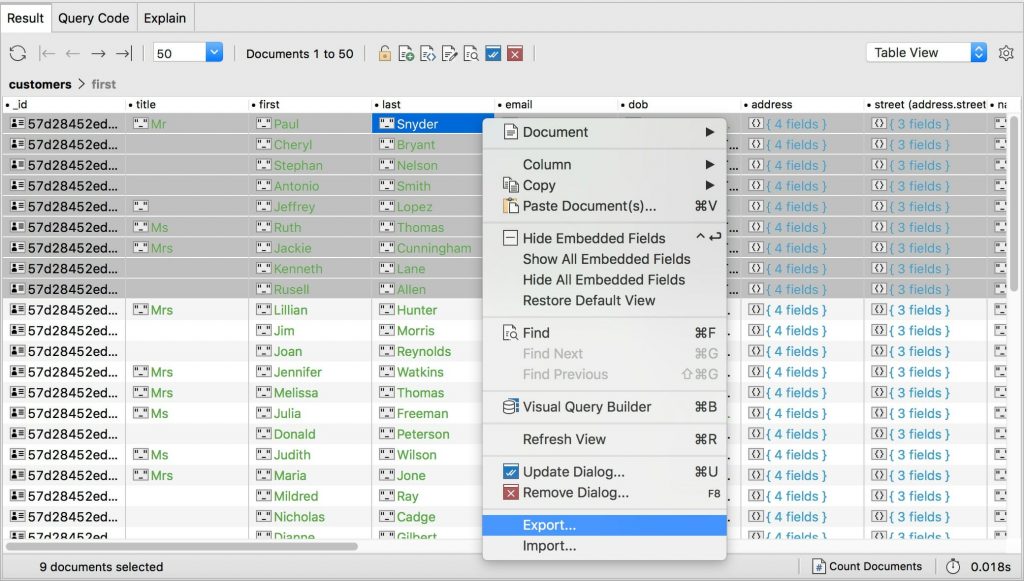
Or right-click anywhere on a Result tab (Collection Tab, SQL Query, IntelliShell), or any input or output panel in Aggregation Editor and choose Export.
Export sources
With Studio 3T, you can export:
- Entire collections
- Entire views
- The current query result of a
find()or aggregation query - The current cursor
- Specific documents
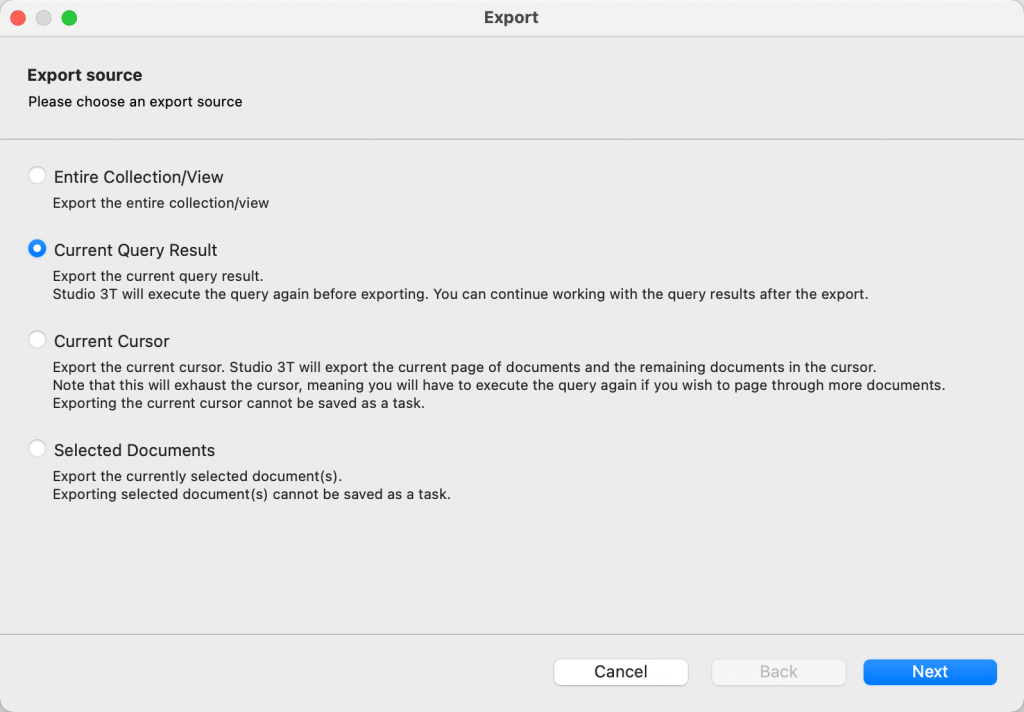
If you haven’t already selected an item in the Connection Tree, run a query, or selected specific documents, you’ll be prompted to choose an export source as follows:
For all exports, you can choose the following actions from the toolbar:
- Save the export as a task, which you can execute on-demand or schedule for later
- Load saved export tasks
- Configure export settings
- Run the task immediately
- Add, edit, duplicate or remove export units
Change the export source
While configuring your export, you can change the export source (for example, the connection, database, or collection).
To change the export source:
- Under Export source, click Change source on the Export unit tab.
- Drag the source from the Connection Tree onto the Export unit tab.

If you’re exporting find() query results, you can edit them directly in the Query bar of the Export unit tab.
The Query bar validates the JSON as you type.

Change the export file path
You can configure the default target folder and file name by clicking General Export settings in the Export unit tab.

Export MongoDB to CSV
Open the Export Wizard and select your export source. Learn more about the Export source page of the Export Wizard.
Next, select CSV as the export format and click Configure.
Studio 3T performs a partial scan to automatically detect fields in your collection and opens an Export tab with two tabs: an Export overview tab and an Export unit #1 – CSV tab (displayed by default).
To detect all fields, you can click Change scan method in the notification box and then choose a full scan but this may take a while. Alternatively, you can manually add fields that weren’t scanned by clicking Add custom field.

The Export unit – CSV tab contains the following sections:
- Export source – Displays the source connection, database, and collection. You can change this by clicking inside the blue dotted box, or by dragging the source from the Connection Tree directly into the tab.
- Export target – Choose between clipboard or file, and define the file path as needed. You can use date and time placeholders in the file path.
- Incremental execution options – Export only the newest documents in collections instead of entire collections. Click Configure incremental execution to turn on incremental exports and select a unique and sortable field to track, or choose a previous point to resume from. Learn more about Incremental Execution for Export and Migration.
- Select fields – Use the checkboxes to specify the fields to include in the export and add custom fields as needed.
- CSV format – Configure settings such as preset, delimiter, and record separator.
- Data Masking – Configure data masking rules for fields by clicking Open field masking editor.
- Other options – Configure non-formatting settings such as how to treat null values and column headers.
- Output preview – Click on the arrow to display a preview of the CSV file.
To configure global export options, click General export settings in the toolbar.
After configuring the export, you can run the export immediately by clicking Run in the toolbar.
You can run multiple CSV exports at a time by adding more export units. To save time, you can save your CSV export as a task, which you can then run on demand or schedule to run later.
Export MongoDB to Excel
Open the Export Wizard and select your export source. Learn more about the Export source page of the Export Wizard.
Next, select Excel as the export format and click Configure.
Studio 3T performs a partial scan to automatically detect fields in your collection and opens an Export tab with two tabs: an Export overview tab and an Export unit #1 – Excel tab (displayed by default).
To detect all fields, you can click Change scan method in the notification box and then choose a full scan but this may take a while. Alternatively, you can manually add fields that weren’t scanned by clicking Add custom field.

The Export unit – Excel tab contains the following sections:
- Export source – Displays the source connection, database, and collection. You can change this by clicking inside the blue dotted box, or by dragging the source from the Connection Tree directly into the tab.
- Export target – Select or specify the destination file as needed. You can use date and time placeholders in the file path.
- Incremental execution options – Export only the newest documents in collections instead of entire collections. Click Configure incremental execution to turn on incremental exports and select a unique and sortable field to track, or choose a previous point to resume from. Learn more about Incremental Execution for Export and Migration.
- Select fields – Use the checkboxes to specify the fields to include in the export and add custom fields as needed. Move fields up or down.
- Format options – Configure settings such as the Excel file format, including or excluding column headers, column auto-sizing, and text alignment.
- Data Masking – Configure data masking rules for fields by clicking Open field masking editor.
To configure global export options, click General export settings in the toolbar.
After configuring the export, you can run the export immediately by clicking Run in the toolbar.
You can run multiple Excel exports at a time by adding more export units. To save time, you can save your Excel export as a task, which you can then run on demand or schedule to run later.
Export MongoDB to JSON
Open the Export Wizard and choose your export source. Learn more about the Export source page of the Export Wizard.
In this example, we’ll export the Current Query Result of the find() query { "package": "Basic" }, which we built using Visual Query Builder.

Click Next, then select JSON as the export format and click Configure.
Studio 3T opens an Export tab with two tabs: an Export overview tab and an Export unit #1 – JSON tab (displayed by default).
The Export unit – JSON tab contains the following sections:
- Export source – Displays the source connection, database, and collection. In this example, we’re exporting the current query result of the find() query { “package”: “Basic” }. If you need to edit it, you don’t need to go back to the original query, you can edit it directly in the Query bar.
- Export target – Choose between clipboard or file, and define the file path as needed. You can use date and time placeholders in the file path.
- Incremental execution options – In this example, we’re exporting a current query result, but if you were exporting an entire collection, you can choose to export only the newest documents. To do this, click Configure incremental execution to turn on incremental exports and select a unique and sortable field to track, or choose a previous point to resume from. Learn more about Incremental Execution for Export and Migration.
- Format options – Choose between JSON – MongoDB Shell / Studio 3T or JSON – mongoexport.
- Data Masking – Configure data masking rules for fields by clicking Open field masking editor.
- Advanced – Choose to export with or without commas between documents, or export as document array.
- Output preview – Click on the arrow to display a preview of the JSON, which dynamically updates as you configure the export settings.
To configure global export options, click General export settings in the toolbar.
After configuring the export, you can run the export immediately by clicking Run in the toolbar.
You can also run multiple JSON exports at a time by adding more export units. To save time, you can save your JSON export as a task, which you can then run on demand or schedule to run later.
Export MongoDB to SQL
Open the Export Wizard and select SQL as the export format. Click Configure.
Studio 3T performs a partial scan to detect fields and map source types to SQL column types. It opens an Export tab with two tabs: an Export overview tab and an Export unit #1 – SQL tab (displayed by default).
To detect all fields, you can click Change scan method in the notification box and then choose a full scan but this may take a while. Alternatively, you can manually add fields that weren’t scanned by clicking Add custom field.

The Export unit – SQL tab contains the following sections:
- Export source – Displays the source.
- Select target – Choose between clipboard or file, and define the file path as needed. You can use date and time placeholders in the file path.
- Incremental execution options – Export only the newest documents in collections instead of entire collections. Click Configure incremental execution to turn on incremental exports and select a unique and sortable field to track, or choose a previous point to resume from. Learn more about Incremental Execution for Export and Migration.
- SQL format – Displays the target SQL format.
- Select fields – Use the checkboxes to specify the fields to include in the export and add custom fields as needed, move fields up or down, and edit SQL field names and types.
- SQL table name – Enter the SQL table name.
- Data Masking – Configure data masking rules for fields by clicking Open field masking editor.
- Other options – Configure other settings, for example adding CREATE TABLE and DROP TABLE IF EXISTS statements.
- Output preview – Click on the arrow to display a preview of the SQL file.
Select the required SQL database in the SQL format list: MySQL Server, Microsoft SQL Server, Oracle Database, or PostgreSQL. Then, select the fields to include in the SQL export. To override the auto-detected SQL column names and SQL column types, double-click on a cell and edit the value.
To configure global export options, click General export settings in the toolbar.
After configuring the export, you can run the export immediately by clicking Run in the toolbar.
You can also run multiple SQL exports at a time by adding more export units. To save time, you can save your SQL export as a task, which you can then run on demand or schedule to run later.
Export MongoDB to BSON or mongodump
If you haven’t chosen an item in the Connection Tree, run a previous query, or selected specific documents, you’ll need to select an export source. Learn more about the Export source page of the Export Wizard.
Select BSON – mongodump as the export format and click Configure.
Studio 3T opens an Export tab with two tabs: an Export overview tab and an Export unit #1 – BSON – mongodump tab (displayed by default).

The Export unit – BSON – mongodump tab contains the following sections:
- Export source – Displays the source connection, database, and collection. You can change this by clicking inside the blue dotted box, or by dragging the source from the Connection Tree directly into the tab.
- Export target – Select or specify the destination file as needed. You can use date and time placeholders in the file path.
- Format options – Choose between BSON – mongodump folder or BSON – mongodump archive.
- Other options – Configure other settings such as compression, document recovery, and more.
To configure global export options, click General export settings in the toolbar.
After configuring the export, you can run the export immediately by clicking Run in the toolbar.
You can run multiple BSON exports in one job by adding more export units. To save time, you can save your BSON export as a task, which you can then run on demand or schedule to run later.
Export to another collection
If you haven’t chosen an item in the Connection Tree, run a previous query, or selected specific documents, you’ll need to select an export source. Learn more about the Export source page of the Export Wizard.
Select To another collection as the export format and click Configure.
Studio 3T opens an Export tab with two tabs: an Export overview tab and an Export unit #1 – To another collection tab (displayed by default).

The Export unit – To another collection tab contains the following sections:
- Export source – Displays the source connection, database, and collection. You can change this by clicking inside the blue dotted box, or by dragging the source from the Connection Tree directly into the tab.
- Export target – Displays the target connection/database/collection. You can edit the export target by clicking inside the blue dotted box, or by dragging the source from the Connection Tree directly into the tab.
- Incremental execution options – Export only the newest documents in collections instead of entire collections. Click Configure incremental execution to turn on incremental exports and select a unique and sortable field to track, or choose a previous point to resume from. Learn more about Incremental Execution for Export and Migration.
- Data Masking – Configure data masking rules for fields by clicking Open field masking editor.
- Export mode – Select one of the export modes.
- Output preview – Click on the arrow to display a preview of the collection data.
Under Export target, click Change target to select a target connection. In the Export target dialog, click Connect to open the Connection Manager. Select the target server, click Connect, and enter passwords as required.

Then, choose the collection and click OK.
To configure global export options, click General export settings in the toolbar.
After configuring the export, you can run the export immediately by clicking Run in the toolbar.
You can also run multiple exports at a time by adding more export units. To save time, you can save your export as a task, which you can then run on demand or schedule to run later.
Check the progress of your export
To track your export’s progress, check the Operations sidebar in the bottom-left hand corner of Studio 3T. You can view the export file by right-clicking the export in the Operations sidebar and selecting Open in File Explorer (Windows, Linux) or Reveal in Finder (macOS).

Automate and schedule exports as tasks
Export Wizard integrates with Tasks and Task Scheduler so that you can save frequently-run exports as tasks.
Click on Save task (as) to save an export as a task.
Name the task, specify where you want to save it, then click Save.
This saves the task in the Task Viewer, from which you can schedule and run the task.

Masking data on export
You can specify data masking rules using Data Masking, allowing you to obfuscate collections at field level.
On the Export unit tab, scroll down to the Data Masking section, and click Open field masking editor to begin configuring your data masking rules. The original data source won’t be overwritten.

Export all collections or multiple MongoDB collections
The Export Wizard treats each export as an export unit.
Instead of running single exports one after another, you can add multiple export units that you can run at once, which is a huge time-saver in tandem with Tasks and Tasks Scheduler.
Add export units
Set up your first export unit using your format of choice:
- Export MongoDB to CSV
- Export MongoDB to JSON
- Export MongoDB to SQL (Oracle, Microsoft SQL Server, MySQL, and PostgreSQL)
- Export MongoDB to BSON/mongodump
- Export to another MongoDB collection
The quickest way to add new export units is to drag items directly from the Connection Tree onto the Export units section on the Export overview tab (in this case, theexpats collection).

Alternatively, click Add unit in the toolbar.
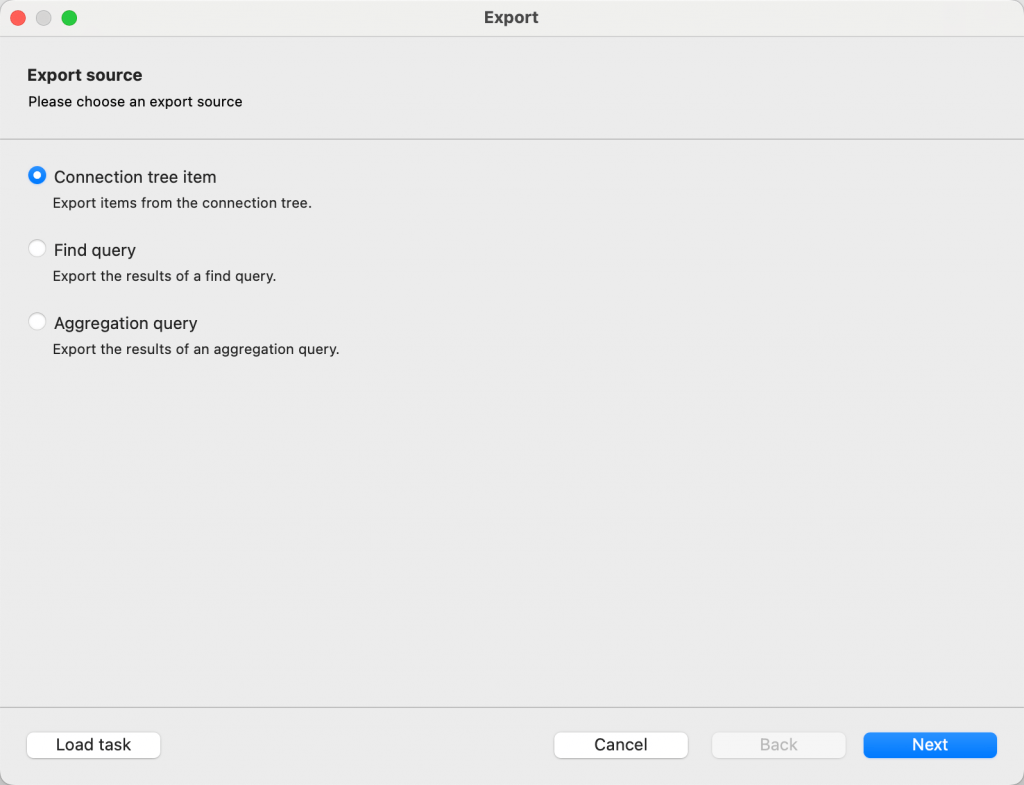
This prompts you to choose your new unit’s export source. Here, we’ll select Connection tree item and then click Next.

Click Connect to open the Connection Manager. Select the target server, click Connect, and enter passwords as required.

Next, chose the connection tree items (databases, collections, views) to export. You can choose multiple items at once. Click Next.

Then, choose the export format and click Configure. The new export unit opens in a separate tab.
Configure the new export unit as you would any export.
On the Export overview tab, you can find an overview of all the export units bundled in your job.

Edit export units
Click on Edit unit in the toolbar.
On the Export overview tab, you can also double-click on the export unit, or right-click on the unit and choose Edit selected units.
Remove export units
Click on Remove unit in the toolbar.
Alternatively, on the Export overview tab, select the unit to be removed and either click on Remove unit in the toolbar or right-click and choose Remove selected units.
More about export sources and formats
At first glance, you might wonder why you don’t see all the export sources options.
The prompt you see depends on which item(s) you’re trying to export or where you’ve clicked in the application.
If no item is selected, clicking on Export in the global toolbar prompts you to choose the export source.

When you choose items from the Connection Tree and click on Export, it will ask you to choose the export format directly.
Note that depending on the items you choose, only the applicable formats will be available.

When you click on Export from a Result tab (Collection Tab, IntelliShell, SQL Query), or an input or output panel in Aggregation Editor, it asks you directly which items you want to export.

This article was originally published by Kathryn Vargas and has since been updated.