Four ways to connect to MongoDB
Studio 3T provides four ways to connect to a MongoDB server. You can:
- Paste a MongoDB connection string or URI
- Import connections from Robo 3T (Robomongo), NoSQLBooster, and other clients
- Import a URI file
- Enter connection details manually
Paste a MongoDB connection string or URI
Hosters like MongoDB Atlas, ObjectRocket, and ScaleGrid provide the MongoDB URI or connection string from their respective interfaces.
Studio 3T supports the two connection string formats: Standard and DNS Seedlist.
The standard connection string format looks like:
mongodb://[username:password@]host1[:port1][,host2[:port2],...[,hostN[:portN]]][/[database][?options]]
While the DNS Seedlist connection format uses a different +srv prefix:
mongodb+srv://server.example.com/?connectTimeoutMS=300000&authSource=aDifferentAuthDB
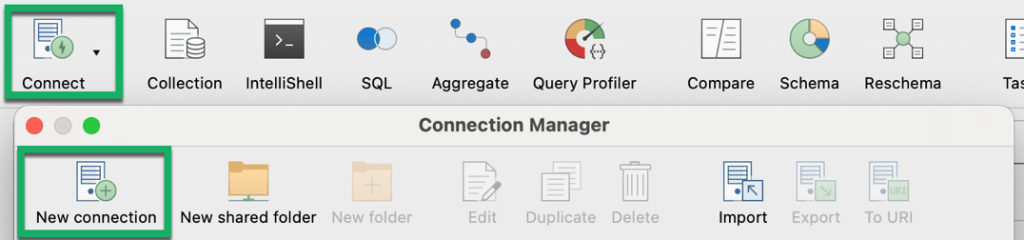
When you have your connection string ready, click on the Connect button in the global toolbar and choose New Connection.
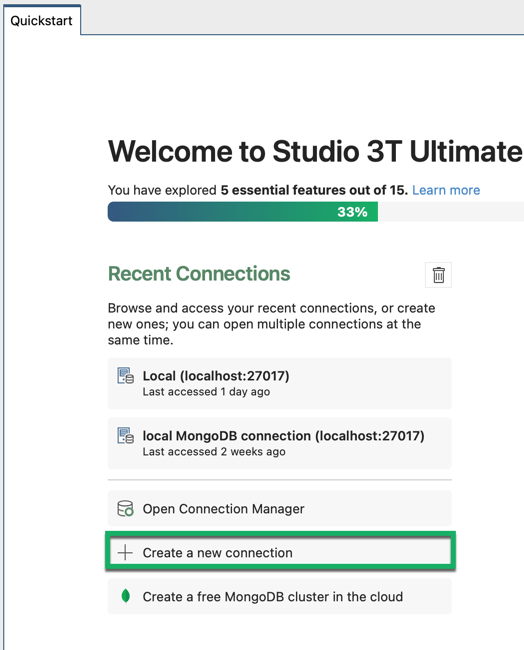
Or click on Create a new connection on the Quickstart tab.
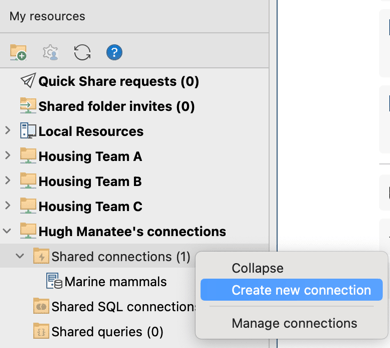
Or in the My resources sidebar, right-click the Shared connections folder where you want to save the connection and select Create new connection.
This opens the New Connection dialog. Paste the connection string and click Next.
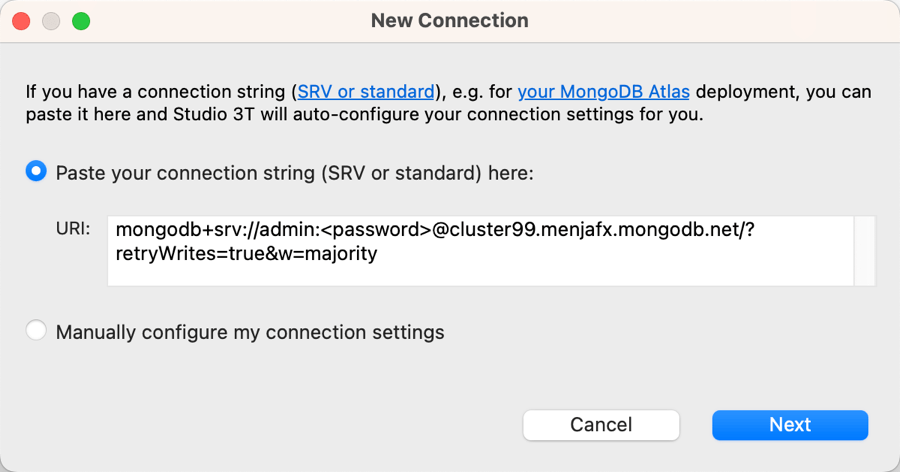
Studio 3T automatically extracts the information and pre-populates the fields in the Server, Authentication, SSL, SSH, and Advanced tabs. Click Save to save the connection for later use.
Import connections from Robo 3T (Robomongo), NoSQLBooster, and other clients
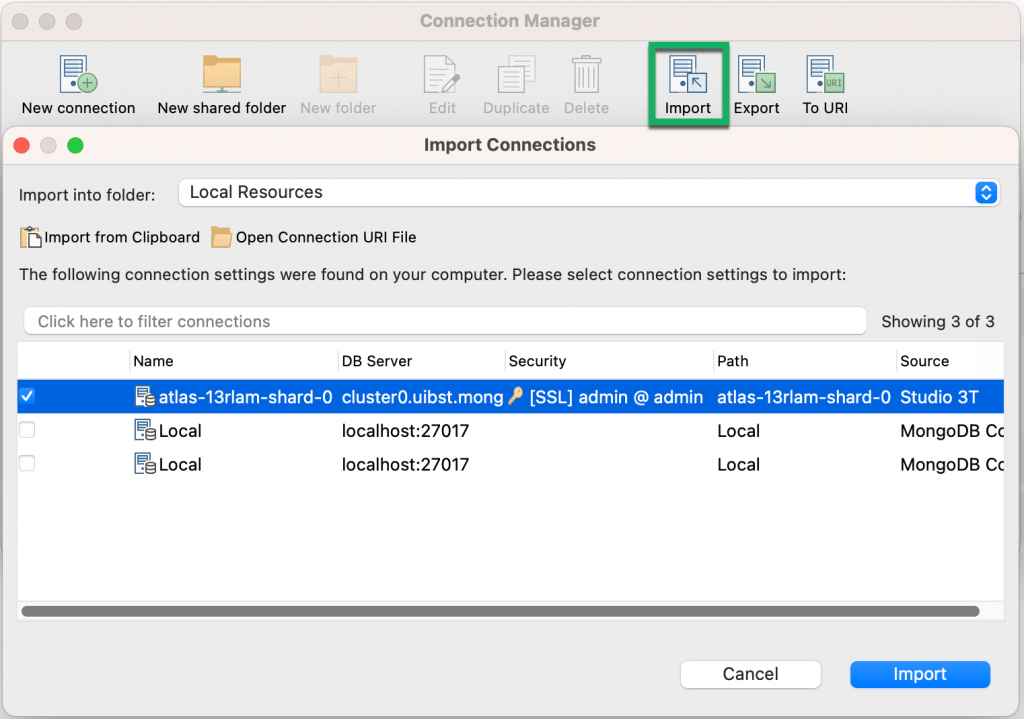
Studio 3T automatically detects and imports connection details – including SSH credentials – already saved in other clients like Robo 3T and NoSQLBooster.
Simply click on Import in the toolbar and Studio 3T lists the auto-detected connections in the Import Connections dialog.
Import a URI file
To import a URI file, click on the Connect button in the global toolbar or Open Connection Manager on the Quickstart tab. This opens the Connection Manager.
Click on Import. Then, click on Open Connection URI File.
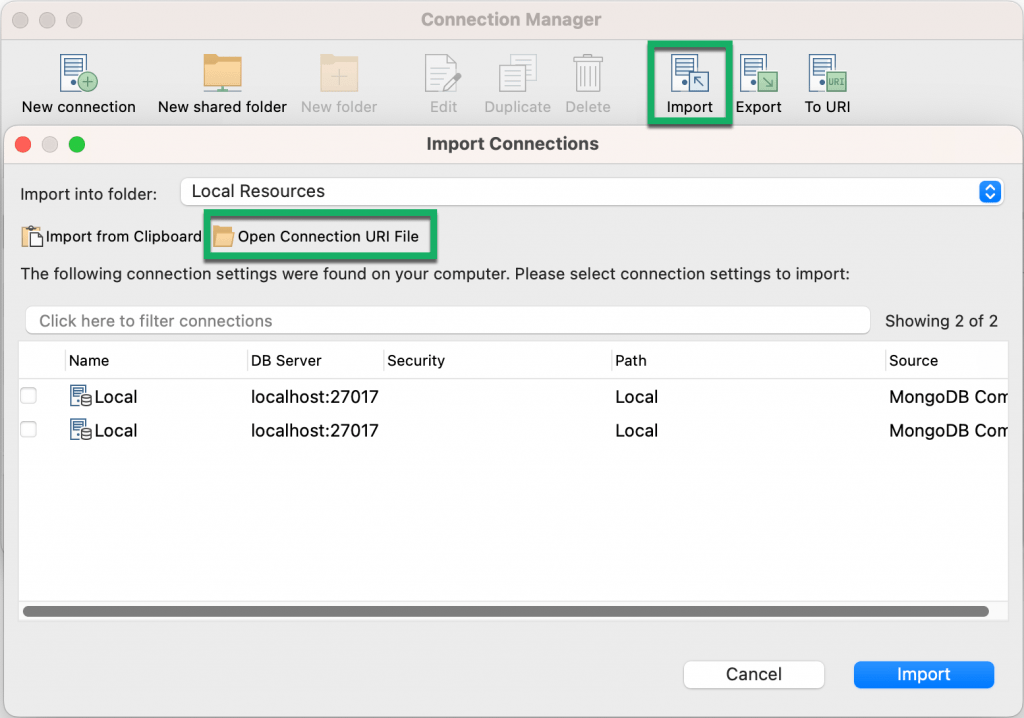
Choose your .uri file and click Open. Then, click Import.
Enter connection details manually
In the following sections, we’ll walk you through how to connect manually to the four supported connection types:
Connect to a standalone connection (e.g. MongoDB localhost)
Let’s try to connect to localhost (which runs on default port 27017) as an example of a standalone connection.
Open the Connection Manager, name the connection, and choose Standalone from the Connection Type list.
Fill out the Server and Port fields.
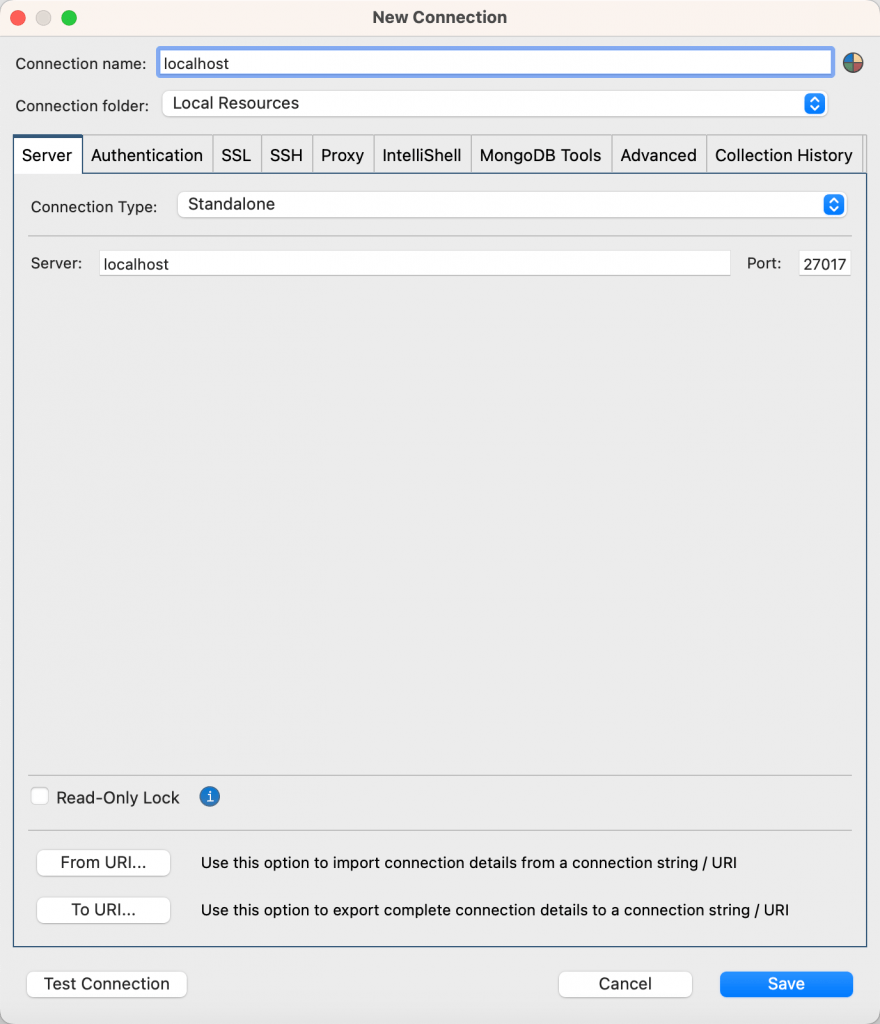
Configure any additional authentication, SSL, SSH, and other settings and click Save for later use in the Connection Manager. Finally, click on Connect.
Connect to a replica set
Open the Connection Manager, name the connection, and choose Replica Set from the Connection Type list.
This displays the Members section.
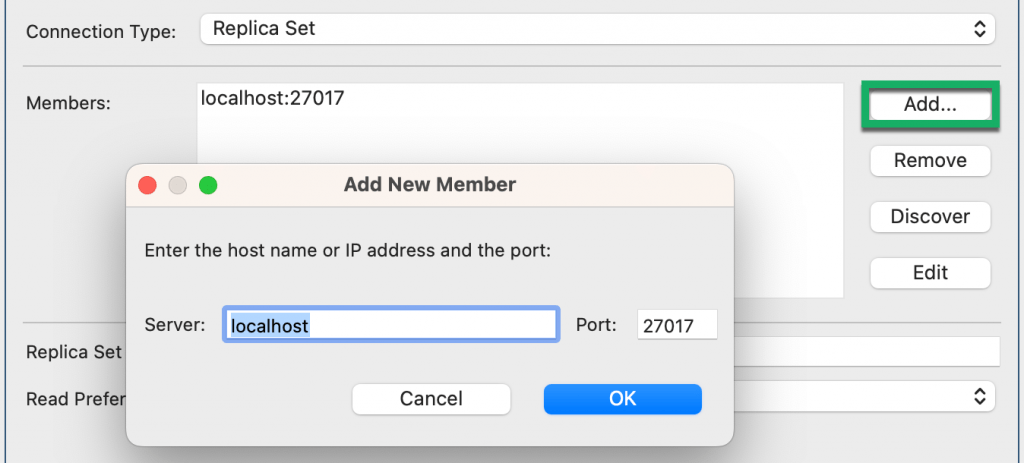
Click on Add to define the additional replica set members, then click OK. Add or remove members as needed.
Next, type the Replica Set Name and choose the Read Preference mode. See MongoDB’s documentation for a detailed description of read preference modes.
Click Add to specify read preference tags, and then in the Edit Preference Tags dialog, click Add. Type the Tag Name and Tag Value, and click OK.
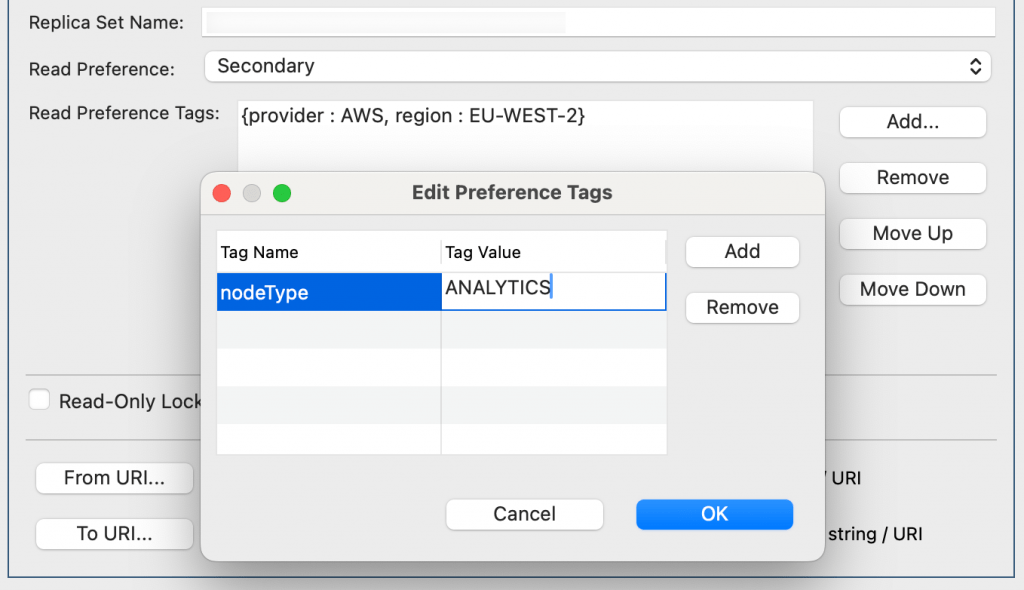
To specify the order in which MongoDB tries the tags when matching documents, use Move Up and Move Down. See MongoDB’s documentation for a detailed description about ordering in tags.
Configure any additional authentication, SSL, SSH, and other settings and click Save for later use in the Connection Manager. Finally, click on Connect.
Connect to a sharded cluster
Open the Connection Manager, name the connection, and choose Sharded Cluster from the Connection Type list.
This opens the Hosts section.
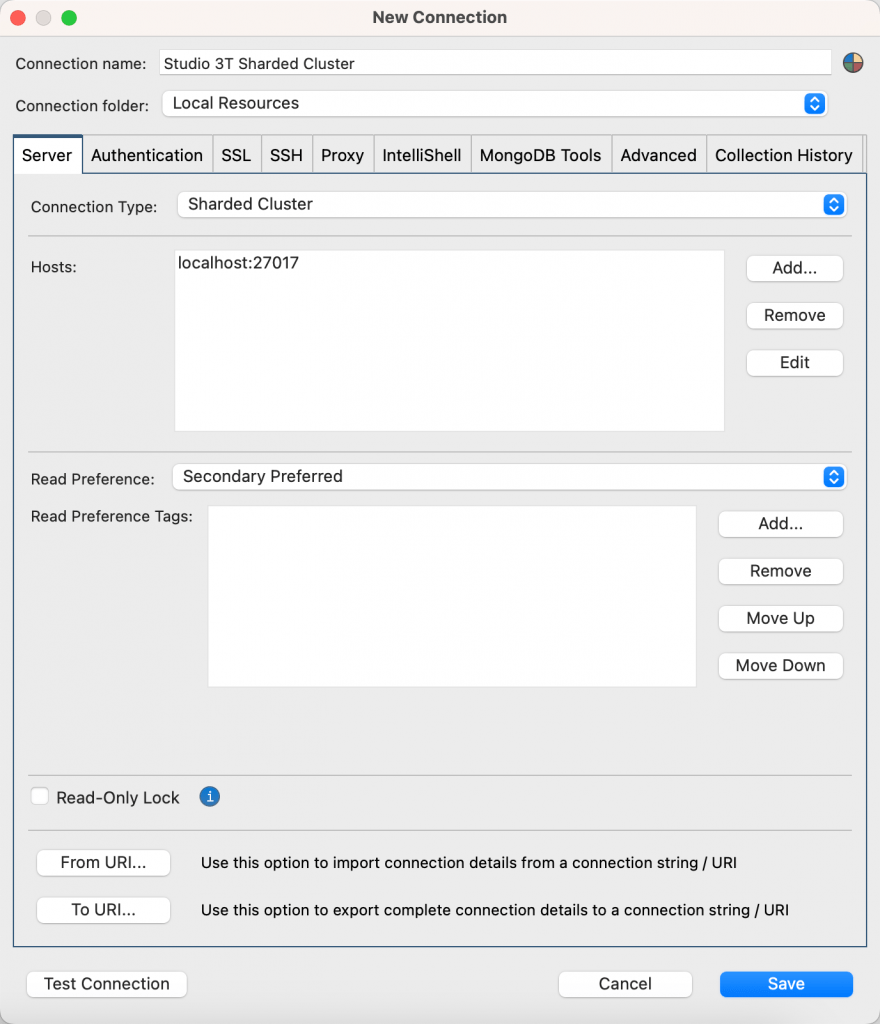
Click on Add to add new hosts or Remove to delete them as needed.
Then, choose the Read Preference.
Configure any additional authentication, SSL, SSH, and other settings and click Save for later use in the Connection Manager. Finally, click on Connect.
Connect to a DNS seedlist
The DNS seedlist is the default connection string format for MongoDB Atlas.
Open the Connection Manager, name the connection, and choose DNS Seedlist from the Connection Type list.
Fill out the Server field.
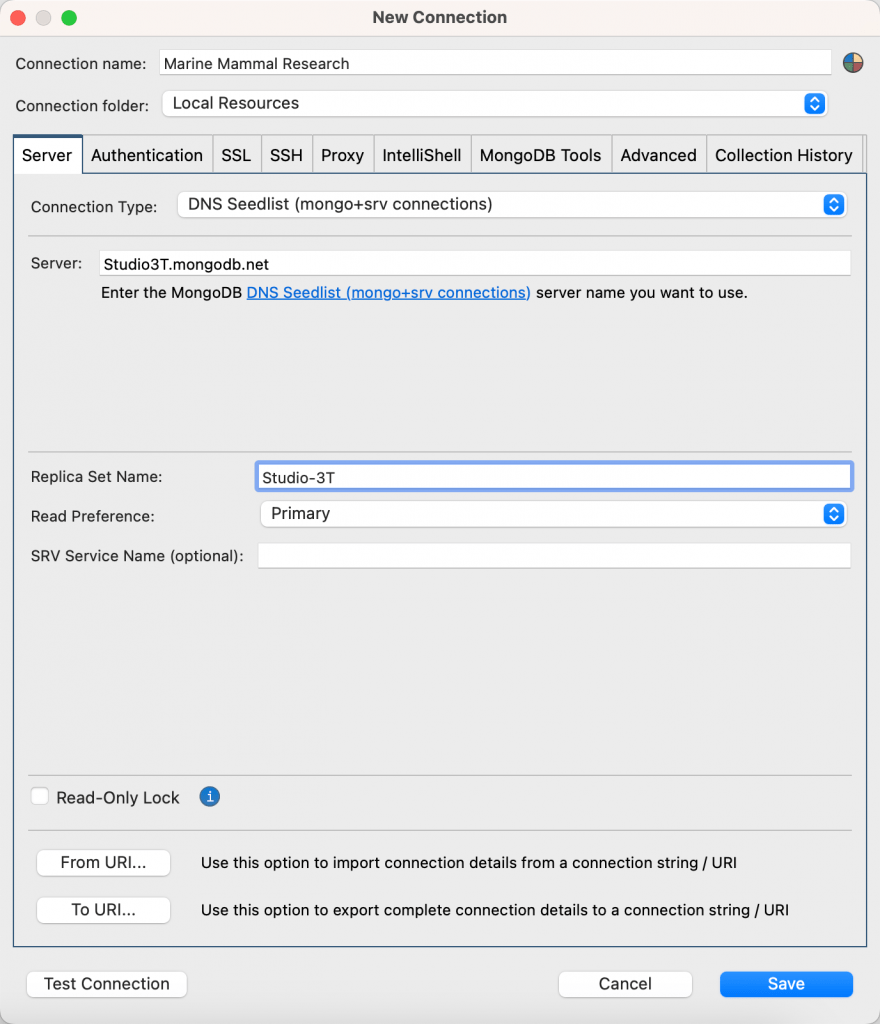
Next, type the Replica Set Name and choose the Read Preference mode.
Configure any additional authentication, SSL, SSH, and other settings and click Save for later use in the Connection Manager. Finally, click on Connect.
Configure your MongoDB connection
The Connection Manager has the following tabs – Server, Authentication, SSL, SSH, Proxy, IntelliShell, MongoDB Tools, Advanced and Collection History – where you can configure the rest of your connection setup.
You can also group connections into folders, share connections by creating shared folders, and color-code your connections.
Group MongoDB connections into folders
You can group connections into folders in Connection Manager to help declutter your view.
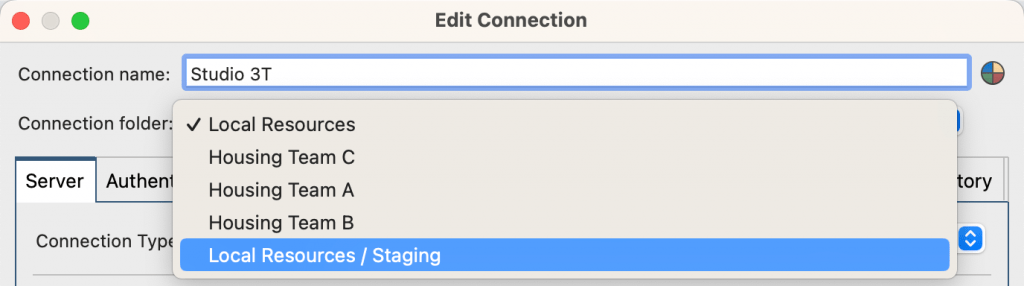
To create a folder, click on New folder in the Connection Manager, name the folder, and click OK.
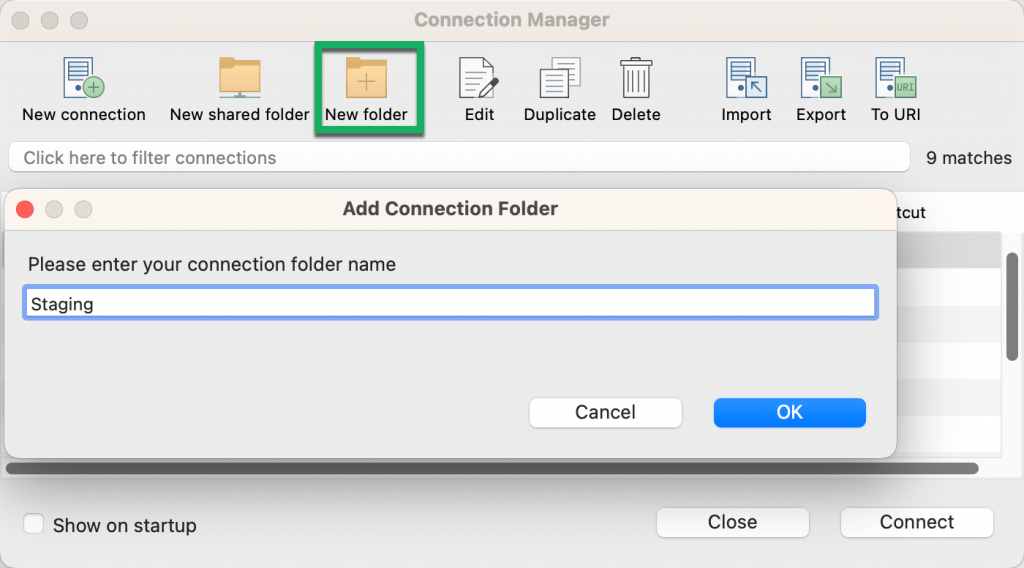
This saves the connection folder, which you can select from the Connection folder list.
Create a shared folder
You can create shared folders so that you can share connections with other team members that are Studio 3T users.
To create a shared folder, click on New shared folder in the Connection Manager.
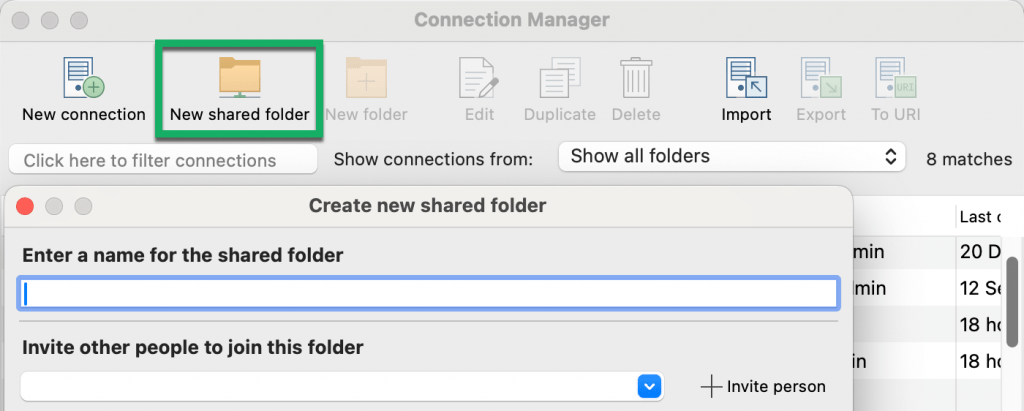
Type the name of the folder in the Enter a name for the shared folder box.
Type or select the email address of the person you want to share the folder with in the Invite other people to join this folder box, and click Invite person. For each person that you add, choose their level of access: Manage, Edit, or View.

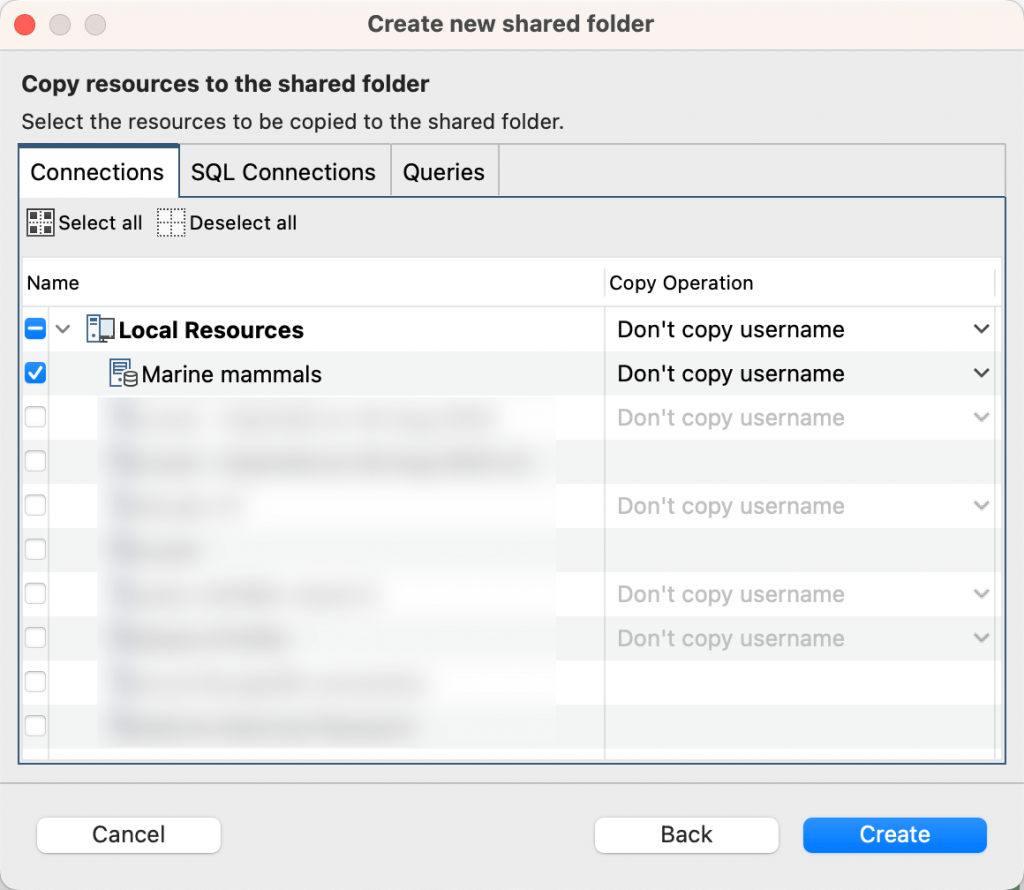
Click Next. Use the checkboxes to select the connections you want to share, and click Create.
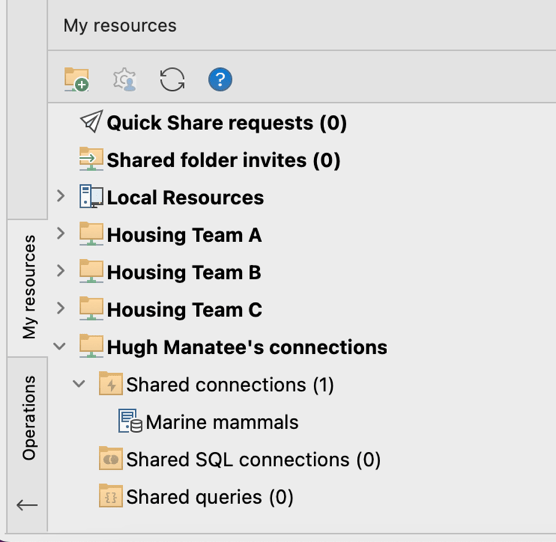
You’ll get a notification in Studio 3T informing you that your shared folder has been created. Invited team members will receive a notification to join the shared folder.
You’ll see the shared folder and the shared connections in the My resources sidebar.
Color-code connections
Click on the palette icon and choose a color for your connection.
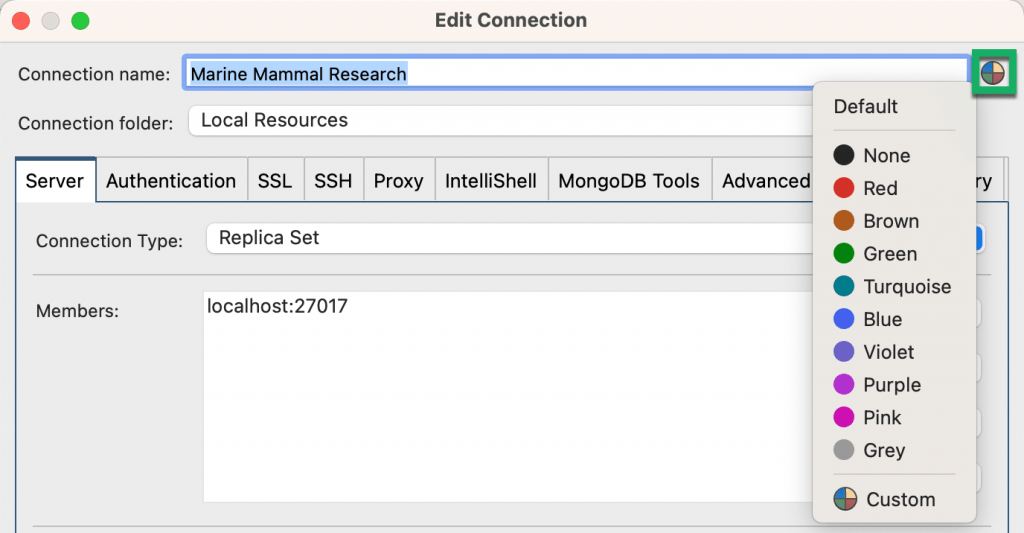
This color-codes your servers, databases, and collections in the Connection Tree, as well as connection tabs – a handy way to avoid production and test database mixups.

Read-only connections
Check Read-Only Lock to enable read-only mode for the results shown in the connection you’re setting up.

Authentication settings
Studio 3T supports these authentication methods:
- None
- Basic (SCRAM-SHA-256)
- Legacy (SCRAM-SHA-1)
- X.509
- Kerberos (GSSAPI) – Studio 3T Ultimate only
- LDAP (Plain) – Studio 3T Ultimate only
- AWS (IAM) – Studio 3T Ultimate only
- MongoDB OIDC – Studio 3T Ultimate only
Basic and Legacy authentication cover most cases.
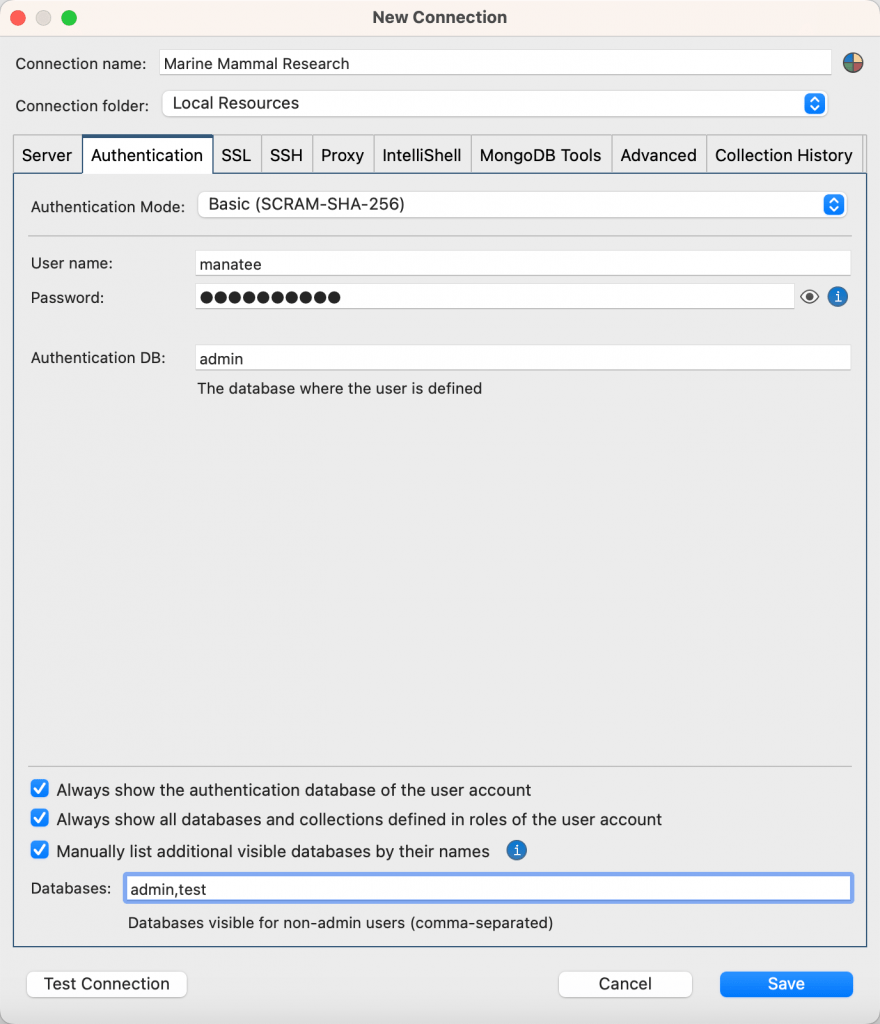
- Authentication Mode – Choose your authentication mode.
- User name – Enter your user name.
- Password – Enter your password. Note that Studio 3T encrypts passwords by default. Alternatively, you can choose to use your own cryptographic key store. Leave the field blank if you prefer not to store your password, you will then be prompted to enter it later when you try to connect to the server.
- Authentication DB – Enter the database where the user is defined.
- Always show the authentication database of the user account – Checking this box will always show the authentication database in the Connection Tree.
- Always show all databases and collections defined in roles of the user account – Checking this box will additionally always show any other databases that your user privileges allow, for example databases that contain collections your user privileges grant you access to.
- Manually list additional visible databases by their names – In most cases, Studio 3T automatically lists the databases that should be visible to non-admin users. In some cases when this information isn’t available, you can check the box and manually specify them here.
For OIDC connections only:
Consider target endpoint trusted – Check this box if you are configuring a connection to a trusted endpoint that is not Atlas or localhost to enable the access tokens to be sent. Use this option only when connecting to servers you trust.
Use ID token instead of Access token – Check this box to use the ID token received from the identity provider instead of the access token. Use this option with identity providers that don’t provide JWT access tokens.
SSL settings
The SSL tab can be quite overwhelming, so let’s break it down.
MUST – If you want to use SSL to connect to MongoDB, it’s imperative to check the box Use SSL protocol to connect. You then have to fill out the rest of the tab depending on your authentication method and settings.

The following section needs to be filled out regardless of your chosen authentication method. The options, from most secure to least secure, are:
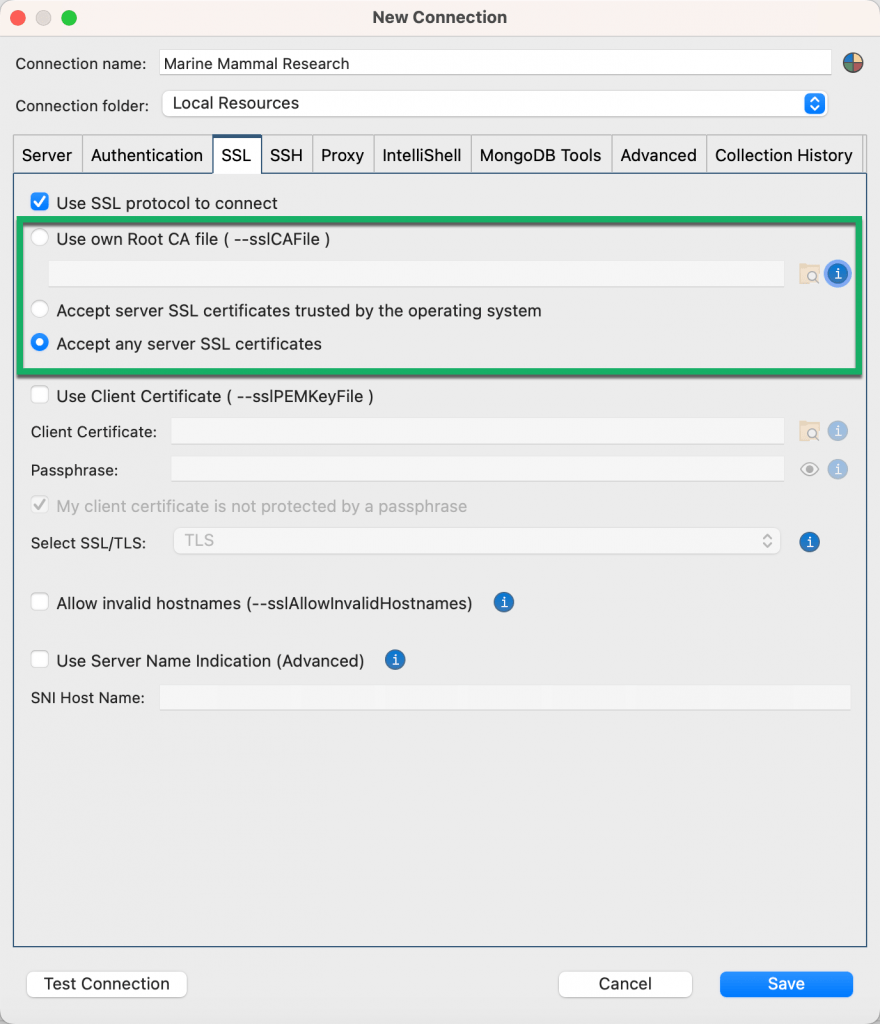
- Use own Root CA file – Likely the option for users in enterprise settings. Here, simply locate the Root CA file provided by your team/company.
- Accept server SSL certificates trusted by the operating system – Reuses the list of OS-trusted server SSL certificates.
- Accept any server SSL certificates – This is the least secure option. Server verification is, of course, highly encouraged.
The next section on setting up a client certificate needs to be filled out especially when using the X.509 authentication method. If you’ve chosen X.509 in the Authentication tab, this will trigger an additional field called X.509 User.
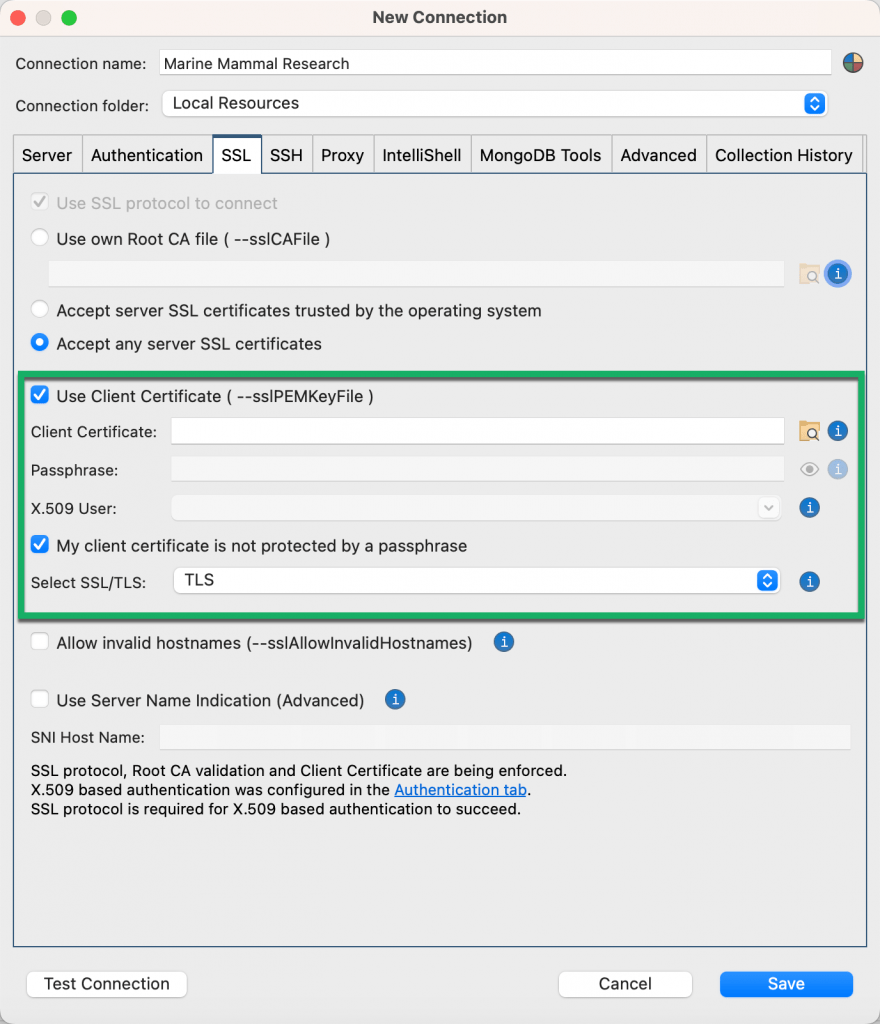
- Client certificate – Locate the certificate on your computer.
- Passphrase – Enter your passphrase.
- X.509 User – Fill this out to override the default value – the subject – read by the database from the client certificate.
- My client certificate is not protected by a passphrase – Check if your client certificate is not encrypted by a passphrase.
Check the remaining checkboxes as needed.
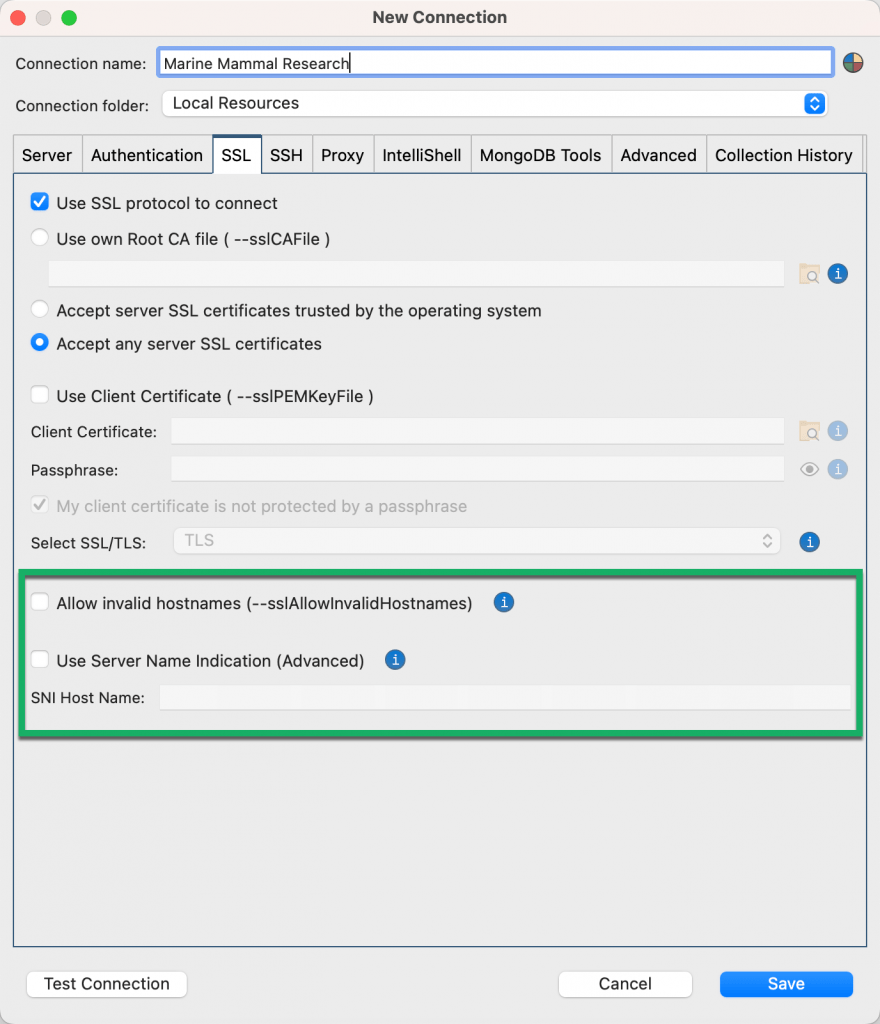
- Allow invalid hostnames – Disables the validation of hostnames in TSL/SSL certificates.
- Use Server Name Indication (Advanced) – Some servers may require the client to specify the server name it’s trying to connect to. If so, fill out this field so that the server can present one of the m124any SSL certificates.
SSH Tunnel settings
Check the Use SSH tunnel to connect box and fill out the fields.
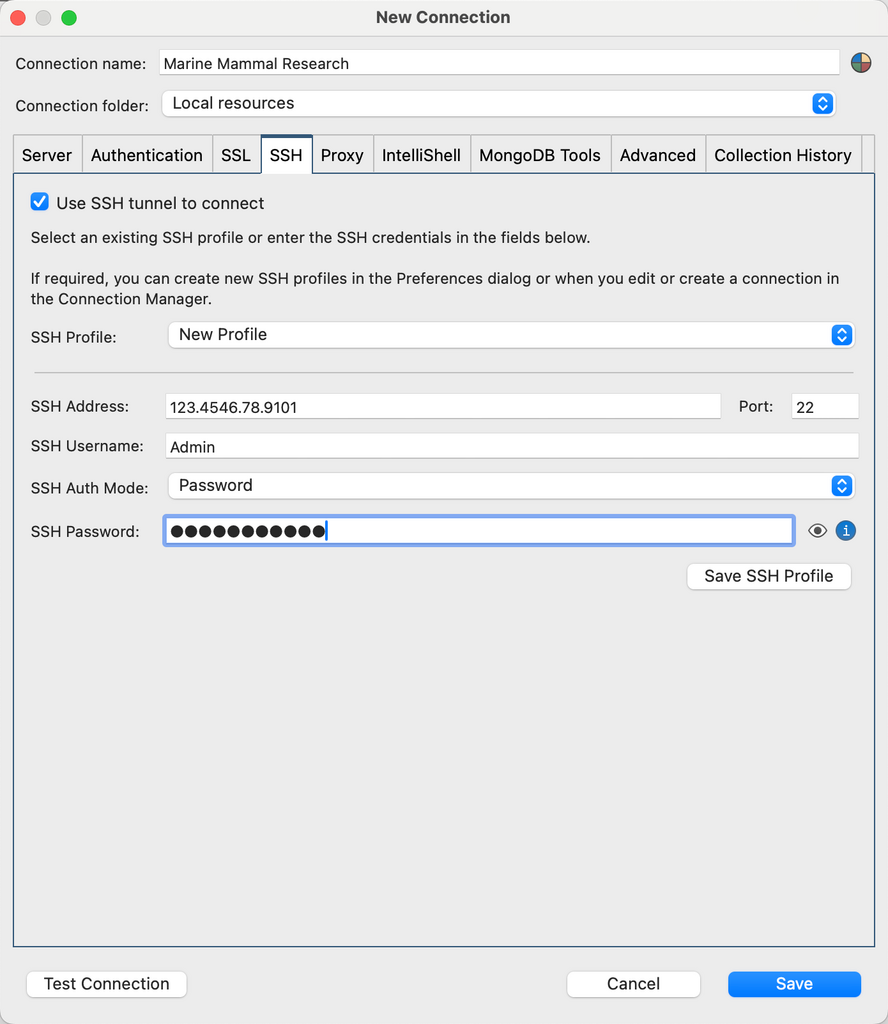
- SSH Profile – Create an SSH profile or choose an existing one. Learn more about using SSH profiles to update common passwords.
- SSH Address – Enter the SSH address.
- Port – Enter the port number.
- SSH Username – Enter your SSH user name.
- SSH Auth Mode – Choose between Password or Private Key.
- SSH Password – Enter your password. Note that Studio 3T encrypts passwords by default. Alternatively, you can choose to use your own cryptographic key store. If you don’t want to store your password, leave the field blank and you’ll be prompted to enter it later.
- Private Key and Passphrase – If you’ve chosen Private Key as the SSH Auth Mode, enter the private key and passphrase here.
Proxy settings
Studio 3T offers HTTP and SOCKS proxy connection support.
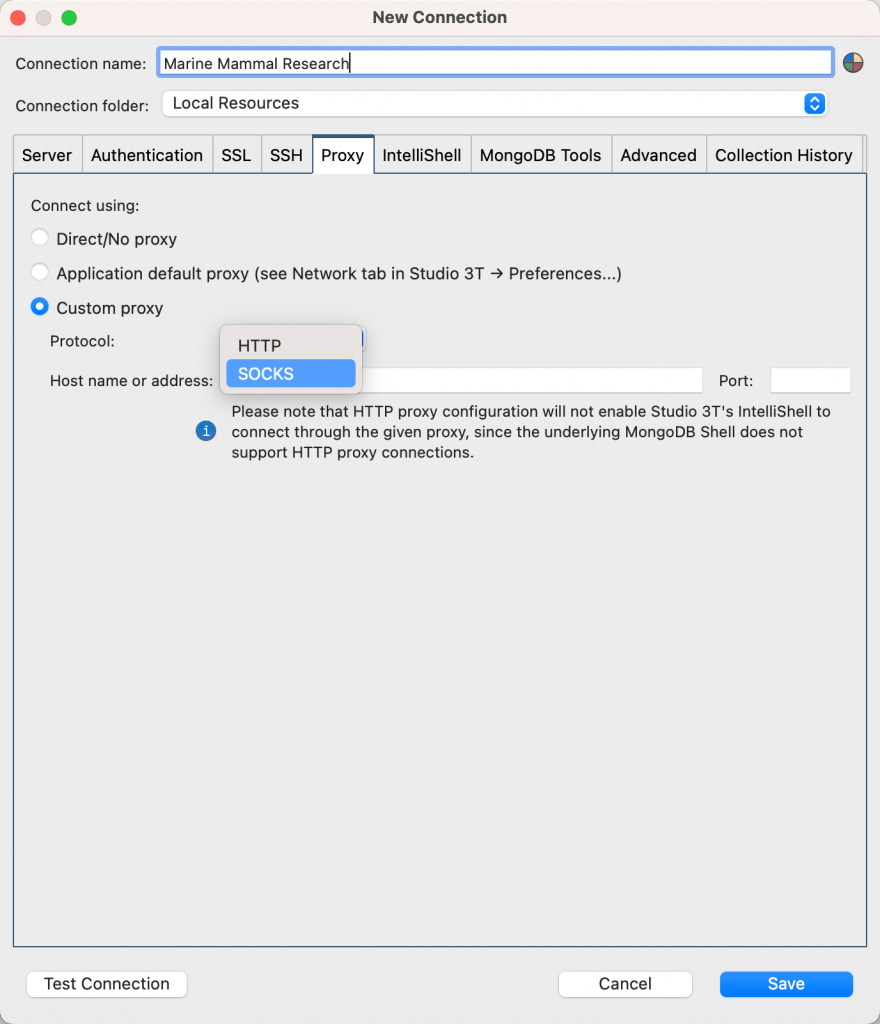
- Direct/No proxy
- Application default proxy – Choosing this option means the Proxy settings defined in Studio 3T > Preferences > Advanced settings > Network will be used.
- Custom proxy (HTTP and SOCKS) – These HTTP and SOCKS custom proxy settings are available when connecting to MongoDB databases, connecting to SQL databases for import, and for application-run HTTPS requests (for example Telemetry).
IntelliShell settings
The Connection Manager uses global settings by default, which means that the connection uses the mongo executables defined in Preferences (Studio 3T > Preferences > Tools > IntelliShell). In most cases, it uses the mongo executables bundled with Studio 3T.
However, it also gives you the flexibility to configure the mongo executable version to use for each individual connection, when you uncheck the Use global settings checkbox.
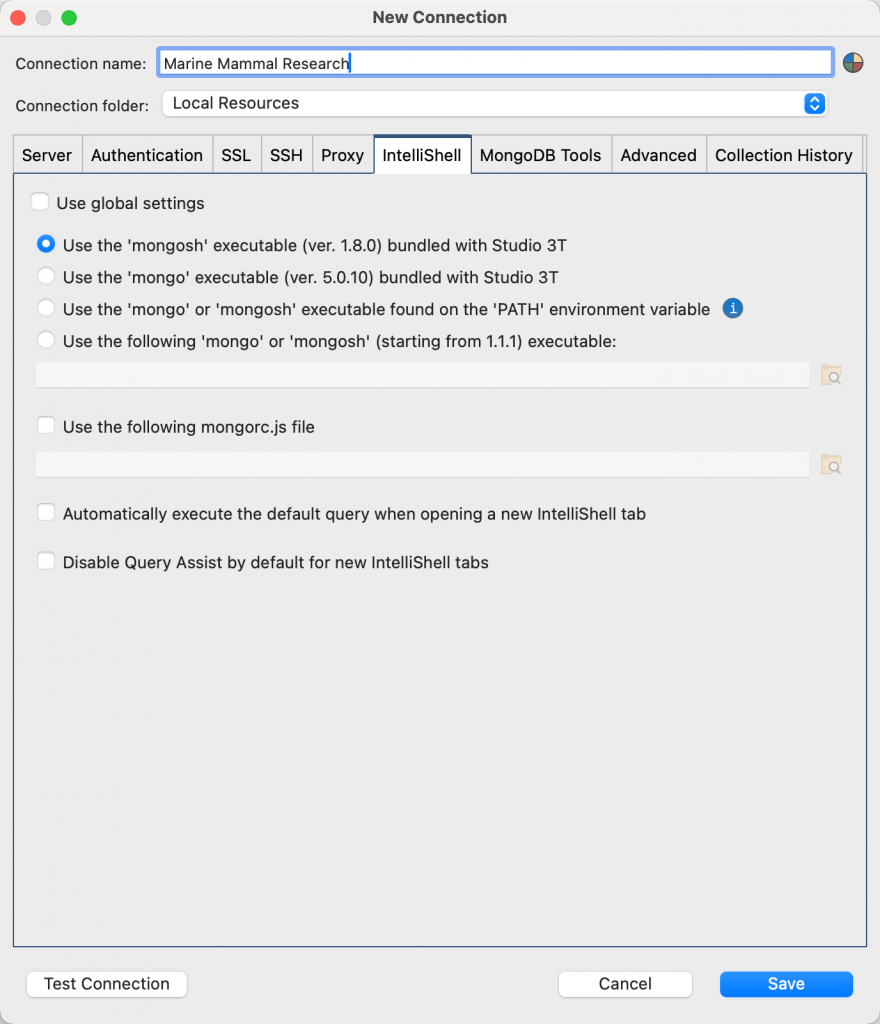
You can choose to use the mongosh or mongo executables bundled with Studio 3T for that version, those found on your PATH environment variable, or your own individual files.
When you open IntelliShell on an existing collection, IntelliShell opens with the default query for that collection. You can override the setting for this connection using the Automatically execute the default query when opening a new IntelliShell tab option.
Query Assist is enabled by default when you open IntelliShell. You can override the setting for this connection using the Disable Query Assist by default for new IntelliShell tabs option.
MongoDB Tools settings
The Connection Manager uses global settings by default, which means that the connection uses the mongo executables defined in Preferences (Studio 3T > Preferences > External tools > MongoDB tools). In most cases, it uses the mongo executables bundled with Studio 3T.
However, it also gives you the flexibility to configure the mongo executable version to use for each individual connection, when you uncheck the Use global settings checkbox.
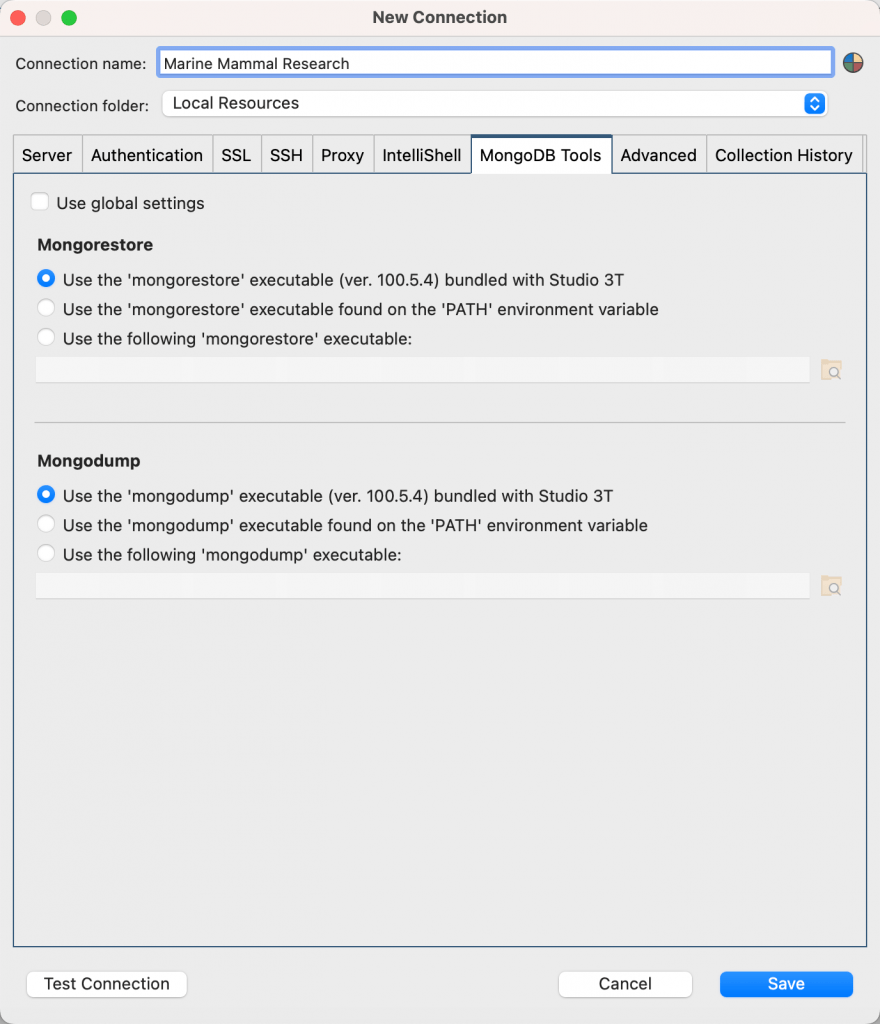
Under the mongorestore and mongodump sections, you can choose to use the mongo executables bundled with Studio 3T for that version, those found on your PATH environment variable, or your own individual files.
Advanced settings
Under the Advanced tab, you can configure other settings related to connection timeouts, idle times, retry writes, and write concern settings.
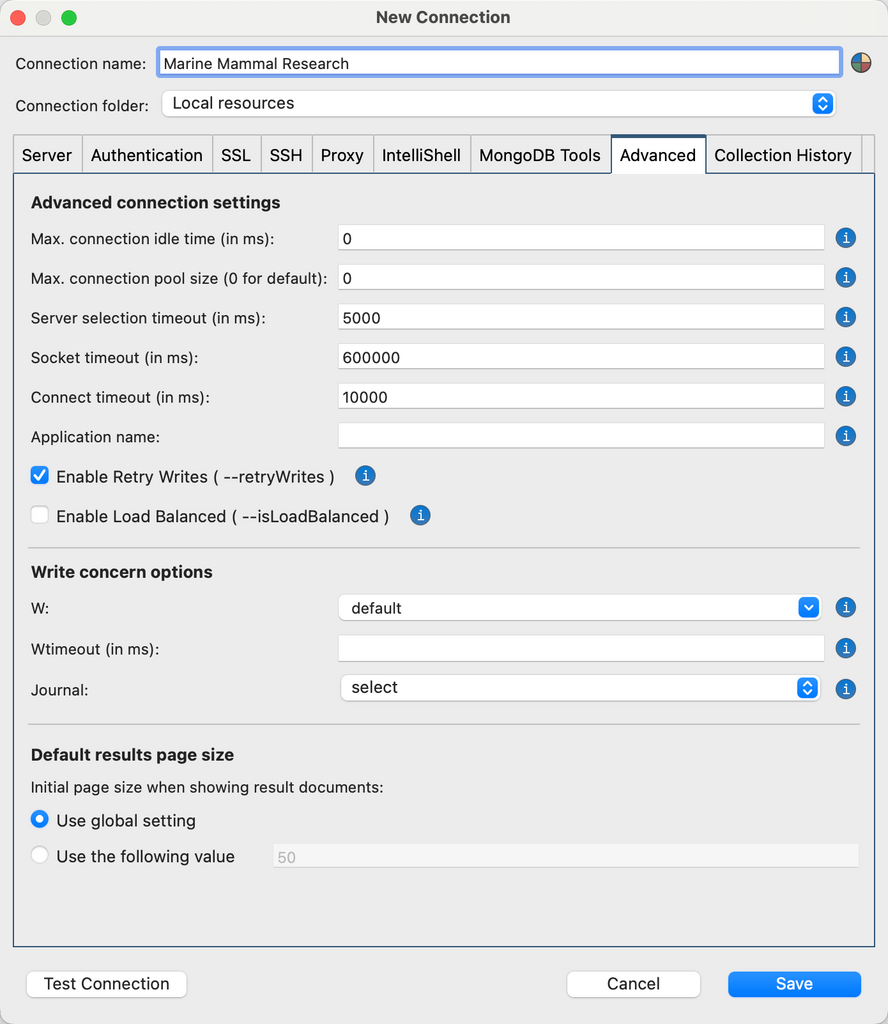
- Max connection idle time (in ms) – Sets the maximum idle time in milliseconds for a connection. In some cases, the connection could be dropped by a firewall or a load balance. Default value of “0” means unlimited idle time.
- Max connection pool size – Sets the maximum number of connections that can be opened in the pool.
- Server selection timeout (in ms) – Defines how long Studio 3T waits for server selection to succeed before throwing an exception. Default value is 30000. A value of 0 means it times out immediately if no server is available. A negative value means it waits indefinitely.
- Socket timeout (in ms) – Sets the socket timeout in milliseconds. It is used for I/O socket read and write operations. Default value is “0” and means no timeout.
- Connect timeout (in ms) – Sets the connection timeout in milliseconds, used solely when establishing a new connection. A value of “0” means no timeout. Default value is 10000.
- Application name – Sets the application name to identify the application to the MongoDB server. The default value (when this field is empty) is Studio 3T.
- Enable Retry Writes – Choose to enable retryable writes (the default), which allows MongoDB drivers to automatically retry certain write operations a single time if they encounter network errors, or if they cannot find a healthy primary in the replica sets or sharded cluster.
- Enable Load Balanced – Enables MongoDB drivers to use the loadBalanced option when applicable.
- Write concern options – Sets the level of acknowledgment for write operations to succeed. The W option requests acknowledgement that the write operation has propagated to a specified number of mongod instances. When W is null (the default), write operations wait for acknowledgement using the default write concern configured on the server. Wtimeout (in ms) specifies a time limit to prevent write operations from blocking indefinitely and is applicable only when W is greater than 1. Journal (the j option) requests acknowledgment that the write operation has been written to the on-disk journal. For more information about write concern options, including the majority write concern, see the MongoDB documentation.
- Default results page size – To override the global setting for how many documents are initially loaded and displayed for a connection, type the value for the initial page size in the Use the following value box.
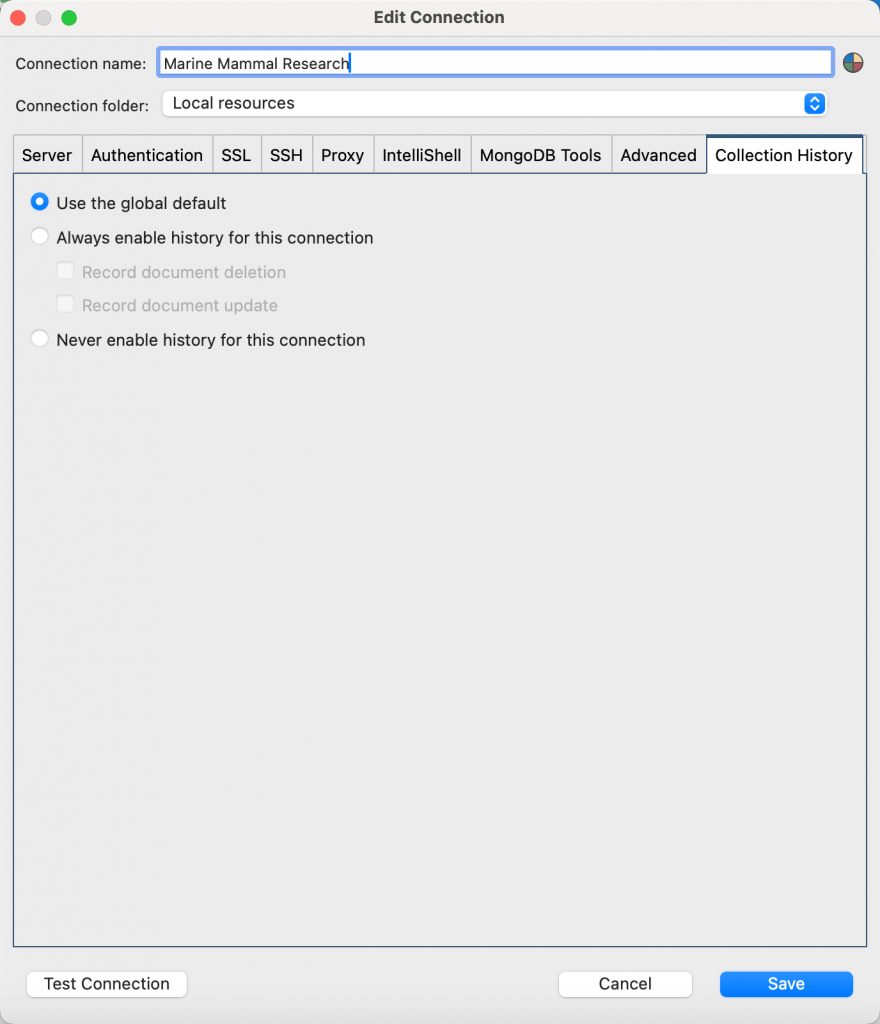
Collection History settings
To override the global setting for enabling the Collection History in the Connection Tree, select Always enable history for this connection or Never enable history for this connection, depending on whether you want to display or hide the Collection History.
By default, when Collection History is enabled, Studio 3T stores document files on your local computer for both deleted documents and updated documents. If you want to override this setting, clear the Record document deletion or the Record document update checkbox.
Test MongoDB connection
You can always test a connection by clicking on Test Connection.
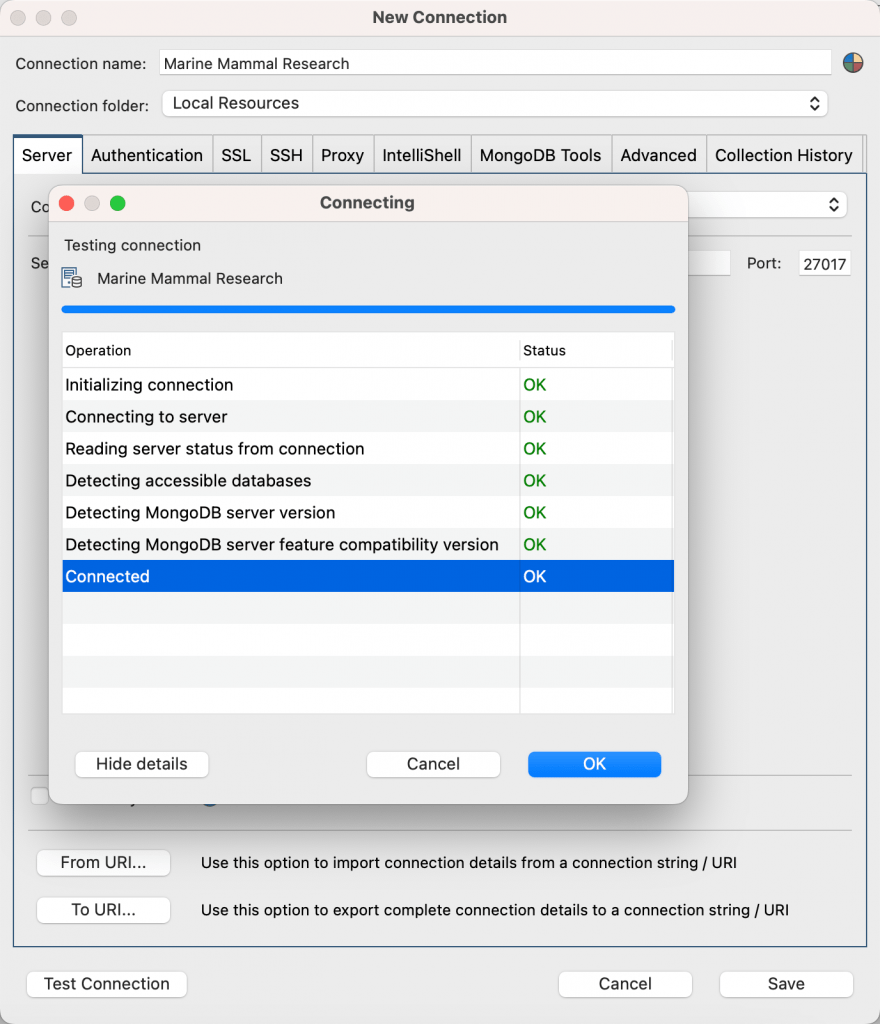
Note that in most cases (for example, connecting to MongoDB Atlas), Detecting MongoDB server feature compatibility version will be N/A, but you will still be able to save and connect successfully.
How to export connection details
When you’ve entered all the connection details, you can export the connection string in the following ways: by exporting to a URI ready to paste to your clipboard, or by exporting to a URI file.
Export to a MongoDB URI
Choose the connection from the Connection Manager and click on Export in the toolbar.
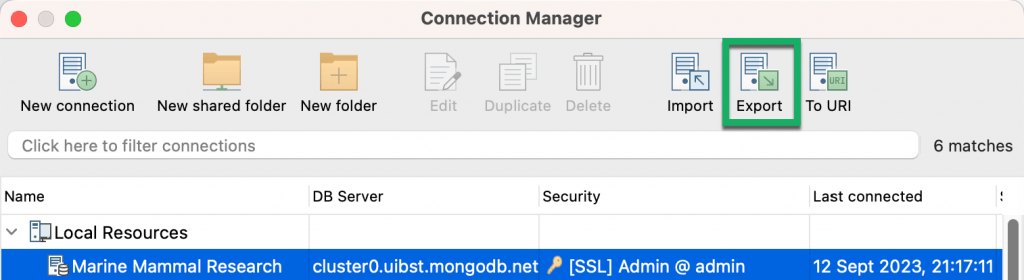
Or edit the connection and click on To URI on the Server tab.

Edit the settings as needed (for example include passwords, SSH configuration, convert DNS seedlist to standard format).
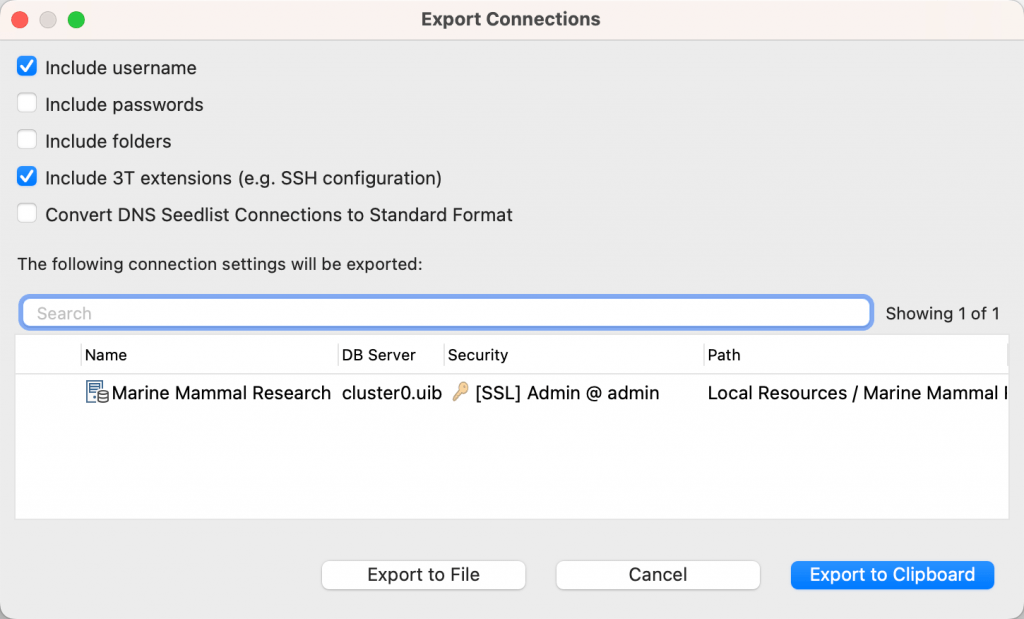
Choose Export to Clipboard to copy and paste it so that you can share it with your team, or choose Export to File to export the connection to a .uri file.
Instead of copying and pasting the connection string, you can share the connection with your team by creating a shared folder.
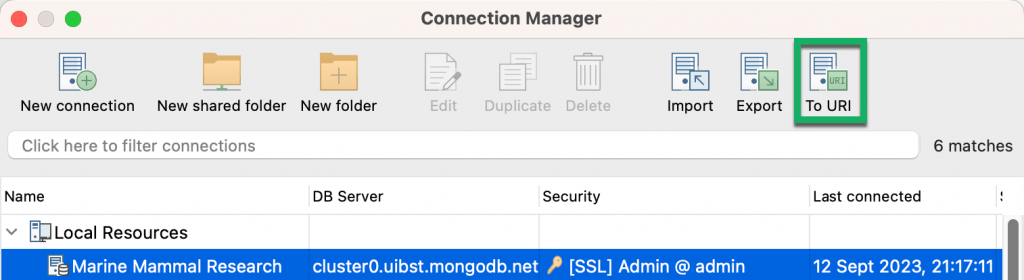
Export to a URI
From the Connection Manager, you can also choose the connection, click on To URI from the toolbar, and follow the steps mentioned above to export to a URI.
How to update passwords for multiple SSH connections
When you have multiple connections that use the same SSH host and you need to regularly update the host password, it can be time consuming to edit all the connections with the new password. By creating an SSH profile with the credentials and assigning all the connections to the SSH profile, the next time the host password changes all you need to do is update the password in the SSH profile.
Create SSH profiles
You can create SSH profiles at the connection level in the Connection Manager or in the Preferences dialog where you can create an SSH profile and assign all the connections.
To create an SSH profile in the Connection Manager:
- Choose the connection from the Connection Manager and click on Edit in the toolbar.
- On the SSH tab, ensure the Use SSH tunnel to connect option is selected.
- Set SSH Profile to New Profile.
- Enter the details as required:
- SSH Address – Type the SSH address.
- Port – Type the port number.
- SSH Username – Type the SSH username.
- SSH Auth Mode – Choose between Password or Private Key.
- SSH Password – Type the password. Note that Studio 3T encrypts passwords by default.
- Private Key and Passphrase – If you’ve chosen Private Key as the SSH Auth Mode, locate the private key and if required, type the passphrase.
- Click Save SSH Profile.
- In the Save SSH Profile dialog, type a name for the profile in New SSH profile name, and click Save.
To create an SSH profile in Preferences:
- Go to Preferences > Advanced settings > SSH Profiles.
- Click Add Profile.
- Enter the details as required:
- Profile Name – Type the name for the SSH profile.
- SSH Address – Type the SSH address.
- Port – Type the port number.
- SSH Username – Type the SSH username.
- SSH Auth Mode – Choose between Password or Private Key.
- SSH Password – Type the password. Note that Studio 3T encrypts passwords by default.
- Private Key and Passphrase – If you’ve chosen Private Key as the SSH Auth Mode, locate the private key and if required, type the passphrase.
- Click Save.
Assign connections to an SSH profile
To assign connections to an SSH profile:
- Go to Preferences > Advanced settings > SSH Profiles.
- Select the SSH profile and click Assign to Connections.
- In the Assign to Connections dialog, select the required connections and click Assign.
You can also assign an SSH profile to an individual connection in the Connection Manager by selecting it in the SSH Profile list on the SSH tab.
Update the password for an SSH profile
To update the password for all connections that are assigned to an SSH profile:
- Go to Preferences > Advanced settings > SSH Profiles.
- Select the SSH profile and click Edit Profile.
- Type the new password in SSH Password.
- Click Save.
How to (help) prevent a connection timeout
After a relatively short period of inactivity, you might try to run a query from within Studio 3T, but are presented with a server error message box. If you try again, the query will work properly again.
The reason is that in some configurations, the connection can get dropped by a firewall or a load balancer. This issue is common with MongoDBs hosted on Azure.
The solution is to manually set the Max. connection idle time to 60s (60000ms) under the Advanced tab:
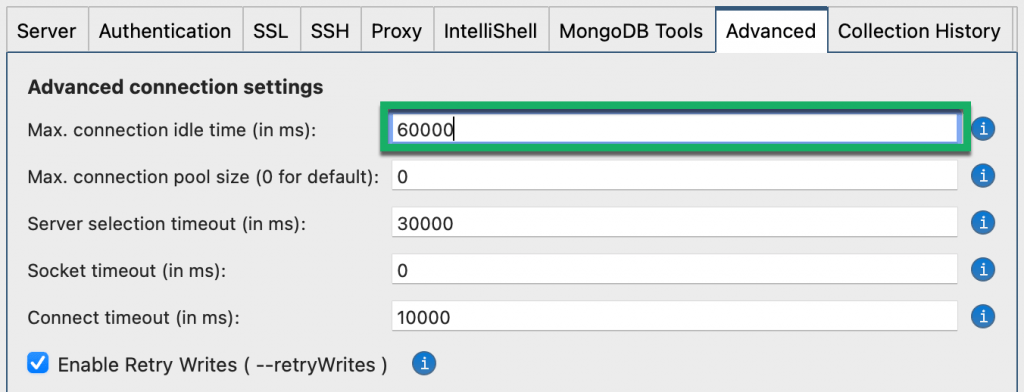
After that, your connection should no longer drop.
Troubleshooting your Studio 3T connection to MongoDB Atlas
Why won’t Studio 3T connect to my MongoDB Atlas database? Are you getting a FAILED: Connecting to server error message like the one below?
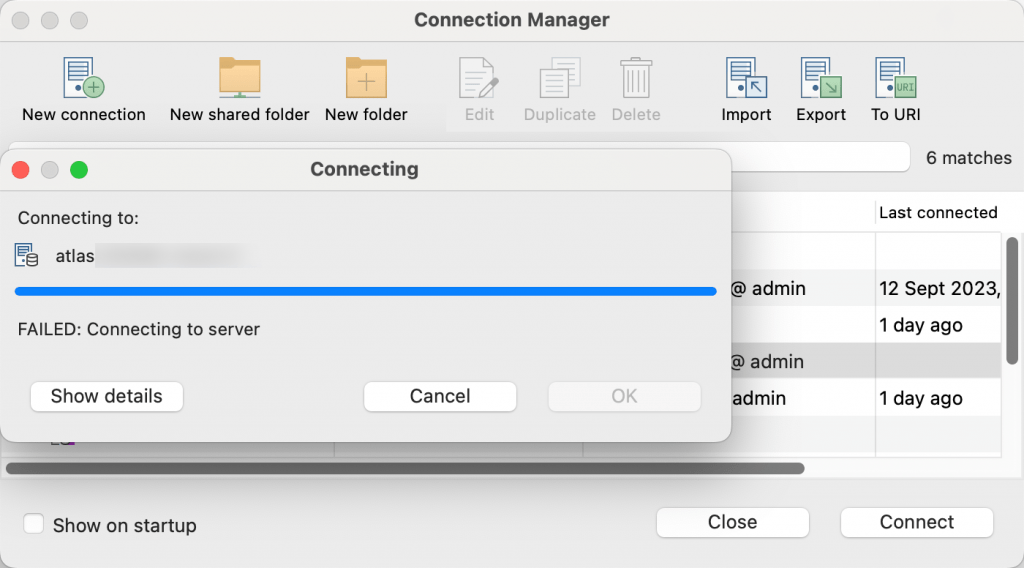
Try logging in to your MongoDB Atlas account and check that your current IP address is whitelisted. For more information, see How to Fix MongoDB Atlas IP Whitelisting Issues.