Prerequisites
IntelliShell requires the mongo shell executable, one of the mongo client tools bundled when downloading MongoDB.
No additional configuration is needed for Windows, macOS, or Linux installations. The mongo shell executable is bundled with Studio 3T on these systems.
If you want to use another version of MongoDB, here’s how you can point IntelliShell to use a different mongo.exe file.
Custom mongo shell
If you choose to use your own installation of the mongo shell, you can configure this in Studio 3T.
When the mongo client tools have been installed:
- Go to Studio 3T > Preferences.
- Open the Tools > IntelliShell page.
- Insert the path of where the mongo shell executable is located.
- Click OK.
Launch IntelliShell
Choose a target server, database, or collection in the Connection Tree, then open IntelliShell as follows:
- Button – Click on the IntelliShell button in the global toolbar
- Right-click – Right-click and choose Open IntelliShell
- Shortcut – Press Ctrl + L (⌘+ L)
When you open IntelliShell on an existing collection, IntelliShell opens with the default query for that collection. You can use Studio 3T’s Query Manager to set a default query.
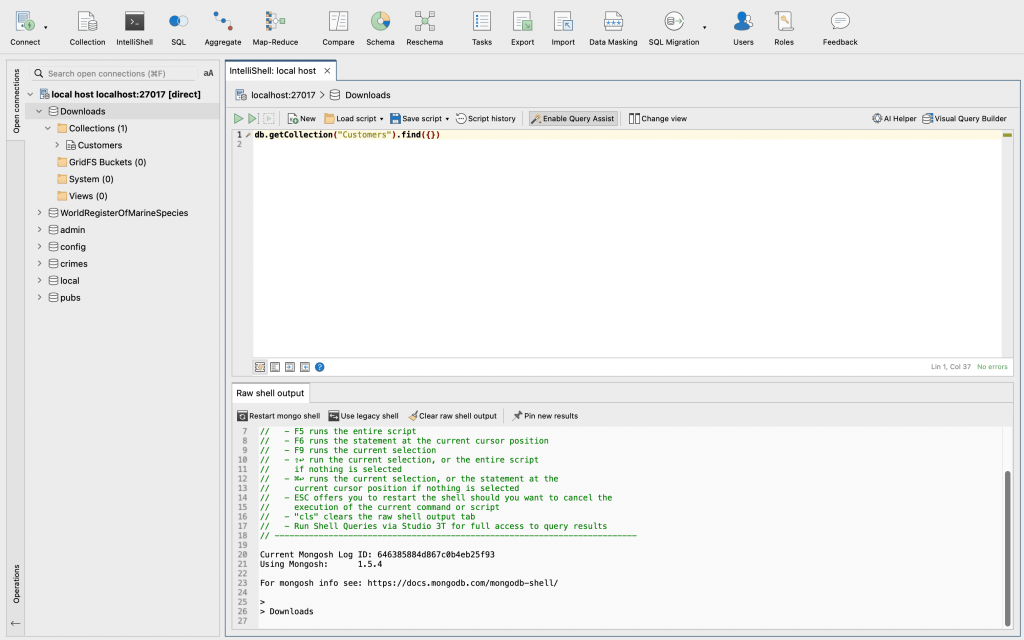
IntelliShell has two main sections: the top Editor section where you can write queries, commands, and scripts, and the bottom result tab section where you can view the shell output.
MongoDB query auto-completion
IntelliShell detects and auto-suggests JavaScript standard library functions, shell-specific types and methods, operators, collection names, field names, and shell helper commands as you type.
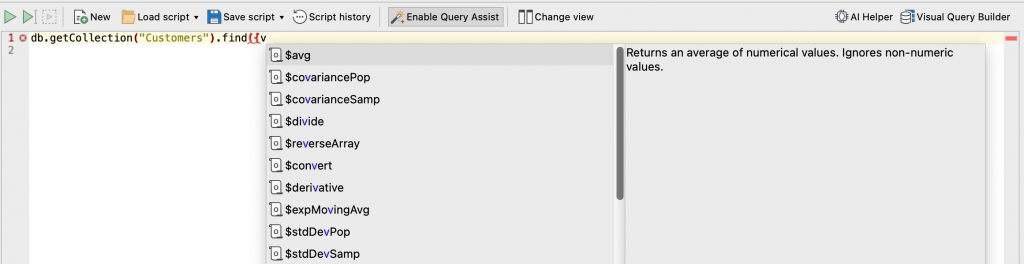
You can trigger query auto-completion in the following ways:
- Right-click – Right-click anywhere in the Editor and choose Open Auto-Completion
- Shortcut – Press Ctrl + Space (^ + Space)
Live error highlighting
IntelliShell highlights syntax errors as you type.
These errors are also noted in the left-hand sidebar as red crosses that you can hover over, and in the right-hand script overview ruler as clickable red markers that take you straight to the error line.

Query with date tags
In Studio 3T, you can write queries with date tags, a shorthand way of querying a date field with a time range, for example today or last week. When Studio 3T runs the query, it converts the date tag into a range using the greater and less than operators, for example:
"registered_on": #today
is expanded into:
Learn more about Date Tags, including a list of all the available date tags.
Run queries via the mongo shell (Disable Query Assist)
You can run queries and scripts entirely, at cursor, or just a selection.

To run an entire script:
- Button – Click on the Run (play) button in the toolbar
- Right-click – Right-click anywhere in the Editor and choose Run Entire Script
- Shortcut – Press F5
To run a script at cursor, place the cursor at any top-level statement and:
- Button – Click on the second Run (play) button in the toolbar
- Right-click – Right-click anywhere in the Editor and choose Run Statement at Cursor
- Shortcut – Press F6
To run a selection, highlight the part of the query or script you want to run and:
- Button – Click on the third Run (play) button in the toolbar
- Right-click – Right-click anywhere on the selection and choose Run Selection
- Shortcut – Press F9
If your query or script contains a destructive command where document data is updated or deleted, or operations such as dropping databases, collections, or indexes, Studio 3T shows a warning that asks you if you want to proceed. You can override these warnings by selecting the Don’t show this message again check box. The setting is persisted across all your IntelliShell tabs, connections, and Studio 3T sessions.
Whenever possible, Studio 3T parses documents and displays them in a tab with the three standard views (Table, Tree, and JSON) but you won’t be able to edit the results.
In the Result tab section, you’ll always find the Raw shell output tab which displays the output of all shell-run commands.
You can run find and aggregation queries in this way but they won’t open editable result tabs. Instead, the results are displayed along with other shell commands and scripts in the Raw shell output tab as you would expect in a real terminal or shell, which means you won’t be able to edit or page through the results.
Run queries via Studio 3T (Enable Query Assist)
Query Assist is enabled by default for standalone, top-level find and aggregation queries. This means they are run through Studio 3T instead of the mongo shell.
Query Assist adds functionalities that are not available for shell-run queries, such as the ability to:
1. Run find and aggregation queries that open their own result tabs. Find queries run using Query Assist allow in-place editing.
Assisted queries are clearly labeled in the left-hand sidebar as wand icons, and in the right-hand script overview rulers as clickable yellow markers that take you straight to the query.

Each assisted query opens in a separate, editable result tab, with its line number from the Editor displayed as part of the tab name.

2. Edit results within the tabs, as you normally would in other parts of Studio 3T through the three standard views: Table, Tree, and JSON.
3. Use Query Code to convert your MongoDB query to JavaScript (Node.js), Java (2.x and 3.x driver API), Python, C#, PHP, and Ruby.
4. Use Visual Explain to help optimize performance by seeing how MongoDB executed your query.
Click on the Explain Query button on any result tab. This opens a new Explain tab that shows which steps MongoDB took to run the query.
Query Assist assists only find and aggregation queries – all other scripts and commands are always run in the shell. You can find the results in the Raw shell output tab.
Pin only the query results you want to keep
Keep things tidy and choose to keep only the query results you need, by using the Pin on any result tab.
All other unpinned result tabs are cleared with the next execution, be it the entire script or a portion of it.
Format and indent code
To format code:
- Button – Click on the Format Code button, at the bottom of the editor
- Right-click – Right-click anywhere in the Editor and choose Format code
- Shortcut – Press Ctrl + Alt + L (or ⌥ + ⌘ + L on Mac)
To indent code:
- Button – Place a cursor in the target query/query selection and click on the Indent Code button at the bottom of the editor
- Shortcut – Press Tab
To unindent code:
- Button – Place a cursor in the target query/query selection and click on the Unindent Code button at the bottom of the editor
- Shortcut – Press Shift + Tab
You can define your Editor tab width preferences under Studio 3T > Preferences > Appearance and behavior > Appearance. The default editor tab width setting is 4 spaces.
Insert and remove comments
You can comment and uncomment with a line comment.
Place the cursor on the line to be made into a comment and:
- Right-click – Right-click anywhere in the Editor and choose Comment code. Repeat to remove the comment.
- Shortcut – Press Ctrl + / (⌘+ /). Repeat to remove the comment.
Open and save queries
To save your query so that you can use it throughout Studio 3T or as a JavaScript file:
- Button – Click on the Save script icon. Alternatively, click on the arrow to find the Save file functions.
- Right-click – Right-click anywhere in the Editor and choose Save
- Shortcuts – Save Script – Ctrl + S (⌘+ S), Save File – Shift + Ctrl + S (Shift + ⌘+ S)
If you are using Studio 3T’s Team Sharing, you can save your script in a shared folder. You and your team members can access the shared script from the My resources sidebar.
To store the connection and database details with your script, select the Save target details checkbox.
To open saved queries:
- Button – Click on the Load script icon
- Right-click – Right-click anywhere in the Editor and choose Load
- Shortcut – Press Ctrl + O (⌘+ O)
Use IntelliShell and AI Helper
AI Helper is Studio 3T’s AI-powered assistant where you can ask questions about your MongoDB data in your native natural language. When you send a question from within IntelliShell to your AI model, Studio 3T responds with a script that contains a MongoDB query. You can use this response as is, or continue developing your script, then run it in IntelliShell.

Learn more about AI-powered query generation and how to set up AI Helper.
Use IntelliShell and Visual Query Builder side by side
Tired of manually typing everything? Try Visual Query Builder – Studio 3T’s drag-and-drop MongoDB query builder – alongside IntelliShell.
To open it, click the Visual Query Builder button in the toolbar.

Any edits that you make in IntelliShell are reflected in Visual Query Builder in real-time, and vice versa. This way, you can skip the command line writing and build queries visually – or combine both ways to work even faster.
This article was originally published by Kathryn Vargas and has since been updated.