Aggregation in MongoDB is a way of processing and transforming documents in a collection by passing them through stages in an aggregation pipeline. Stages can filter, sort, group, reshape, or modify documents.
Watch the video below to learn how to add aggregation stages to a pipeline and check the data inputs and outputs of a stage:
Basics
To open Aggregation Editor:
- Toolbar – Click on the Aggregate button
- Right-click – Right-click on a target collection and choose Open Aggregation Editor
- Shortcut – Press F4
The Aggregation Editor consists of the following sections: Pipeline, Stage editor, Pipeline output, Stage input/output, Query Code, and Explain.
Pipeline
Pipeline (top left) shows all the aggregation stages at a glance and you can add, duplicate, and move them as needed.
Stage editor
The Stage editor (top right) is where you write or edit the aggregate query. When you open a new Aggregation Editor tab, Stage 1 is automatically added for you, ready for you to enter the details and if required, add a name of your choice to the stage number.
Pipeline output
The Pipeline output tab (bottom) shows the output of the full pipeline.
Stage input/output
The Stage input/output tab (bottom) shows the inputs and outputs in their respective panels, Stage Input and Stage Output.
Query Code
The Query Code tab (bottom) translates aggregation queries to JavaScript, Java, C#, Python, PHP, Ruby, and the MongoDB Shell language. Run the aggregation query and get code you can use in your applications.
When Language is set to MongoDB Shell, Open in IntelliShell lets you develop your query in Studio 3T’s built-in MongoDB Shell.
Explain
The Explain tab visualizes the steps MongoDB took to run the aggregation query in a diagram. It shows information provided by explain ().
Learn more about Explain.
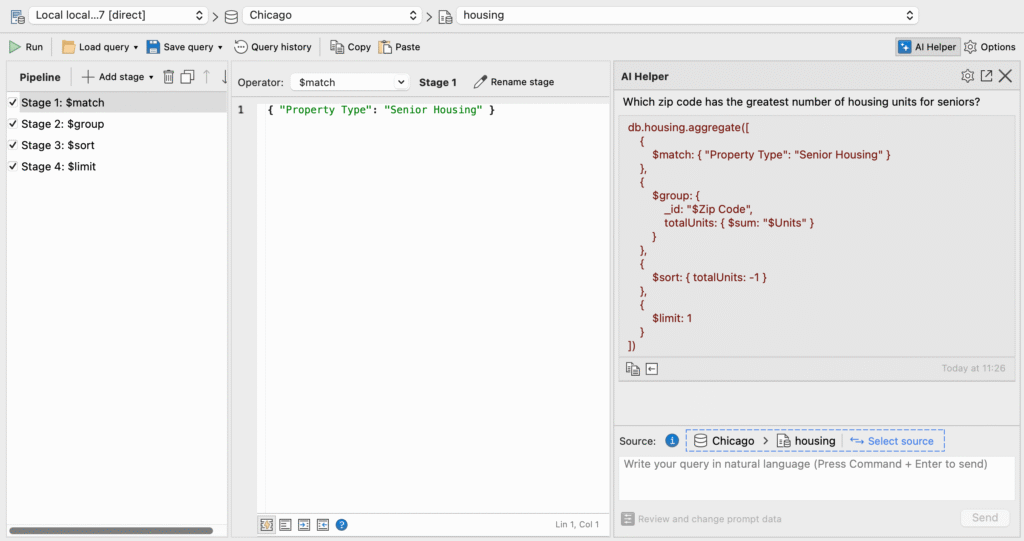
AI Helper
AI Helper is Studio 3T’s AI-powered assistant where you can ask questions about your MongoDB data in human language. When you send a question from within the Aggregation Editor to your AI model, Studio 3T responds with an aggregation query that contains the corresponding stages of an aggregation pipeline. You can use this response as is, or continue building your aggregation query, then run it in the Aggregation Editor.
Learn more about AI-powered query generation and how to set up AI Helper.
Options
The Options dialog is where you can set disk use, custom collation, and index hint settings.
Allow disk use enables writing to temporary files, which will then allow aggregation operations to write data to the _tmp subdirectory in the dbPath directory.
Customizing your queries’ collation influences how searching and sorting is performed. Learn more about collation.
Index hints enable you to tune aggregation performance by specifying an index to use when loading the pipeline with documents. You can choose the order of the collection scan, select a particular index, or create an index specification document to define the first pass that aggregation makes to fill the pipeline.
A MongoDB aggregation pipeline example
To illustrate how Aggregation Editor works, we’ll build a simple aggregation pipeline with three stages, each with a different aggregation operator:
$matchas Stage 1$groupas Stage 2$sortas Stage 3
In this example, the output of the first stage becomes the input for the next, with the first stage filtering documents, the second stage summarizing, and the final stage sorting the documents into the final result.
We’ll use the publicly-available housing data from the City of Chicago Data Portal. Download the zip file, then import the JSON file to your MongoDB database.
Identify the question to answer
The question we want to ask of our data is simple:
Which zip code has the greatest number of senior housing units available?
To think how we’ll answer this and how we’ll form our query, let’s take a look at the data.
Click on Run to view the data. Note that running an empty pipeline simply shows the contents of the collection.
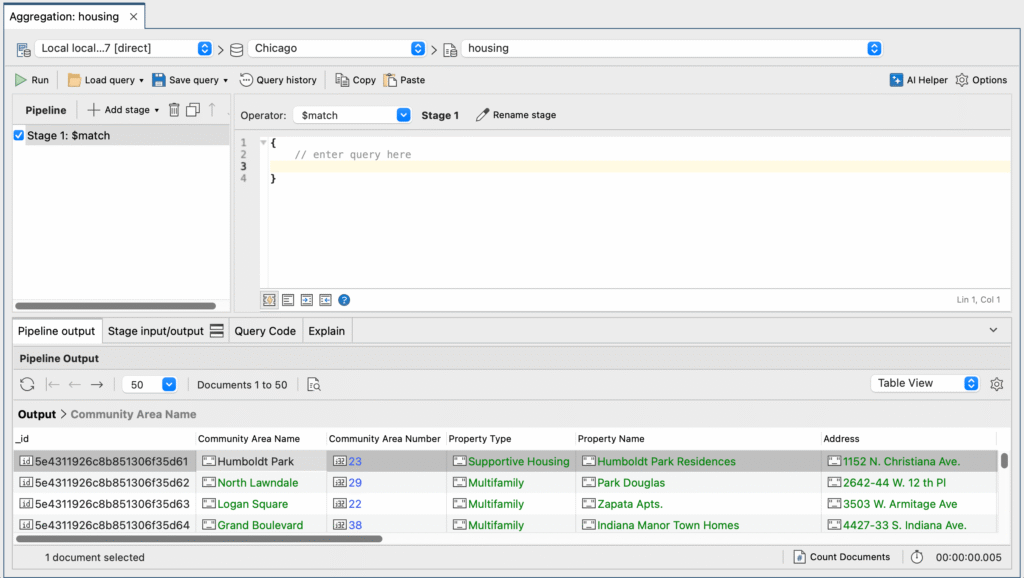
You can switch between Table, Tree and JSON views of your results.
We can see the fields that we need. We can check Property Type. Zip Code and Units give us the zip code and number of available units there are, respectively.
To answer our question, we need to combine these into the right aggregation query.
Add Stage 1: Match criteria with MongoDB $match
The first stage with $match as the operator is added for you when you open a new Aggregation Editor tab. The operator defines what the stage does.

The $match operator takes the input set of documents and outputs only those that match the given criteria. It is essentially a filter.
We want to filter out all senior housing units, so we’ve typed the query:
{
    "Property Type": "Senior"
}
Check stage inputs
On the Stage input/output tab, click Run – the play button – to show how many input documents went into the $match stage.
By clicking on Count Documents, we can see that there were 389 input documents, which is exactly how many documents there are in the housing collection.

Check stage outputs
We know that 389 documents went into the stage, but how many documents matched our specification, "Property Type": "Senior"?
By clicking on Run under Stage 1: Output and clicking on Count Documents, we can see that 89 documents have a value of Senior for the field Property Type.

The stage input and output checks are convenient features for keeping track of your data at each stage in the aggregation pipeline.
Now that we have the results we need from Stage 1 – a quick visual check of the column Property Type should do – we’re ready to pass them on to next stage of our aggregation pipeline, the $group stage.
Add Stage 2: Group results with MongoDB $group
We now need a way to group the senior housing units from Stage 1 by zip code, and then calculate the sum of housing units for each zip code. The $group operator is exactly what we need for this.
To add a new stage:
- Pipeline – Click Add stage or right-click anywhere in the Pipeline section and choose Add New Stage
- Shortcut – Press Shift + Ctrl + N (Shift + ⌘+ N)
Choose $group from the Operator list in the Stage editor section and write the query:
{
    _id: "$Zip Code",
    total: { $sum: "$Units" }
}
This specification states that the output documents of this stage will contain:
- an _id with a distinct zip code as a value and will group input documents together that have the same zip code
- a total field whose value is the sum of all the Units field values from each of the documents in the group
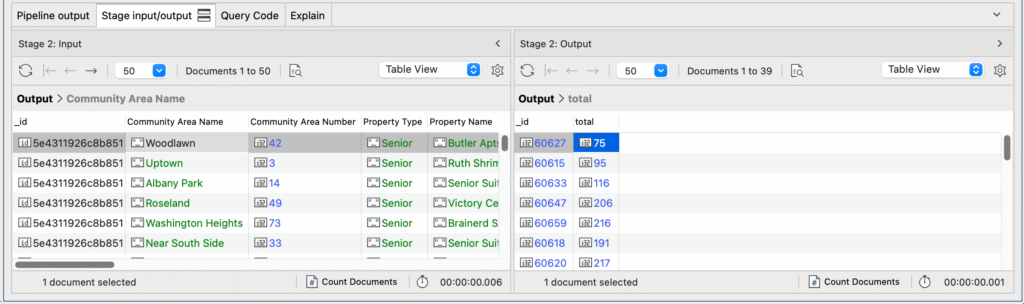
We can check the stage input, which we expect to be 89 documents:
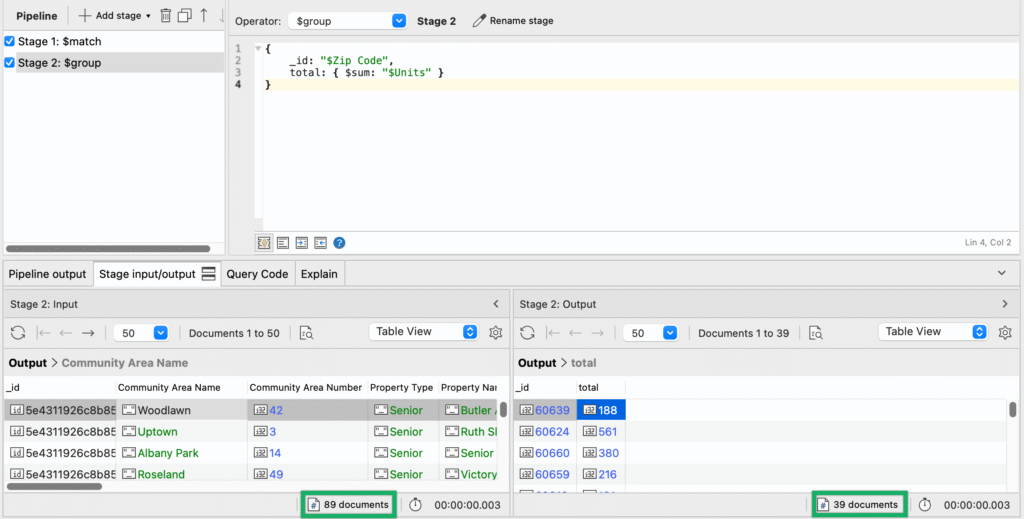
The stage output returns 39 documents – meaning there were 39 unique zip codes – and only the fields we need, _id and total.
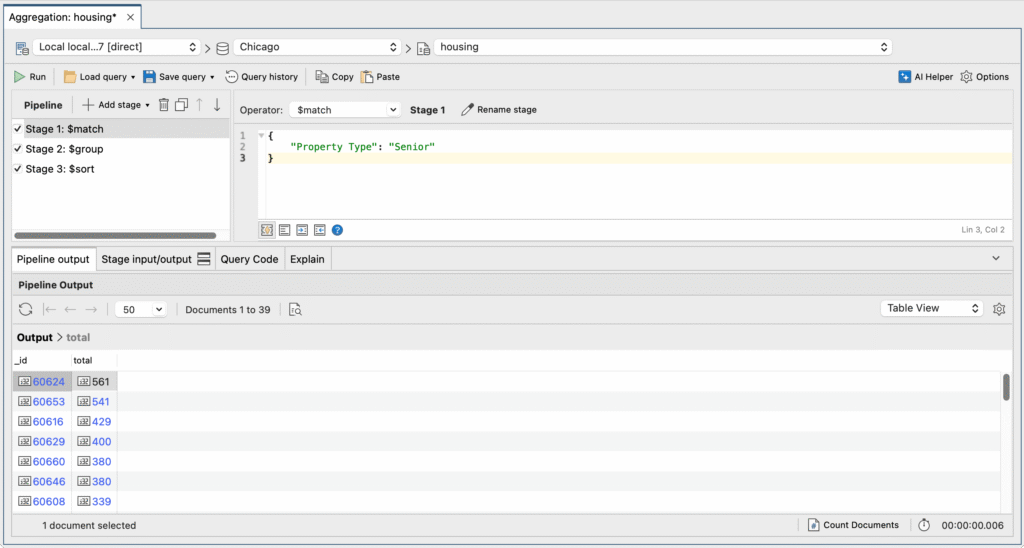
Add Stage 3: Sort results with MongoDB $sort
As we want to know the zip codes that have the greatest number of senior housing units available, it would be convenient to sort the results from the greatest to the least total units available.
To do this, we’ll add a third stage, choose the $sort operator from the dropdown, and write the following specification:
{
    total: -1
}
The stage input and output should, of course, be the same, but the zip codes should now be arranged in descending order.
It looks like 60624 is the place to be (for Chicago-based retirees).

Run the full aggregation pipeline
The Pipeline tab shows all the stages we’ve built in our aggregation pipeline – Stages 1, 2 and 3 – in one view.
To run the full pipeline:
- Toolbar – Click on the Run button in the toolbar
- Pipeline – Right-click and choose Run the Entire Pipeline
- Shortcut – Press F5
The Pipeline output tab should populate with the same results as those found in the last stage output.
Add a stage before or after a selected stage
It is also possible to place an additional stage before or after any selected stage:
- Toolbar – Click on the down arrow next to the Add stage button and choose Add New Stage Before Selected Stage or Add New Stage After Selected Stage
- Pipeline – Right-click and choose Add New Stage Before Selected Stage or Add New Stage After Selected Stage
- Stage editor – Right-click and choose Add New Stage Before This Stage or Add New Stage After This Stage
Duplicate a stage
Choose the stage you want to clone and:
- Pipeline – Click on the Duplicate button for the selected stage or right-click and choose Duplicate Selected Stage
- Stage editor – Right-click and choose Duplicate This Stage
Move a stage
Select the stage to move in the Pipeline section and:
- Click on the up and down arrows
- Right-click and select Move Selected Stage Up or Move Selected Stage Down
- Shortcuts – Press Shift + F8 to move a selected stage up or F8 to move it down
Alternatively, in the Stage editor – right-click and choose Move This Stage Up or Move This Stage Down.
Enable or disable a stage
To temporarily enable or disable stages in your pipeline, simply check or uncheck the stage checkbox as needed.
Or right-click on a stage in the Pipeline section and choose Include Stage in Pipeline or Exclude Stage From Pipeline.
Delete a stage
Select the stage to be deleted in the Pipeline section and:
- Click on the Delete button
- Right-click and choose Delete Selected Stage
Alternatively, in the Stage editor – right-click and choose Delete This Stage.
Toggle between vertical and horizontal layouts
Click on the Window icon on the Stage input/output tab to show stage inputs and outputs horizontally or vertically.

Refresh results
Refresh results in the Pipeline Output, Stage Input, and Stage Output sections:


- Toolbar – Click on the Refresh icon in the respective toolbars
- Right-click anywhere in these sections and choose Refresh View
- Shortcut – Press Ctrl + R (⌘ + R)
Export document data
Right-click on the results in the Pipeline output or Stage input/output tabs and select Export Documents. The Export Wizard opens, ready for you to specify how you want to export your data.
Learn more about the Export Wizard.
Query with date tags
In $match stages, you can use date tags, which are a shorthand way of querying a date field with a time range, for example today or last week.
When Studio 3T runs the query, it converts the date tag into a range using the greater and less than operators, for example:
"registered_on": #today
is expanded into:
Learn more about Date Tags, including a list of all the available date tags.
Change databases, collections, and connections while building aggregation queries
In the toolbar, click on any database, collection, or connection to select a different option from the dropdown menu.

View the aggregation query in full MongoDB Shell code
To show the full MongoDB aggregation query instead of viewing code line-by-line in individual stages:
- Run the entire pipeline.
- Click on the Query Code tab.
- Choose MongoDB Shell from the dropdown.
Generate JavaScript, Java, Python, C#, PHP, and Ruby code from MongoDB aggregation queries
To generate code from an aggregation query:
- Run the entire pipeline.
- Click on the Query Code tab.
- Select the target language.
Create a view from an aggregation query
Views are a great shortcut to accessing the data you need without having to run the same queries.
Right-click anywhere in the Pipeline section and Stage editor and choose Save > Create view from this aggregate query.
In the Create View dialog, name the view and click OK.
Your view opens as a new tab, next to the Aggregation Editor tab. The view is also shown in the Connection Tree, under the database where your collection is located, within a separate folder called Views.
Explain the full pipeline
The Explain Tab features Visual Explain, which shows information on query plans and execution statistics normally provided by the explain() method.
- Run the entire pipeline.
- Click on the Explain tab.
Save aggregate queries
To save your aggregation query so that you can use it throughout Studio 3T or as a JavaScript file:
- Pipeline section and Stage editor – Right-click and choose Save, and then choose Save query or Save file
- Shortcut – Save query – Ctrl + S (⌘+ S), Save file – Shift + Ctrl + S (Shift + ⌘+ S)
If you are using Studio 3T’s Team Sharing, you can save your aggregation query in a shared folder.

You and your team members can access the shared aggregation query from the My resources sidebar.

To store the connection, database, and collection details with your aggregation query, select the Save target details checkbox.
Open aggregate queries
To open aggregation queries previously saved as queries:
- Pipeline section and Stage editor – Right-click and choose Load > Load query
- Shortcut – Press Ctrl + O (⌘+ O)
To open aggregation queries previously saved as JavaScript files:
- Pipeline section and Stage editor – Right-click and choose Load > Load file
- Shortcut – Press Shift + Ctrl + O (Shift + ⌘+ O)
Copy and paste aggregate queries
The copy and paste function is extremely helpful, especially when working across Studio 3T’s various features (for example, going from SQL Query to the Query Editor).
To copy and paste an aggregation query:
- Pipeline section and Stage editor – Right-click and choose Copy Aggregate Query or Paste Aggregate Query
Even better than copying and pasting, why not share your aggregation query with other team members? Learn more about how to share a query in the Aggregation Editor.