Q: I’ve been asked to turn a MongoDB collection into a spreadsheet, but MongoDB data is all documents, where do I start?
Welcome to the latest Studio 3T Ask Manatees Anything – #Studio3T_AMA. Want to know how to use Studio 3T to make your MongoDB life better? Just tweet and use #Studio3T_AMA or email [email protected].
A: Let’s start by working back from the spreadsheet. Most if not all of spreadsheets import CSV (comma separated variables) files. What you want to do is export from MongoDB to a CSV file. Thanks to Studio 3T’s export capabilities, you’re already good to go.
Exporting to CSV means taking each document in MongoDB and turning the document on its side so the fields in the document become the columns in the spreadsheet. Performing this transformation by hand would mean identifying all the different fields in the documents and you probably don’t want to do that.
That’s why Studio 3T’s export scans the first few hundred of your MongoDB collections’ documents and works out what fields actually exist. And it frees you up to work out which fields your spreadsheet needs.
Practical Exporting
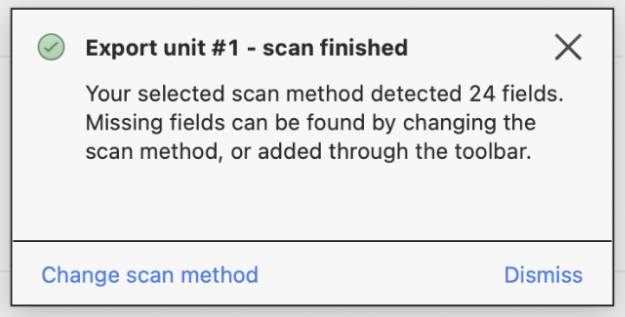
How do you start this process? Click on the Export button and, for this example, pick Connection Tree Item as the source for your collection. Click Next and then pick a collection and click Next again. You’ll arrive at the Export type selection page – select CSV and click Configure. You’ll be presented with the CSV export configuration page and in the bottom right a dialog which says:

This means Studio 3T has scanned the first 200 documents in the collection to work out what fields are in those documents. That includes expanding out the fields embedded in other fields and unwinding any arrays it finds. If your documents are more varied than that, you can change the scan method to a full scan. It’ll take longer though as it will work through every single document in your collection.
With this collection, the quick scan found 24 fields. They are listed in the Select Fields list where you can pick exactly which fields are included in the export:

The Select Fields controls above the list that let you add custom fields which may not have been scanned, select and deselect all fields, and sort or filter the fields so you can reduce it down to what you want as your spreadsheet’s columns.
Once you’ve done that, set the CSV Format to Excel. You can get a feel for what the exported data will look like by double clicking on the Output Preview bar at the bottom; it’ll show you the first few rows in the format you’ve selected.
If you are happy with that, head up to the top right, where you can set your export target. Select File and click on the folder to pick a directory and filename to export to. That’s pretty much everything set up. What we’ve created here is an export task and the next step is to run that task. You’ll find the Run button on the top of the pane, between Schedule and Export Options.
Excel importing
Once run, there will be a file which you can load or import into your preferred spreadsheet application. Take a spreadsheet like Excel for example. It can happily open an exported CSV file and display it as a spreadsheet, but what you can do with that opened spreadsheet is severely limited by what it can save back to the file. CSV files aren’t made to store formulas or formatting data.
To get the full flexibility of a spreadsheet, you’ll want to import the content into an Excel sheet. Select File, Import, CSV File and point the file selector at your freshly exported file. Click Get Data to begin the import and Excel will detect your file is delimited – Click Next to get to the delimiters settings.
Oddly, for a Comma Separated Variable file, Excel doesn’t assume commas are delimiters. You will need to check Comma in the delimiter list. You can now click Finish to kick off the import or Next to move onto options like skipping columns that you forgot to uncheck back when you were exporting the data.
With the data imported into an Excel sheet, you’ll be free to embed formulas to perform calculations using the data and save the spreadsheet, complete with those formulas. Happy exporting with Studio 3T (and Excel importing!).


