OpenID Connect (OIDC) is a secure authentication protocol that enables user authentication and identity verification in modern architectures. It allows users to sign in to applications using a single set of credentials from trusted identity providers, such as Microsoft Entra ID and Okta. OIDC supports Single Sign-On (SSO), facilitating centralized identity and access management. This eliminates the need to store credentials directly in MongoDB and integrates with MongoDB Atlas or MongoDB Enterprise.
Note: For OIDC connections only, exporting and importing BSON data using mongodump is currently not supported. We plan to make this feature available in a future version of Studio 3T.
OIDC reduces security risks in MongoDB using the following measures:
- Federated authentication: Facilitates the exchange of user identity information between the external identity provider and Studio 3T.
- Token-based authentication: Uses JSON Web Tokens (JWTs) to securely transfer user information between the external identity provider and Studio 3T.
- SSO and Multi-factor authentication: Uses enhanced security via external identity provider policies.
- Role-based access control: Maps user identity claims (groups, roles, or email) from OIDC tokens to MongoDB roles, ensuring users access only permitted databases and collections.
The OIDC authentication process
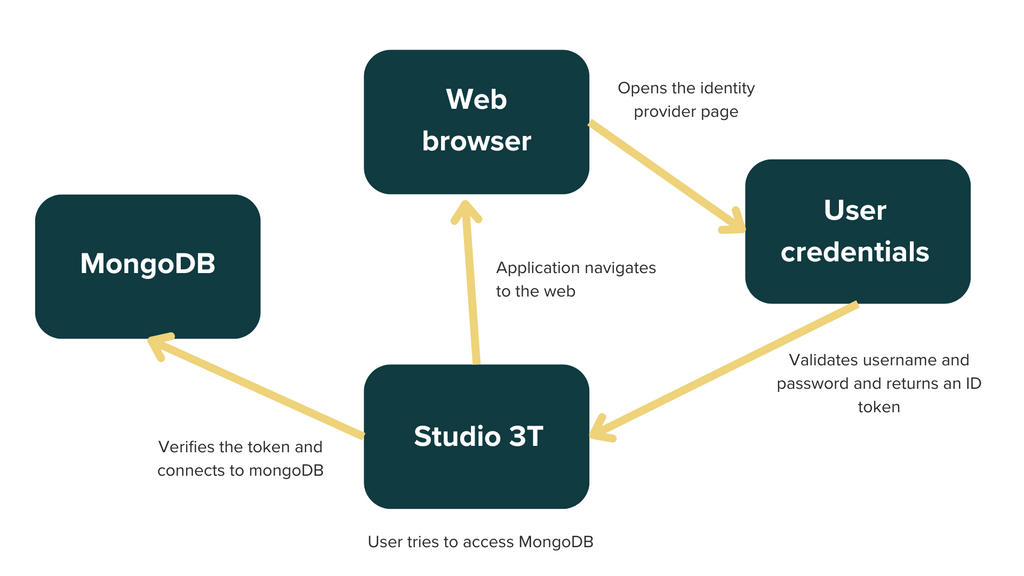
With OIDC enabled, when you attempt to access MongoDB through Studio 3T, you are redirected to the external identity provider for authentication. The identity provider validates your credentials and authenticates you. After successful authentication, the identity provider generates an ID token (a JWT) containing identity claims, and sends it to Studio 3T. Studio 3T receives the ID token and verifies its authenticity using the public key provided by the identity provider. When Studio 3T verifies the token, the user is authenticated and connected to MongoDB based on the claims in the token, such as role-based access permissions.
Whenever Studio 3T uses an OIDC connection, such as when opening a new Collection, IntelliShell, or Aggregation Editor tab, or creating a new Import/Export task, it always authenticates the connection. For most users this means that your web browser opens and your user is automatically authenticated.
Prerequisites
To use OIDC with MongoDB, you need:
- A MongoDB deployment: MongoDB Atlas (fully managed) or MongoDB Enterprise (self-hosted 7.0 or later).
- An Identity provider (IdP) that supports OIDC, such as Microsoft Entra ID (Azure AD), Okta, Google, Auth0, Keycloak, or Ping Identity.
- OIDC configuration in MongoDB: Configure OIDC settings for Workforce Identity Federation to integrate with the chosen IdP.
- Role-based Access Control: Define role mappings in MongoDB based on OIDC claims, such as groups, roles, or email.
Get a connection string from MongoDB
To connect to a MongoDB server or cluster, you’ll need a connection string. MongoDB supports two connection formats: the standard URI (Uniform Resource Identifier) and the SRV (Service Record) URI format.
The standard URI format follows this structure:
mongodb://[username:password@]host1[:port1][,host2[:port2],…[,hostN[:portN]]][/[database][?options]]
and the SRV URI format starts with the prefix:
mongodb+srv://
The SRV URI format simplifies connections by using DNS records to automatically discover servers in a replica set or shared cluster, so you don’t need to list individual server addresses. MongoDB Atlas uses the SRV URI format.
Learn more about getting a connection string from MongoDB Atlas or MongoDB Enterprise.
Add a connection in Studio 3T
- Open Studio 3T and click Connect.
- In the Connection Manager, click on New connection.
- Paste the connection string you copied from MongoDB Atlas in the URI box on the New Connection dialog.
- Click Next.
- Click OK when you see the message box informing you that the connection has been successfully configured.
- Click Save. You’ll see the connection you just added in the Connection Manager.
- Select the connection and click Connect.
The following configuration options are available on the Authentication tab:
- Use ID token instead of Access token – Check this box to use the ID token received from the identity provider instead of the access token. Use this option with identity providers that don’t provide JWT access tokens.
- Consider target endpoint trusted – Check this box if you are configuring a connection to a trusted endpoint that is not Atlas or localhost to enable the access tokens to be sent. Use this option only when connecting to servers you trust.
Authenticate your credentials with the identity provider
After clicking Connect in the Connection Manager, you’ll need to authenticate your user with the identity provider.
Studio 3T opens your web browser ready for you to enter your password for the chosen identity provider.
Upon successful authentication, you’ll see a message in your web browser on the studio3t.com page informing you of a successful login. In most cases, we recommend not quitting your web browser or clearing the cache and cookies, as this may remove your ID token.
You’ll also see the new connection in Studio 3T’s connection tree.