Skip to content
Studio 3T - The professional GUI, IDE and client for MongoDB
  • Tools
    • Aggregation Editor
    • IntelliShell
    • Visual Query Builder
    • Export Wizard
    • Import Wizard
    • Query Code
    • SQL Query
    • Connect
    • Schema Explorer
    • Compare
    • SQL ⇔ MongoDB Migration
    • Data Masking
    • Task Scheduler
    • Reschema
    • More Tools and Features
  • Solutions
  • Resources
    • Knowledge Base
    • MongoDB Tutorials & Courses
    • Tool/Feature Documentation
    • Blog
    • Community
    • Testimonials
    • Whitepapers
    • Reports
  • Contact us
    • Contact
    • Sales Support
    • Feedback and Support
    • Careers
    • About Us
  • Store
    • Buy Now
    • Preferred Resellers
    • Team Pricing
  • Download
  • My 3T
search

Studio 3T® Knowledge Base

  • Documentation
  • Tutorials
  • Workshops
Take the fastest route to learning MongoDB. Cover the basics in two hours with MongoDB 101, no registration required.
Start the free course

MongoDB User Authentication: A Step-by-Step Guide

Posted on: 23/07/2018 (last updated: 04/08/2021) by Thomas Zahn

It goes without saying that securing your MongoDB instances is of the utmost importance.

On top of network-level security such as VPNs or SSH, MongoDB itself provides robust built-in user authentication that governs and restricts what users can and cannot see and do inside your MongoDB instances.

At the very least, you always should run your MongoDB server(s) with user authentication enabled.

Always.

Studio 3T makes user management – a task that can seem somewhat daunting – incredibly easy. In this post, we’ll see how Studio 3T can get you up and running with MongoDB user authentication in no time.

Download the latest Studio 3T version to follow along the tutorial.

Of Chickens and Eggs

First, let’s start with some background.

There is of course a bit of a chicken-and-egg situation when starting with MongoDB user authentication.

If you start your mongod / mongos server(s) with user authentication enabled right away, you will of course need a user to authenticate with when you try to connect to your server.

If, on the other hand, you run your mongod / mongos server(s) without user authentication, you can define as many users as you like – they will simply remain inactive.

Therefore, there are two general approaches to bootstrapping MongoDB user authentication:

For further reading, check out our guide for authentication in LDAP and Kerberos with the MongoDB Enterprise license.

Enable user authentication after creating the user administrator

This straightforward approach requires the following steps:

  1. Launch your MongoDB server without authentication.
  2. Create the system user administrator.
  3. Restart your MongoDB, this time with authentication enabled. You can now connect to your server as that user administrator.

Enable user authentication right away and use the localhost exception

This approach lets you run your MongoDB server with authentication right from the beginning. However, it requires localhost access to your server:

  1. Start your MongoDB server with authentication enabled straight away.
  2. Now connect to your MongoDB server from localhost. This localhost exception grants you full access (i.e. without any authentication required) to your instance via the localhost interface.
  3. Proceed to create your system user administration – which must be the first user you create this way.

Note that the localhost exception is only active as long as no users have been created in your MongoDB instance.  You can also always disable the local host exception by passing —setParameter enableLocalhostAuthBypass=0 to your server.

Bootstrapping User Administration

Since it won’t always be possible to connect to your MongoDB server via your localhost interface, we will use the first approach in this post and create the user administrator before we restart our MongoDB server with authentication.

Start your MongoDB server without user authentication

From your command line (on your server), start your MongoDB server. For the sake of simplicity, we’ll just start a single mongod instance using the new WiredTiger storage engine:

mongod —dbpath ./data/3.0.0 —storageEngine wiredTiger —port 27017

Note that your data path, your port and other options may differ from this simple example.
The main thing is that you start the server without authentication (i.e. you do not pass —auth to it).

Create the system user administrator

Now, let’s quickly connect to our MongoDB server.

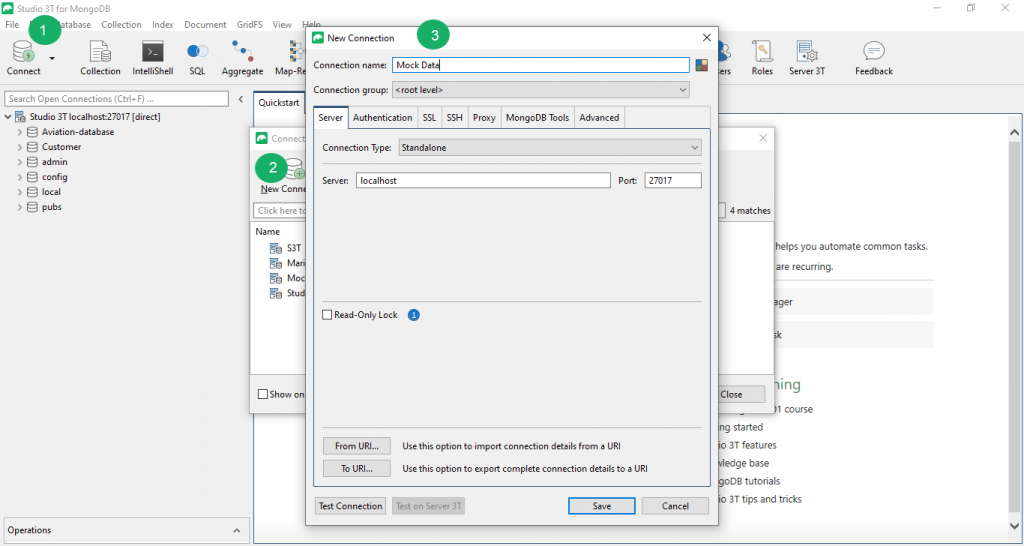
In Studio 3T, click the “Connect” icon in the toolbar and then choose “New Connection” in the Connection Manager.

Here, simply enter the name or the IP address of your server, and then just click “Connect”.

In MongoDB, system-wide users (i.e. users that can have access to all other databases on the server) need to be created in a special database “admin”.

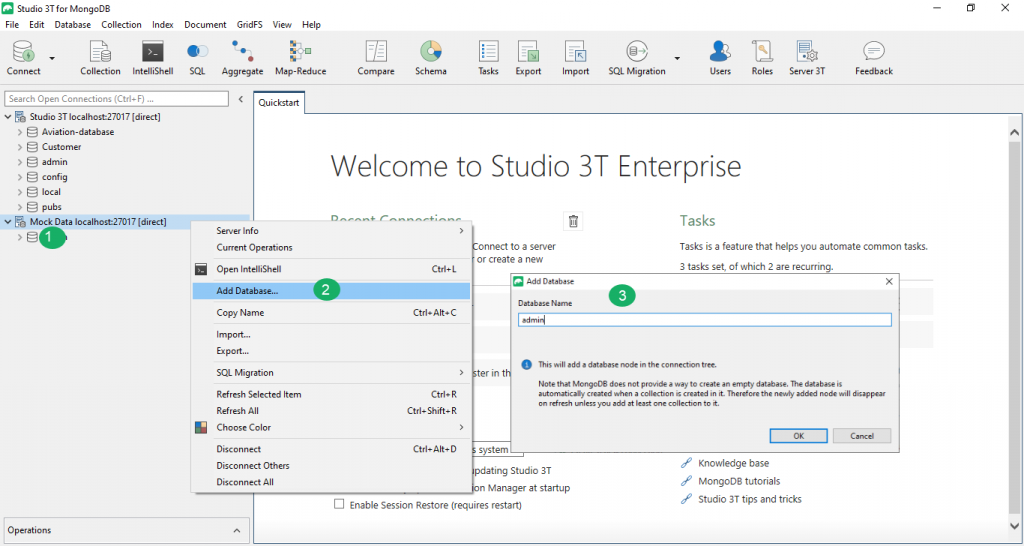
If you have only just started your server for the first time, you probably won’t have an “admin” database yet. Let’s quickly create one in this case (if you already have an “admin” database, just skip this step).

To add the “admin” database to your MongoDB instance, simply right-click your connection, choose “Add Database…” and name your new database admin:

Now, we can add our system-wide user administrator.

A system-wide user administrator is simply an (arbitrarily named) user defined in your “admin” database that has – at least – been granted privileges to create other users.

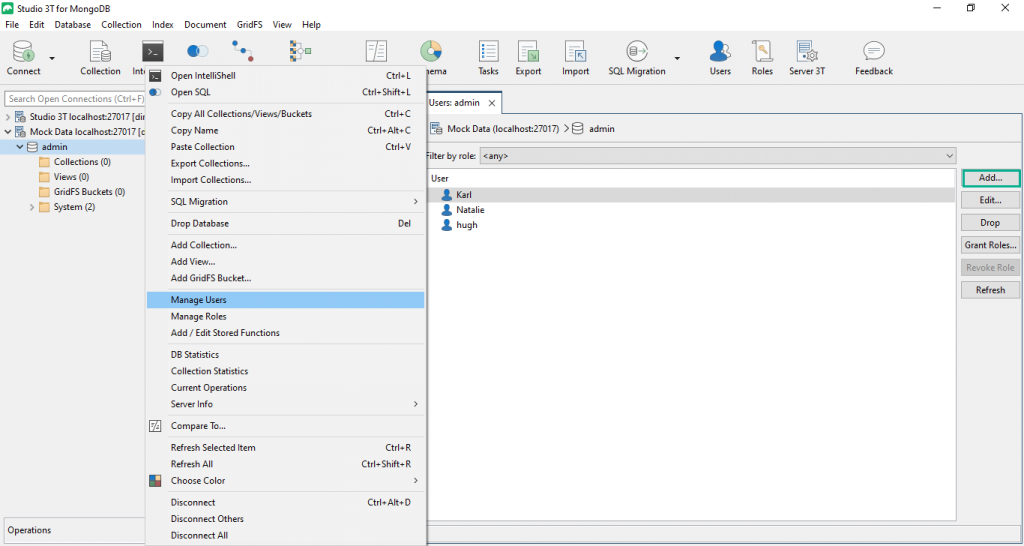
To start, select your “admin” database, right-click, and choose “Manage Users”. This will open a user management tab for the “admin” database.

Of course, since we are only just getting started, there aren’t any users defined yet. Click the “Add…” button to add a new user.

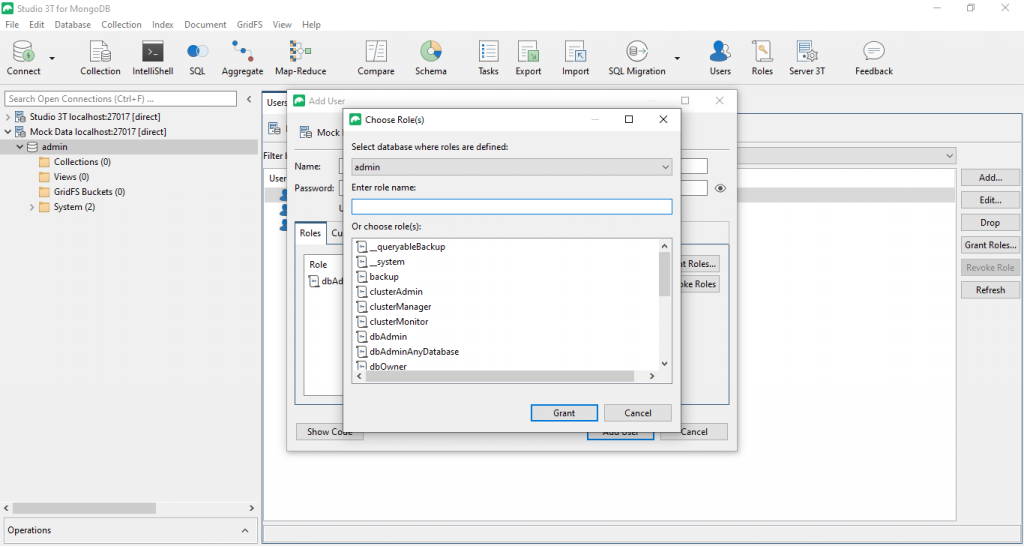
Enter a name (anything goes) for your new user and a password. In order to make this new user a system-wide user administrator, we now need to assign it an appropriate role. For this, click the “Grant Roles…” button.

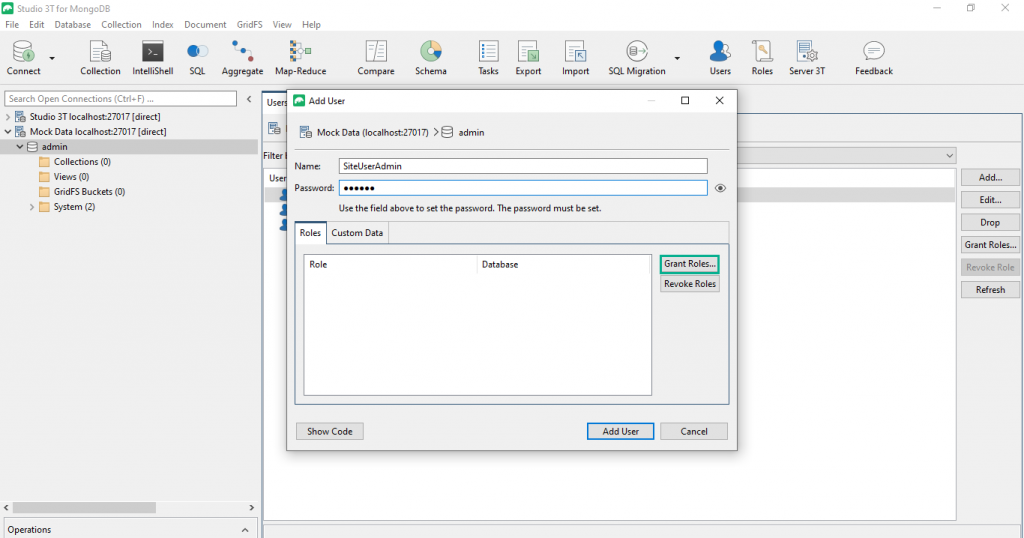
Now, choose from the list of all built-in roles defined for database “admin” the role “userAdminAnyDatabase”.

This role will grant the user the privileges required to create (additional) users in any database on your server.  Please note however that the original user will only exist in one database at a time.

Click “Grant” to close the roles selection dialog. Your Add User dialog will now show that role for your new user:

Click “Add User” to create your new system-wide user administrator.

Restart your MongoDB instance with authentication enabled

OK, now that we have a user administrator, we need to restart our MongoDB instance – this time with authentication enabled – as part of the process to bootstrap MongoDB user authentication.

Before restarting your server, disconnect Studio 3T from it first.

Simply right-click your connection and choose “Disconnect” from the context menu.

Next, let’s restart our MongoDB instance with authentication enabled, again from your command line (on your server):

mongod —dbpath ./data/3.0.0 —storageEngine wiredTiger —auth —port 27017

That’s it! You have successfully set up user authentication on your MongoDB server!

Connect to your MongoDB Instance with your System-Wide User Administrator

You can now connect to your MongoDB instance with your system-wide user administrator and create additional users.

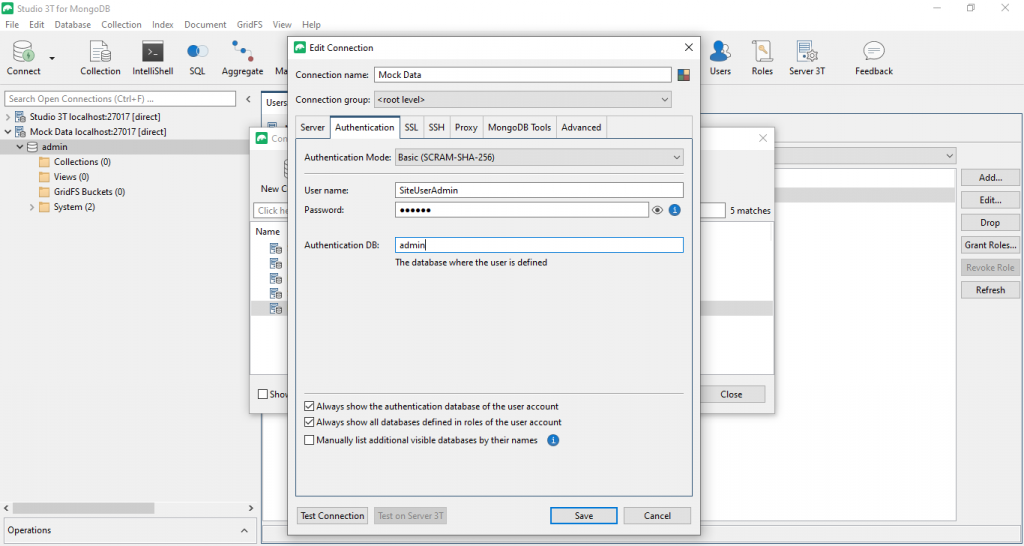
As before, open your Connection Manager. Since adding new users probably won’t be a one-off task, we recommend that you create a new connection for this step (rather than just quick-connect to your server).

The IP and port of your server will be the same as before, but this time we need to specify the user we want to connect with in the “Authentication” tab.

Enter the name and the password of your system-wide user administrator here and make sure that you specify the database “admin”, as that is where the user was defined.

Note that Studio 3T will automatically use the new challenge-response SCRAM-SHA-1 user authentication mechanism introduced in MongoDB 3.0.

After you’ve connected, you can then go on and define additional users for any database on your server.

Want to know more about User Management in Studio 3T?  Check out our main overview for more info.


Complement this guide with other MongoDB user management tutorials:

  • Create a MongoDB user
  • Grant and edit roles
  • List MongoDB users by role

How helpful was this article?
This article was hideous
This article was bad
This article was ok
This article was good
This article was great
Thank you for your feedback!

About The Author

Thomas Zahn

Having grown up with a living room that was essentially the office of his mother’s software start-up in the 80s, Thomas is a dyed-in-the-wool software engineer. In the past, he has worked for large outfits such as Microsoft Research and Nokia as well as for specialised engineering shops and start-ups. He lives in Berlin with his wife and two kids, and loves tennis and hiking (though, bizarrely, he constantly seems to find no time to do much of either those two). Thomas holds a Ph.D. in Computer Science from the Freie Universität Berlin.

Article navigation

Related articles

  • MongoDB DevOps Seven-Step Checklist
  • What’s New in Studio 3T 2022.1 – SQL Connection Import/Export, MongoDB-AWS authentication
  • The Studio 3T Field Guide to MongoDB Aggregation
  • The Studio 3T Field Guide to MongoDB Aggregation – Form
  • The Beginner’s Guide to MongoDB Aggregation (With Exercise)

Studio 3T

MongoDB Enterprise Certified Technology PartnerSince 2014, 3T has been helping thousands of MongoDB developers and administrators with their everyday jobs by providing the finest MongoDB tools on the market. We guarantee the best compatibility with current and legacy releases of MongoDB, continue to deliver new features with every new software release, and provide high quality support.

Find us on FacebookFind us on TwitterFind us on YouTubeFind us on LinkedIn

Education

  • Free MongoDB Tutorials
  • Connect to MongoDB
  • Connect to MongoDB Atlas
  • Import Data to MongoDB
  • Export MongoDB Data
  • Build Aggregation Queries
  • Query MongoDB with SQL
  • Migrate from SQL to MongoDB

Resources

  • Feedback and Support
  • Sales Support
  • Knowledge Base
  • FAQ
  • Reports
  • White Papers
  • Testimonials
  • Discounts

Company

  • About Us
  • Blog
  • Careers
  • Legal
  • Press
  • Privacy Policy
  • EULA

© 2023 3T Software Labs Ltd. All rights reserved.

  • Privacy Policy
  • Cookie settings
  • Impressum

We value your privacy

With your consent, we and third-party providers use cookies and similar technologies on our website to analyse your use of our site for market research or advertising purposes ("analytics and marketing") and to provide you with additional functions (“functional”). This may result in the creation of pseudonymous usage profiles and the transfer of personal data to third countries, including the USA, which may have no adequate level of protection for the processing of personal data.

By clicking “Accept all”, you consent to the storage of cookies and the processing of personal data for these purposes, including any transfers to third countries. By clicking on “Decline all”, you do not give your consent and we will only store cookies that are necessary for our website. You can customize the cookies we store on your device or change your selection at any time - thus also revoking your consent with effect for the future - under “Manage Cookies”, or “Cookie Settings” at the bottom of the page. You can find further information in our Privacy Policy.
Accept all
Decline all
Manage cookies
✕

Privacy Preference Center

With your consent, we and third-party providers use cookies and similar technologies on our website to analyse your use of our site for market research or advertising purposes ("analytics and marketing") and to provide you with additional functions (“functional”). This may result in the creation of pseudonymous usage profiles and the transfer of personal data to third countries, including the USA, which may have no adequate level of protection for the processing of personal data. Please choose for which purposes you wish to give us your consent and store your preferences by clicking on “Accept selected”. You can find further information in our Privacy Policy.

Accept all cookies

Manage consent preferences

Essential cookies are strictly necessary to provide an online service such as our website or a service on our website which you have requested. The website or service will not work without them.

Performance cookies allow us to collect information such as number of visits and sources of traffic. This information is used in aggregate form to help us understand how our websites are being used, allowing us to improve both our website’s performance and your experience.

Google Analytics

Google Ads

Bing Ads

Facebook

LinkedIn

Quora

Hotjar

Reddit

Functional cookies collect information about your preferences and choices and make using the website a lot easier and more relevant. Without these cookies, some of the site functionality may not work as intended.

HubSpot

Social media cookies are cookies used to share user behaviour information with a third-party social media platform. They may consequently effect how social media sites present you with information in the future.

Accept selected