In this exercise, you’ll modify the query you imported into the Aggregation Editor in the previous exercise.
As part of this process, you’ll add a stage to the pipeline that limits the documents to those with a name value that contains the term horse. You’ll also change the name of one of the output columns to better reflect the type of data it contains.
To edit the aggregate query
1. In the top section of the Aggregation tab, ensure that the Pipeline tab is selected and then click the Add a new stage to the pipeline button (![]() ).
).
The stage is inserted at the end of the pipeline, with the $match operator specified.
An operator defines a condition that the documents must match to be included in the results. For this exercise, you’ll stick with the $match operator.
2. Ensure that the new stage is selected on the Pipeline tab, and then click the up arrow on the toolbar three times to move the stage up to the first position.
Your pipeline should now look similar to the following figure.

3. Go to the Stage 1 tab and type the following code snippet between the two curly braces:
"name" : /.*horse.*/i
The code specifies that only documents with a name value containing the term horse should be returned. Be sure to retain the initial braces when you add the snippet. The final code should look like the following.
{
  "name" : /.*horse.*/i
}
4. Under Stage Output on the bottom-right panel, click the Execute button ( ).
).

The Aggregation Editor runs the query up to this point in the pipeline, giving you results similar to those shown in the following figure. Notice that all name values include the term horse.
5. Go to the Stage 3 tab and, in the third line of code, replace the first instance of the string COUNT(*) with the word amount, retaining the quotation marks.
By default, the Aggregation Editor assigns the name COUNT(*) to the output column. Changing the string value in this stage changes the column name to amount. Your Stage 3 code should now look like the following snippet.
{
    "local_authority" : "$_id.local_authority",
    "amount" : "$COUNT(*)",
    "_id" : NumberInt(0)
}
6. Click the Execute button ( ) under the Stage Output panel.
The results should now reflect the execution of the first three pipeline stages:
- Stage 1 limits the results to those documents with a
namevalue that includeshorse. - Stage 2 groups the results by the local_authority values and provides the total number of documents in each group.
- Stage 3 reshapes the results to clearly display the local authorities and the number of pubs associated with each one. Your results should look similar to those in the following figure. At this point in the pipeline, the results are sorted by the name of the local authority.

7. Go to the Stage 4 tab and, in the second line of code replace the string COUNT(*) with amount to ensure that the Stage 4 code references the correct column name.
Your snippet should now look like the following code:
{
    "amount" : NumberInt(-1)
}
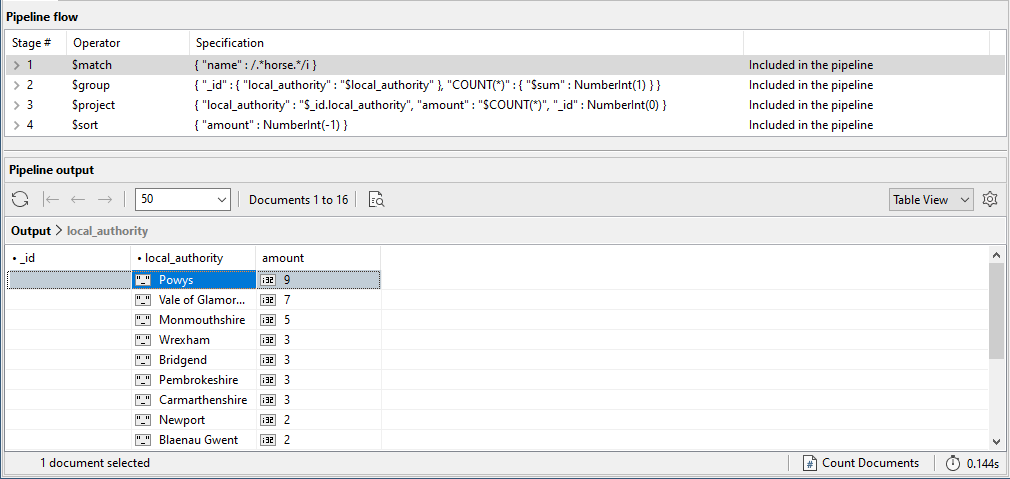
8. Click the Execute button ( ) – this time on the main toolbar – to execute the full pipeline.

The Aggregation Editor now runs the entire pipeline, giving you the results shown in the following figure. Notice that the Powys local authority has the greatest number of pubs that include the term horse in the name.

