If you already have an existing MongoDB database or connection you can use for learning purposes, click to Connecting to MongoDB with Studio 3T to move on to the next lesson.
In this exercise, you’ll set up MongoDB Atlas using the free M0 service tier and get a connection string which you can use to create a Studio 3T connection.
The setup process consists of registering with the MongoDB Atlas service and configuring a cluster. When registering with the service, you must provide an email address, first name, last name, and password.
For assistance on IP whitelisting mentioned in the video above, see How to fix MongoDB Atlas Whitelisting Issues.
To set up MongoDB Atlas
1. Go to the MongoDB Atlas registration page.
Open the MongoDB Atlas Registration Page2. If you have a Google account, you can sign up with that by clicking the Sign Up with Google button. Skip to step 6.
Otherwise, fill in the required information (email address, first name, last name, and password).
3. Click the terms of service and privacy policy links, which should open on a new tab.
Review the terms, and then return to the Get started free form.
4. If you want to continue with the registration, select the I agree to the terms of service and privacy policy check box.
5. Click the Create account at the bottom of the form. You will be sent a verification email. Once you receive the mail and verify, by clicking the enclosed link, you will be returned to MongoDB Atlas in your browser.
6. You will be sent to a page where you can mention your goal, the type of application you are building and your preferred programming language. Answer according to your own preferences – This does not affect the process.

7. Once you have submitted that form, Atlas will ask you to choose a cluster type. Choose Shared and click on Create a cluster.

You should also receive a welcome email, which confirms that you’re registered with MongoDB Atlas and includes a link for logging onto the service.
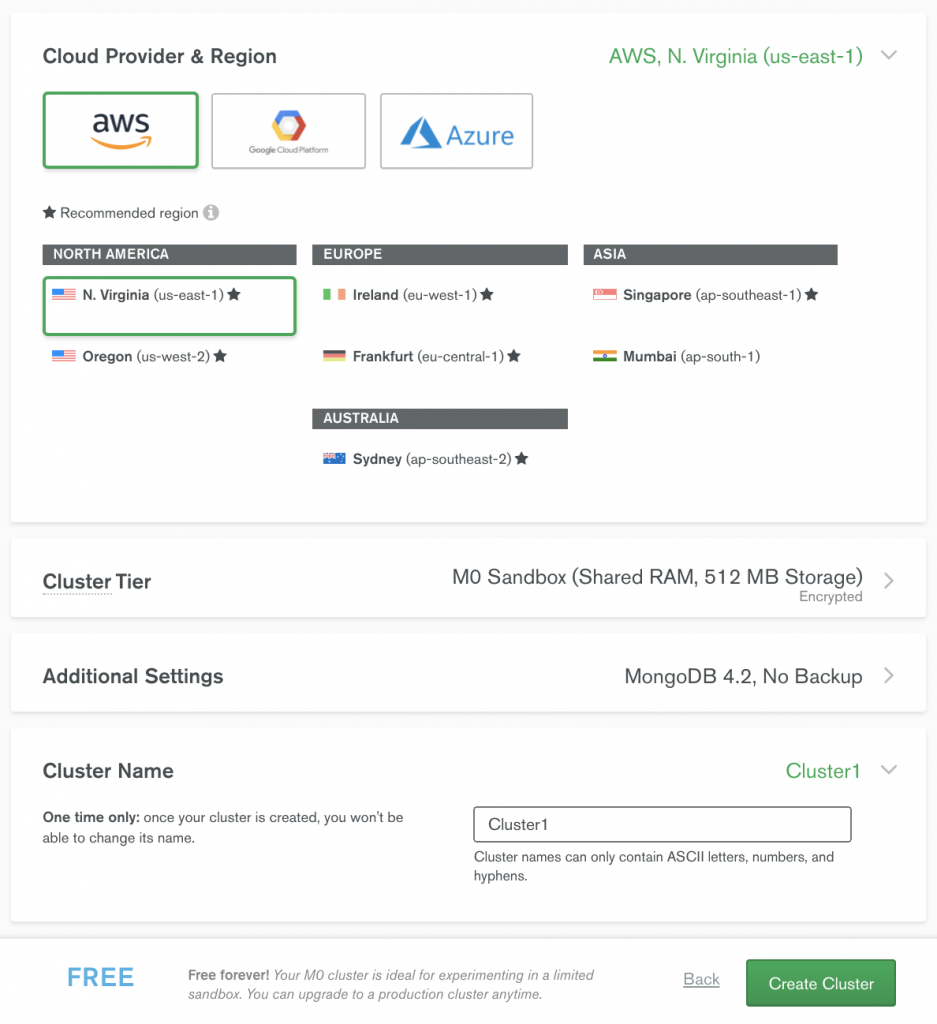
8. In the Cloud Provider & Region section, the aws option is selected as the default provider, but you can select any provider. All three platforms support the free service tier.
9. Beneath the list of providers, select a region.
We recommend a region near yourself for best network performance.
10. Expand the Cluster Tier section and ensure that M0 Sandbox is selected. This is the free M0 service level.
11. Expand the Cluster Name section and type Cluster1 in the text box.

12. Click the Create Cluster button at the bottom of the web page.
13. Once you click the Create Cluster button, you will be asked to set up a database user (and password) that can be used when connecting to the MongoDB Atlas cluster you just created. This is separate from your Atlas account username and password.
To make it easier to connect to MongoDB Atlas from Studio 3T, your password should include only alphanumeric characters, that is, letters and numbers only with no special characters.
If you use special characters, you will need to encode them when creating a connection string for accessing the MongoDB service.
To generate a password automatically, click the Autogenerate Secure Password button. A password will be generated that includes only alphanumeric characters. Be sure to save the password somewhere secure.

14. Immediately below the form for setting up the username and password is a section where you can add IP addresses to your access list. Atlas only allows particular IP addresses to connect to the cluster to improve security. Only the IP addresses (or ranges) in the access list can connect to the project’s cluster. `
Select My Local Environment of the two larger options.
- If you plan to connect from the computer you’re currently using, click Add My Current IP Address and then click Add Entry.
- If you plan to connect from a different computer, click on the IP address field and enter the IP address for that computer, then enter a description of that computer in the description field, and then click Add Entry. You can edit the IP address, add IP addresses, or delete them at any time in case you change devices.

When done, click Finish and Close and you will be returned to the Clusters overview.
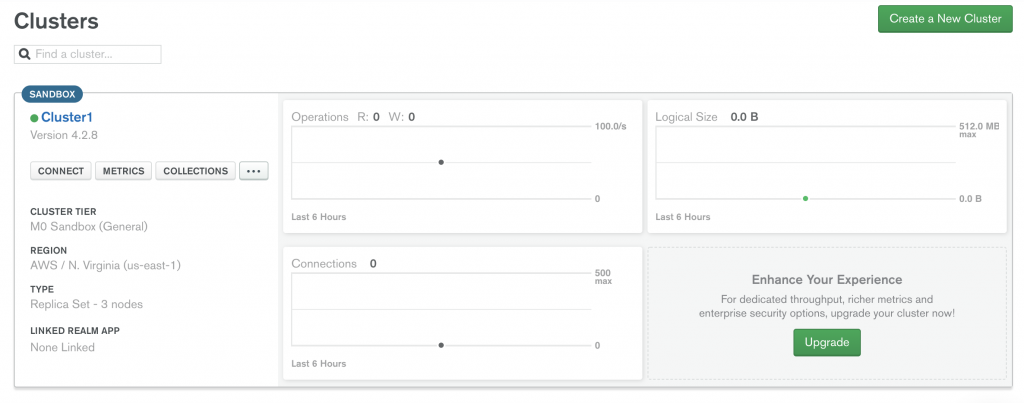
15. Atlas will then complete deploying and initialising the database cluster and inform you when done. When it has completed that task return to the Cluster overview..

The overview will now includes a listing for your new cluster, as shown above.
The cluster information shown includes the service level, cloud provider, and region, along with details about operations, connections and logical size, all of which currently show zero amounts.
16. We now need to get a Connection String, also known as a URI, to connect Studio 3T to the database. Click on the Connect button in the Cluster1 panel on the Overview page. The Connection Choices dialog will appear.

17. Select Connect your application
(If you see a different dialog, select MongoDB Drivers in the Connect to your application section)
18. The dialog will change to the driver selection dialog.

In the section ❶ select Java in the driver selection and 4.3 or later in the version selector.
19, The “mongodb+srv:…” string in section ❷ will update automatically, This is the connection string. Click on the copy icon to the right of the string to take a copy of it. Save that string in a safe location.
20. Before using the connection string, you will need to incorporate the password and, possibly, the username.
- If you have only created one user, the name of that user will already be included in the string. Here is it “admin”. If you have more than one user,
<username>will appear in the connection string. You will have to replace that<username>(including the angled brackets) with the name of the user you created. - The string will contain
<password>and this will need to be replaced with the password for the user in the username section.
Once these changes have been made, you will have a complete connection string, including login credentials. Remember to store this connection string securely. We will use the completed connection string/URI in the next lesson, to connect Studio 3T to your new MongoDB database.


