
In this post, we’ll show you how to:
- Compare MongoDB collections located in different databases and/or servers
- Analyze differences between their documents and fields
- Sync your data as needed
- Export the comparison results to the clipboard or CSV file
All using Studio 3T’s Data Compare and Sync feature.
Why you should diff your MongoDB
There are a number of situations where being able to conveniently analyze the differences between two database installations is extremely handy.
For example, you have a problem with your production system. All you know about it is that the problem lies somewhere in the database, but WHERE in the database? It worked fine yesterday, so if you compare the current database with yesterday’s backup, most likely you’ll find out what the problem is.
Additionally, it could be time to release an upgrade to the production system, but there are new configuration parameters required. The upgrade can be performed with a calm confidence when you can easily compare against the staging server and clearly see which parameters need to be introduced, changed or removed.
Or worse: an accidental update has removed vital configuration from the system, and it’s now crashing. You knew you should have taken a backup, but there just wasn’t time. And besides it was just a trivial change, so what could possibly go wrong?
But now, all you can do is sit and stare at your screen in horror. Unless of course, you can compare the differences and quickly identify which settings have been lost, and carry out an informed repair before anyone realizes your terrible blunder! (Of course, this NEVER HAPPENS on production systems, right?)
More generally, being able to see how your data is changing is very powerful. Not only does it let you gain insight to your data, but it also provides confident control over the changes when you can see them explicitly and edit them directly.
Studio 3T’s Data Compare and Sync
First of all, download our MongoDB GUI in case you haven’t already. It’s available for Windows, Mac, and Linux.
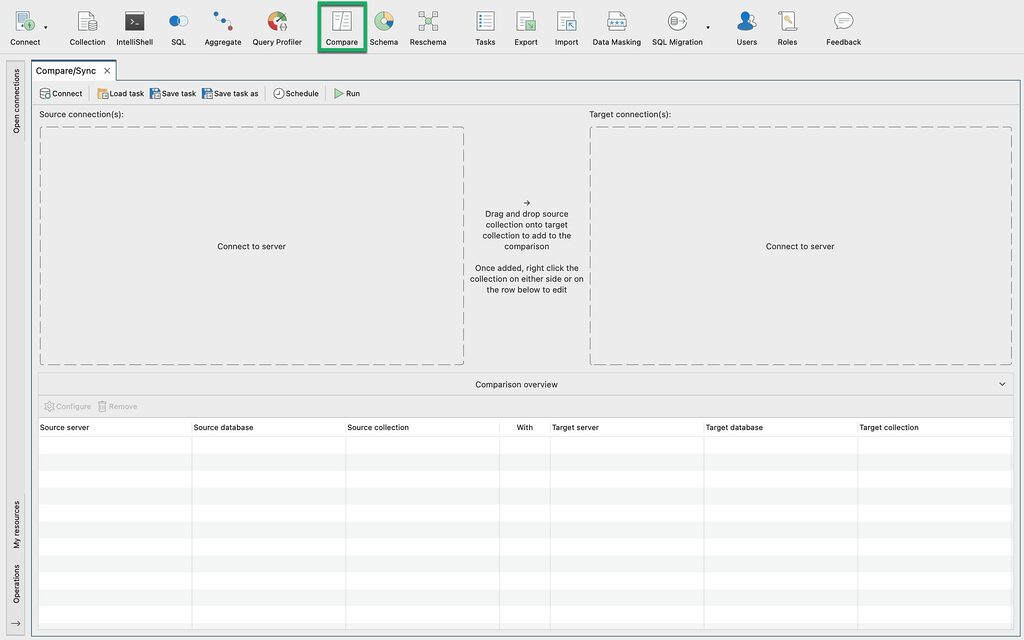
Next, open Data Compare and Sync either by right-clicking on a collection and selecting Compare To, or clicking on the Compare button in the global toolbar.
This opens up a Compare/Sync tab where we can select source and target connections, which looks like this:
Once you’ve chosen your source and target connections, it’s time to select the specific collections we want to compare.
Choose collections to compare
Simply drag the source collection on top of the target collection. All collections with the same name in the source and target databases are automatically selected for comparison.
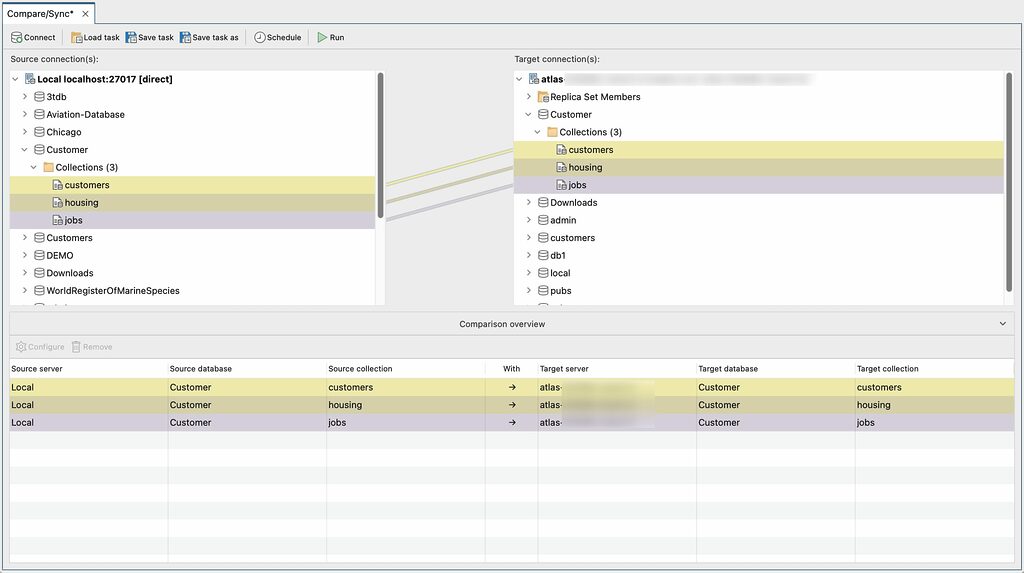
Of course, it’s not mandatory that collections need to have the same name. For example, if you need to compare the source collection current_customers with the target collection existing_customers, simply drag current_customers on top of existing_customers and it will be added to the comparison.
If you want to remove a particular pair of collections from the selection, simply right-click it and choose Remove from comparison list. Alternatively, click the Remove button in the Comparison overview section.
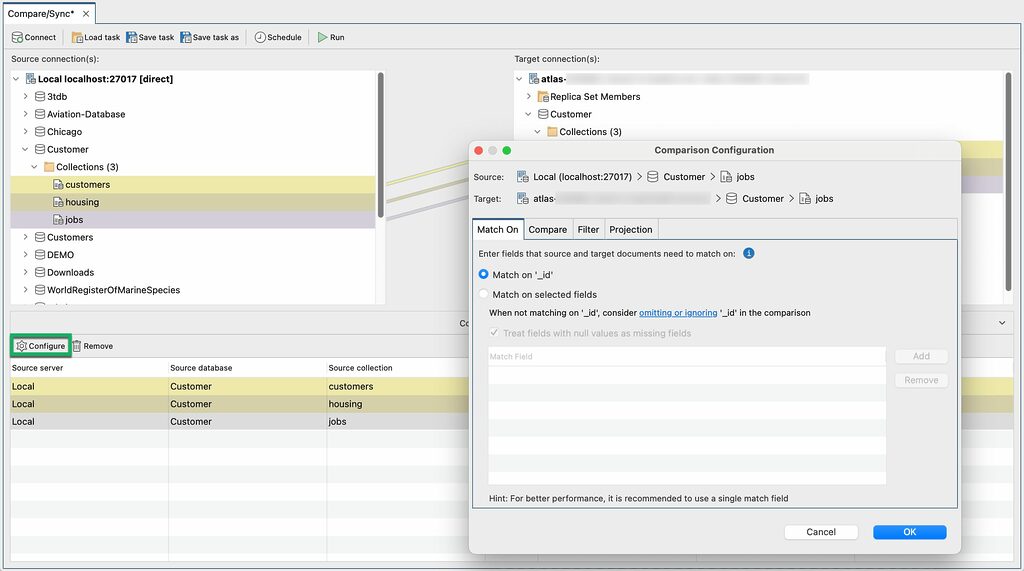
Configure your data comparison
Studio 3T’s Data Compare and Sync feature also lets you configure data comparison settings, which can come in handy in case you only want to compare certain fields, filter based on certain criteria, etc.
To start, click on Configure in the Comparison overview section. This opens the Comparison Configuration dialog which has four tabs: Match On, Compare, Filter, and Projection. You can read about them in full in our Knowledge Base article Data Compare and Sync.
Run the analysis
OK, now that we’ve selected what we want to compare, click the Run button at the top of the tab.
When the run is completed, a tab opens for each pair of collections. Let’s take a closer look at the comparison of the customers collections.

In the image above, we can see the comparison took 414 milliseconds and found seven differences in total: five differing documents, one document that only appeared on the source side, and one document that only appeared on the target side.
The Overview tab shows details about the comparison. This is useful if we save the results to come back to them later, by which time the comparison configuration may have been updated.
Spot the difference(s)
OK, now it’s time to drill down into the details! Click on the Differences tab.

Differing documents are highlighted in yellow, source-only documents in green, and target-only in red (all in pastel shades that are easy on the eye).
You can even show just the differing documents for a cleaner, more targeted overview by clicking on View options:

Now let’s expand a document.

Here we can see the same highlighting pattern: yellow shows fields that are different, green shows source-only fields, and red shows target-only fields.
Export comparison results
For a more convenient data analysis and easier sharing across teams, simply click on the Export button on the far right-side of the Differences tab to export results as a CSV file or to the clipboard.
Sync MongoDB documents
We realize our source-only document should indeed be on the target collection, so to copy the source document to the target MongoDB database, we simply right-click Copy Document to Target and confirm the copy operation.
Alright. Now we realize the target-only document is old and should no longer be present on the target.
No problem: We simply right-click and select Delete Document to remove the document that Data Compare and Sync found in the MongoDB data comparison.
Sync MongoDB fields
OK, we’ve done some syncing at document level, now we sync individual fields. View Options > Show Differing Fields Only really comes in handy here.
Looking at the first document, it looks like ‘pet:cat’ on the target side is incorrect, but instead should be ‘pet:manatee’ as it is on the source side.
Right click on either ‘pet:manatee’ or ‘pet:cat’. Since the field exists on both source and target, you can choose to either Copy Field to Target or Copy Field from Source, respectively.

You might also come across missing fields in the source document that should be copied over from the target document.
In this case, you would simply right click and select Copy Field to Source if you clicked on the target side, or Copy Field from Target if you clicked on the source side.
Studio 3T’s Data Compare and Sync lets you do a bi-directional sync on the same document, in that some changes are copied from the target document to the source, and other changes from the source to the target.
Sync MongoDB data via in-place editing
For small changes, you don’t even need to invoke the right-click menu. Simply double-click a field and edit it directly – the diff status is updated in real time.

Automate data comparison
You can schedule when to compare MongoDB collections with Tasks and Task Scheduler and run the task whenever you want or run the task on a periodic basis.
Conclusion
And that concludes our journey through how to compare MongoDB collections! I hope this tutorial on how to diff MongoDB has left you a little bit more powerful than when our journey first began.
Complement your new data comparison skills by checking out:
- Schema Explorer to help you in your data analysis and identify outliers or generate schema documentation.
- Reschema to try out changes to the schema of your MongoDB collections, such as renaming fields, adding fields, or deleting fields. You can also improve your MongoDB schema, for example by restructuring layers of embedded objects and arrays.
- Schema Validator to apply validation rules for insert or update operations on your MongoDB collections.


