Ok, I have told you a lot of theory. But, if this is your first time dealing with MongoDB roles and users I know all this can sound very confusing. So let’s go step by step through an example of what you can do when you have a fresh three node replica set up and running with the security option flag to true.
Along the way we’ll also see how easy it is to manage users and roles using a visual interface such as Studio 3T, the IDE for MongoDB.
Modifying the mongod.conf
security:
  authorization: enabled
  keyFile: /var/lib/rs.key

replication:
  replSetName: 'studio3trs'
Running the mongod service (on ubuntu 16.04) on the three servers
$ systemctl start mongod.service
Connecting to one of the servers
vagrant@primary:~$ mongo
MongoDB shell version v3.4.16
connecting to: mongodb://127.0.0.1:27017
MongoDB server version: 3.4.16
Welcome to the MongoDB shell.
For interactive help, type "help".
For more comprehensive documentation, see
    http://docs.mongodb.org/
Questions? Try the support group
    http://groups.google.com/group/mongodb-user
>
First, initiate the replica set:
> rs.initiate()
{
    "info2" : "no configuration specified. Using a default configuration for the set",
    "me" : "192.168.60.10:27017",
    "ok" : 1
}
studio3trs:SECONDARY>
studio3trs:PRIMARY>
Creating the first user
> use admin
switched to db admin
> db.createUser(
 { user : 'juan',
   pwd : 'juanpwd',
   roles : [ { role : 'userAdminAnyDatabase', db : 'admin' } ]
 }
)
Successfully added user: {
    "user" : "juan",
    "roles" : [
        {
            "role" : "userAdminAnyDatabase",
            "db" : "admin"
        }
    ]
}
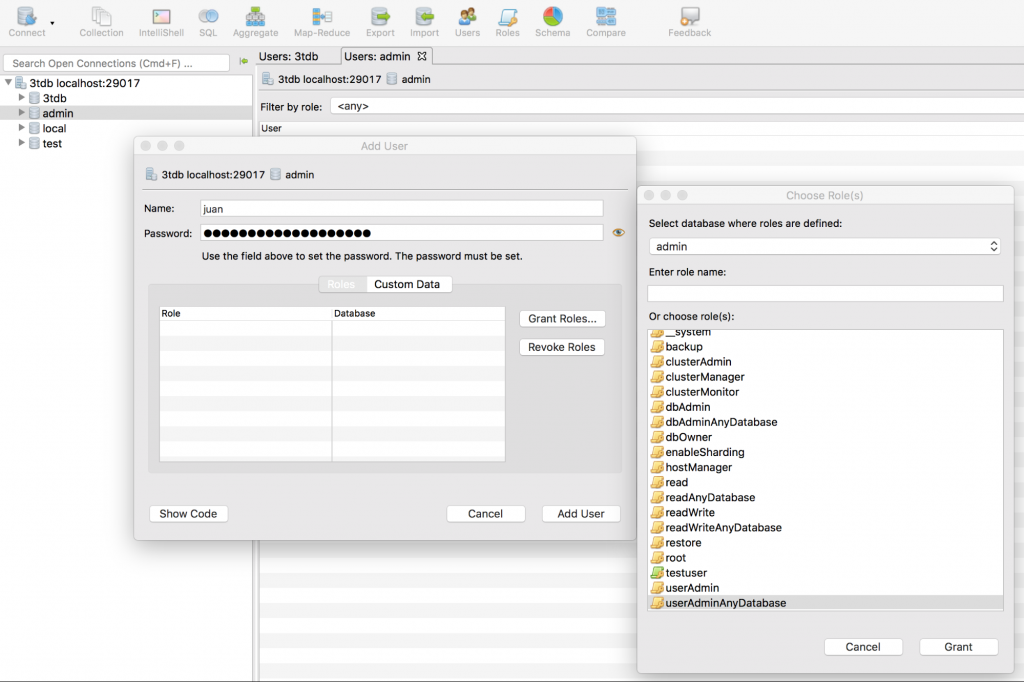
Adding this first user is easily accomplished via the point and click wizards in Studio 3T.
As we discussed earlier, the first step is to select the database where you are going to create the user, then click on the ‘Users’ button, fill in the required data, and grant the roles to it.
Login as the new user
>db.auth('juan','juanpwd')
1
>
Creating a dbAdmin user for the ‘test’ database
> use admin
switched to db admin
> db.createUser({ user : 'dbadminuser', pwd : 'dbadminuserpwd', roles : [ { role : 'dbAdmin', db : 'test' } ] })
Successfully added user: {
    "user" : "dbadminuser",
    "roles" : [
        {
            "role" : "dbAdmin",
            "db" : "test"
        }
    ]
}
>
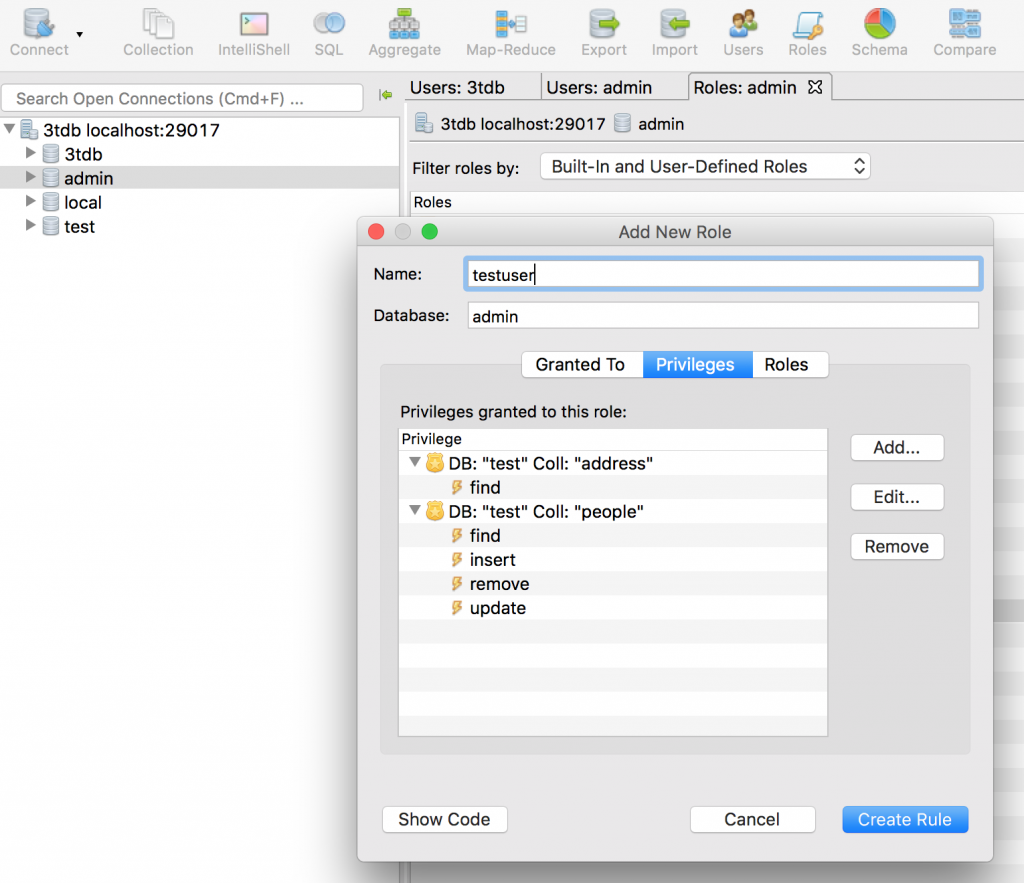
Creating a role with ‘find’, ‘insert’, ‘update’ and ‘remove’ permissions over ‘people’ collection and only ‘find’ permissions over ‘address’ collection, both of them for the test database.
> use admin
switched to db admin
> db.createRole({ role : 'testuser', privileges : [ { resource : { db : 'test', collection : 'people' }, actions : [ 'find', 'insert', 'update', 'remove' ] }, { resource : { db : 'test', collection : 'address' }, actions : [ 'find' ] } ], roles : [] })
{
    "role" : "testuser",
    "privileges" : [
        {
            "resource" : {
                "db" : "test",
                "collection" : "people"
            },
            "actions" : [
                "find",
                "insert",
                "update",
                "remove"
            ]
        },
        {
            "resource" : {
                "db" : "test",
                "collection" : "address"
            },
            "actions" : [
                "find"
            ]
        }
    ],
    "roles" : [ ]
}
>
Creating a MongoDB role in Studio 3T is really straightforward. Select the database, click on the ‘Roles’ button, fill in the data and that’s all!
Now, we have to create the user who is going to use this role:
> use admin
> db.createUser(
 { user : 'testuser',
   pwd : 'testuserpwd',
   roles : [ 'testuser' ]
 }
)
Successfully added user: { "user" : "testuser", "roles" : [ "testuser" ] }
>
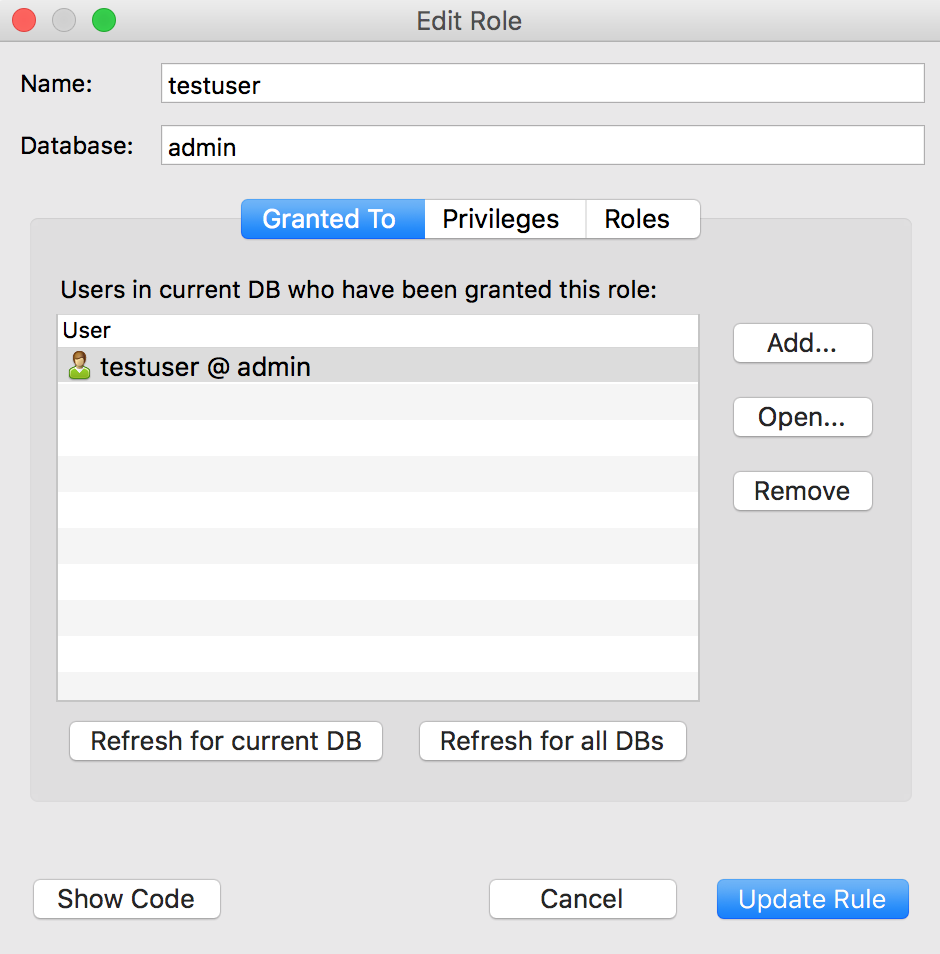
If you prefer not to do this at the command line, we can also grant a role to a user through the Studio 3T MongoDB GUI.
We would also like to be able to monitor our replica set:
> use admin
> db.createUser(
 { user : 'monitoruser',
   pwd : 'monitoruserpwd',
   roles : [ 'clusterMonitor' ]
 }
)
Successfully added user: { "user" : "monitoruser", "roles" : [ "clusterMonitor" ] }
>
Alright, so we need a user to build our replica set:
> use admin
> db.createUser(
 { user : 'clustermanageruser',
   pwd : 'clustermanageruserpwd',
   roles : [ 'clusterManager' ]
 }
)
Successfully added user: { "user" : "clustermanageruser", "roles" : [ "clusterManager" ] }
>
Our last step will be to create the replica set. So, we need to authenticate with this last user we have already created:
> use admin
> db.auth('clustermanageruser','clustermanageruserpwd')
1
>
Connecting to one of the nodes using the ‘clustermanageruser’ user
$ mongo admin -u clustermanageruser --authenticationDatabase admin -p
MongoDB shell version v3.4.16
Enter password:
connecting to: mongodb://127.0.0.1:27017/admin
MongoDB server version: 3.4.16
>
Adding the rest of the members to the replica set
studio3trs:PRIMARY> rs.add('secondary:27017')
{ "ok" : 1 }
studio3trs:PRIMARY> rs.addArb('arbiter:27017')
{ "ok" : 1 }
studio3trs:PRIMARY>
Checking the health of the replica set
studio3trs:PRIMARY> rs.status()
Checking the permissions of the ‘testuser’ user
studio3trs:PRIMARY> use admin
switched to db admin
studio3trs:PRIMARY> db.auth('testuser','testuserpwd')
1
studio3trs:PRIMARY> use test
switched to db test
studio3trs:PRIMARY> db.address.find()
studio3trs:PRIMARY> db.address.insert({ a : 1 })
WriteResult({
    "writeError" : {
        "code" : 13,
        "errmsg" : "not authorized on test to execute command { insert: \"address\", documents: [ { _id: ObjectId('5b7215bcc1c1ef9b446c2c9b'), a: 1.0 } ], ordered: true }"
    }
})
studio3trs:PRIMARY>
studio3trs:PRIMARY> db.people.insert({ a : 1 })
WriteResult({ "nInserted" : 1 })
studio3trs:PRIMARY> db.people.update({ a : 1 }, { $set : { b : 2 } })
WriteResult({ "nMatched" : 1, "nUpserted" : 0, "nModified" : 1 })
studio3trs:PRIMARY> db.people.find({ a : 1 })
{ "_id" : ObjectId("5b7215e5c1c1ef9b446c2c9c"), "a" : 1, "b" : 2 }
studio3trs:PRIMARY> db.people.remove({ a : 1 })
WriteResult({ "nRemoved" : 1 })
studio3trs:PRIMARY> db.people.find({ a : 1 })
studio3trs:PRIMARY>
Conclusions
We have learnt what MongoDB user authentication and authorization are, also the concepts of roles and users and assigning the former to the latter.
We already know how to enable access control in MongoDB, how to manage users, and roles and how to make use of the localhost exception.
We are now able to use a variety of convenient ways to connect to the database.
We have talked about the most important built-in roles and we know how to create our own custom roles and assign them to our users.
Finally, we have a step-by-step guide of how to enable access control on a fresh three data-bearing node replica set, to create our first user making use of the localhost exception and to create our needed MongoDB roles for our users.
Also, we have learnt how you can save time administering MongoDB user management and role management by using a MongoDB IDE such as Studio 3T.