In this exercise, you’ll use SQL Query to build an SQL statement that aggregates data.
After you run the statement, you’ll open the mongo shell code in the Aggregation Editor, where you’ll update a field name in two of the pipeline stages.
To aggregate the collection data
1. Return to the SQL tab for the customers collection. The tab should still be in place from the previous exercise.
2. At the command prompt in the SQL editor, replace the existing code with the following SELECT statement:
select address.state, sum(transactions) as total
from customers
where prio_support = false
group by address.state
order by sum(transactions) desc
The statement groups the documents by the state in which customers live and then provides the total number of transactions per state.
The statement limits the results to those documents with a prio_support value that equals false, indicating that they have not signed up for premium support. The results are then sorted by the number of transactions, in descending order.
3. Press F5 to run the statement. The statement returns an error message stating that SQL Query does not support column aliases.
4. The message is referring to the code following the SUM function (as total). The code is attempting to assign the name total to the outputted column.
As you saw in the previous exercise, SQL Query does not support all SQL statement elements.
5. At the command prompt in the SQL editor, replace the existing code with the following SELECT statement and then press F5 to run the statement:
select address.state, sum(transactions)
from customers
where prio_support = false
group by address.state
order by sum(transactions) desc
The statement should now return 47 rows of data.
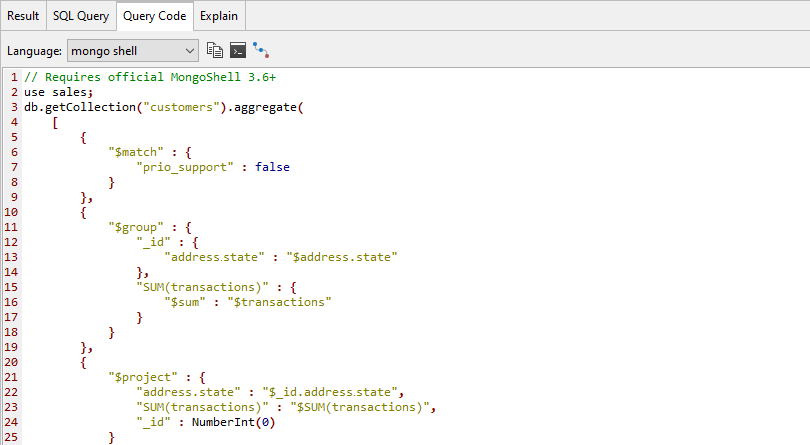
6. Go to the Query Code tab and verify that mongo shell is selected in the Language drop-down list. Your code should look like the following figure.

The code includes the aggregate method, which is called on the customers collection. The $match, $group, $project, and $sort operators are passed in as arguments to the aggregate method.
Each operator carries out a specific task in the aggregate pipeline. If you were to run this code in IntelliShell, you should get the same results as running the original SQL statement.
7. At the top of the Query Code tab, click the Open query in Aggregation Editor button (![]() ). This launches the Aggregation Editor in its own tab in the main window.
). This launches the Aggregation Editor in its own tab in the main window.
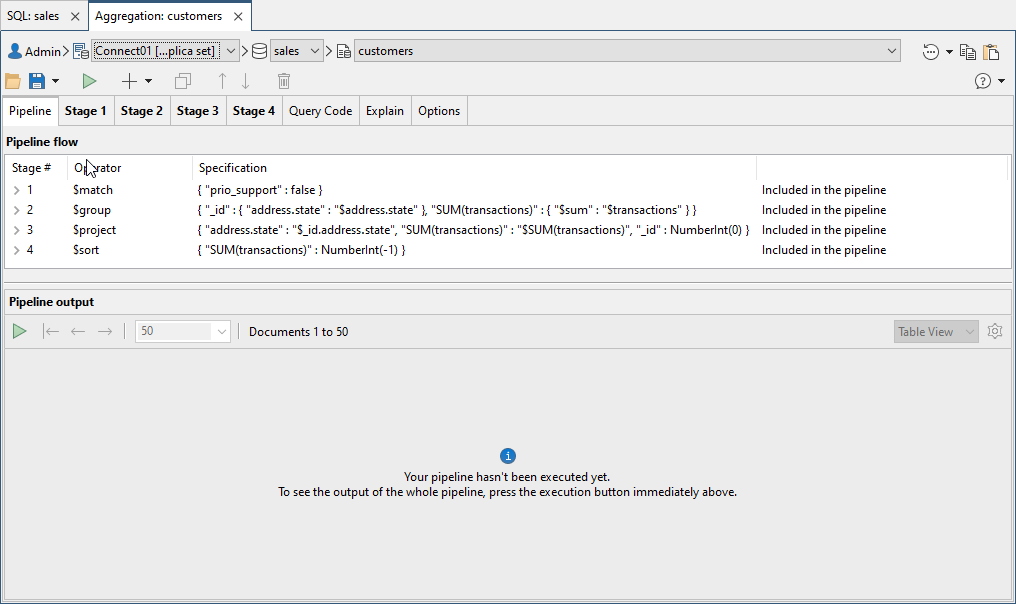
The Aggregation tab shows the aggregate query imported from the SQL tab, with the query broken down into individual stages, as shown in the following figure.

Like the SQL tab, the Aggregation tab is separated into two sections.
The top section shows the components that make up the aggregate pipeline, and the bottom section shows the results of running the entire pipeline or individual stages.
Currently, the bottom section displays only a placeholder because you have yet to run your statement.
8. Go to the Stage 3 tab and, in the third line of code, replace the first instance of the string SUM(transactions) with the word total, retaining the quotation marks. This renames the summary output column, which you could not do in your SQL statement because column aliases are not supported.
Your Stage 3 code should now look like the following snippet.
{
  "address.state" : "$_id.address᎐state",
  "total" : "$SUM(transactions)",
  "_id" : NumberInt(0)
}
9. Go to the Stage 4 tab and, in the second line of code, replace SUM(transactions) with the word total, retaining the quotation marks. This ensures that the new column name is used when sorting the data. Your Stage 4 code should now look like the following snippet.
{
  "total" : NumberInt(-1)
}
10. Go to the Pipeline tab and click the run button on the Aggregation Editor toolbar.
11. In the Pipeline output window at the bottom of the Aggregation tab, display the results in JSON View. Your aggregation tab should now look similar to the following figure.

12. Close the Aggregation tab. If prompted to save your changes, click No.
13. Close the SQL tab. If prompted to save your changes, click No.
14. Close Studio 3T.


