In this exercise, you’ll create the sales database and import the customers collection into that database, retrieving the data from the customers.json file.
You’ll then use the Collection Tab to add a single document to the MongoDB collection.
To complete the exercises in this section, you must first download the customers.zip file, unzip the file, and save the .json file to a local drive that you can access from within Studio 3T. You’ll be using the file to create the customers collection, which you’ll need throughout this course.
To insert a MongoDB document:
1. Launch Studio 3T and connect to MongoDB Atlas.
2. In the Connection Tree, right-click the connection (top-level node) and click Add Database.
3. In the Add Database dialog box, type sales in the Database Name text box, and then click OK. Studio 3T adds the sales database node to the Connection Tree.
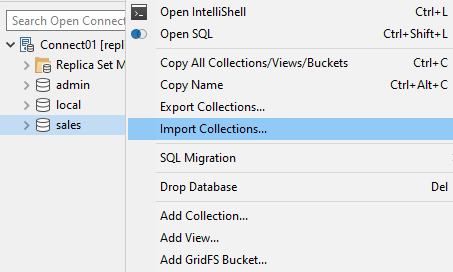
4. Right-click the sales database node and click Import Collections.

5. In the Choose Import Format dialog box, select the JSON option if not selected, and then click OK.
Studio 3T adds the JSON Import tab to the main window, as shown in the following figure.

On the JSON Import tab, you can add files that contain source data to be imported into the database. The files appear as a list in the tab’s main window, which you can then select for import.
6. Click the Add Source Files button (![]() ).
).
7. In the file manager dialog box, navigate to the folder where you saved the customers.json file.
8. Select the file and click Open. Studio 3T adds the file to the import list, as shown in the following figure.

9. Select the customers.json file from the list, and then click the Execute button on the tab’s toolbar. Studio 3T adds the customers collection to the sales database.
10. Close the JSON Import tab. If prompted to save your changes, click Discard changes.
11. In the Connection Tree, expand the sales database node and then expand the Collections node. The Connection Tree should now include the customers collection node.

12. Double-click the customers collection node to open the collection in a collection tab. The collection contains 1,000 documents, each one a customer record. The following figure shows part of the collection in Table View.

13. On the Result tab toolbar, click the Add Document button (![]() ).
).
Studio 3T launches the Insert Document dialog box, where you can add individual documents to the collection, as shown in the following figure.
When you add a document, you must include an outer set of curly braces, which is why the text box provides them by default. If you paste in a document that already includes the braces, be sure to delete the existing braces first.
14. In the Insert Document dialog box, type or paste the following document into the text box:
{
  "title" : "Ms",
  "first" : "Phyllis",
  "last" : "Grey",
  "email" : "[email protected]",
  "dob" : ISODate("1979-07-07T15:21:30.000+0000"),
  "address" : {
    "street" : {
      "name" : "Bobwhite",
      "suffix" : "Circle",
      "number" : "37"
    },
    "city" : "Orlando",
    "state" : "Florida",
    "zip_code" : "32808"
  },
  "user_name" : "pgray87",
  "package" : "Premium",
  "prio_support" : true,
  "registered_on" : ISODate("2017-09-21T00:00:00.000+0000"),
  "transactions" : NumberInt(8),
  "interests" : [
    "Technology",
    "Gaming",
    "Web Design"
  ],
  "device" : "Apple iPhone"
}
15. Click the Validate JSON button. You should receive a message saying that the document contains valid JSON. Click OK to close the message box and return to the Insert Document dialog box.
16. Click Add Document. Studio 3T adds the document to the collection.
17. At the bottom of the Result tab, click the Count Document button. The collection should now contain 1,001 documents.

18. Leave the customers collection tab open for the next exercise.


