Skip to content
Studio 3T - The professional GUI, IDE and client for MongoDB
  • Tools
    • Aggregation Editor
    • IntelliShell
    • Visual Query Builder
    • Export Wizard
    • Import Wizard
    • Query Code
    • SQL Query
    • Connect
    • Schema Explorer
    • Compare
    • SQL ⇔ MongoDB Migration
    • Data Masking
    • Task Scheduler
    • Reschema
    • More Tools and Features
  • Solutions
  • Resources
    • Knowledge Base
    • MongoDB Tutorials & Courses
    • Tool/Feature Documentation
    • Reports
    • Case Studies
    • Whitepapers
    • Blog
    • Testimonials
    • Community
  • Contact us
    • Contact
    • Sales Support
    • Feedback and Support
    • Career
    • About Us
  • Store
    • Buy Now
    • Preferred Resellers
    • Team Pricing
  • My License
  • Download
search

Studio 3T Knowledge Base

  • Documentation
  • Tutorials
  • Workshops
Take the fastest route to learning MongoDB. Cover the basics in two hours with MongoDB 101, no registration required.
Start the free course

Using Hackolade to configure Studio 3T SQL Migrations

Posted on: 24/08/2021 (last updated: 09/03/2022) by DJ Walker-Morgan

Studio 3T has an extensive range of operations it can perform to merge data in a relational schema (and usually SQL) into a document centric schema. For some users, they wish to approach this task using modeling tools such as Hackolade which can assist with the field mappings and leave a documentable pathway and records for future use. For those users, we have the Hackolade integration.

Required Versions:


  • Hackolade: At least version 5.0.5 of Hackolade is required to create Studio 3T importable models; we recommend that users install Hackolade 5.1.2 or later, for full functionality.
  • Studio 3T: The Hackolade integration is available in Studio 3T version 2021.6.0 and later.

Starting A Migration

A migration, using Hackolade, begins at the source SQL database; you should export the schema DDL you wish to migrate there as a DDL formatted backup. That file typically requires a `.sql` extension. Once you have this file, move to Hackolade.

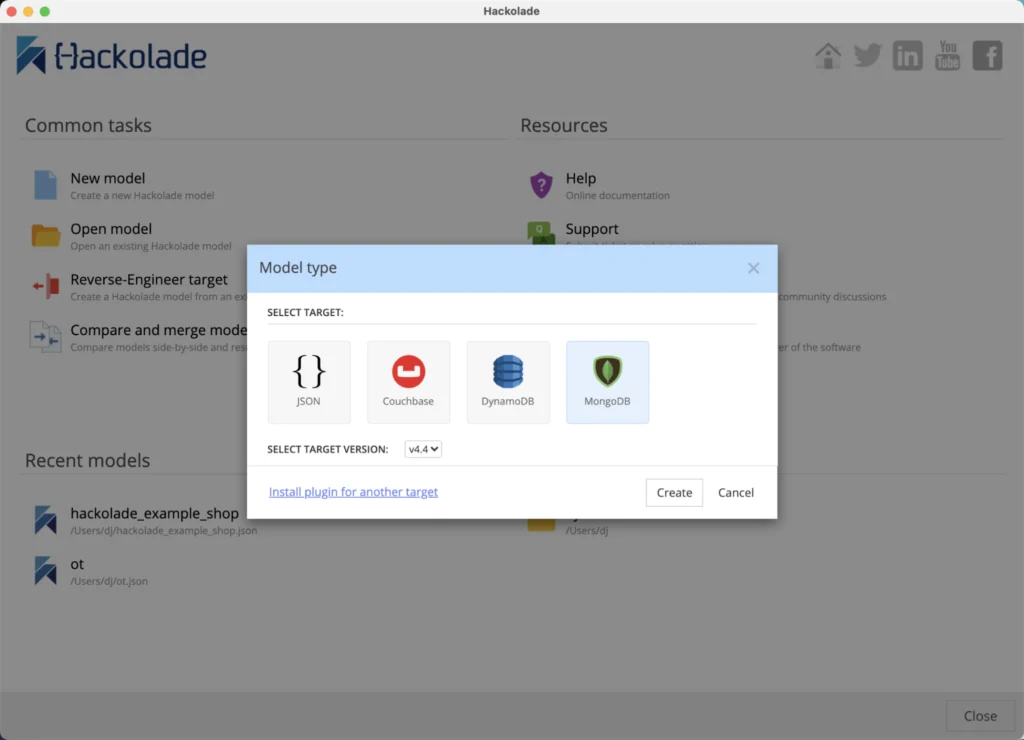
In Hackolade, create a new model using Hackolade➡New Model.

New Model Selection for Hackolade
Select the target database for the new model.

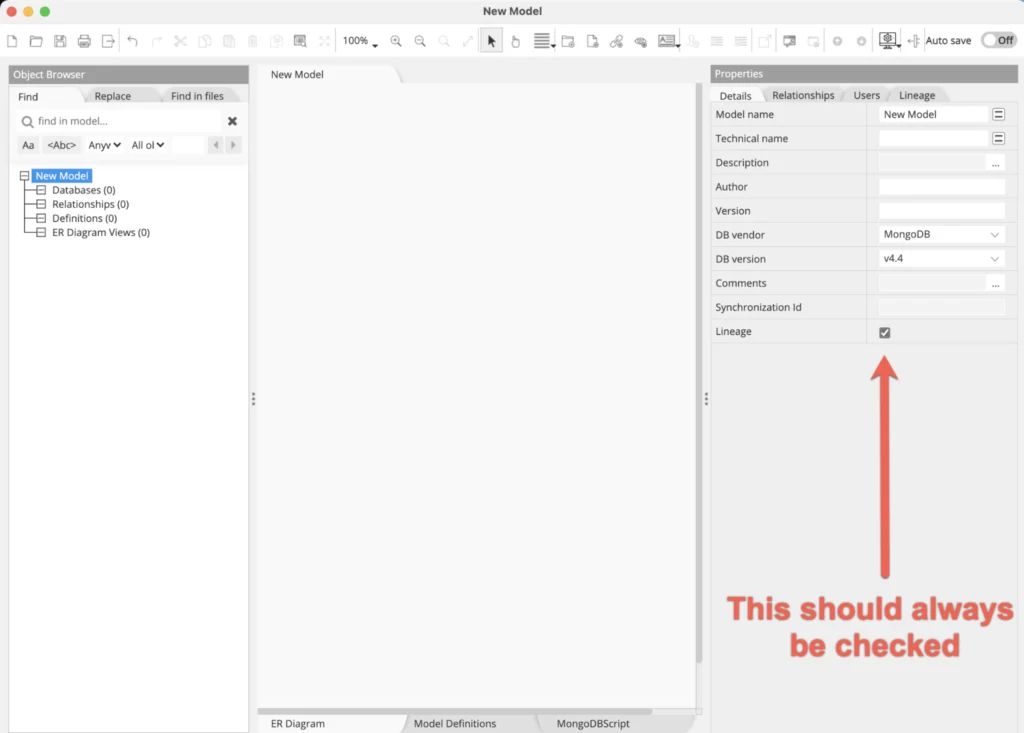
Important: Studio 3T needs the lineage data that Hackolade models optionally generate. On creating the new model, select the node at the top of the object browser tree and then, on the opposite side of the screen, under Properties and the Details tab, check the Lineage checkbox.

As Lineage Is Important. Always select the lineage checkbox
The Lineage Checkbox must be selected.

Select Tools➡Reverse Engineer➡Data Definition Language file… to begin the process of creating the model. If you have not turned on Lineage at this point, Hackolade will warn you with this dialog and an opportunity to turn Lineage on:

Lineage Warning Dialog. A reminder that lineage is important.
This dialog reminds you to turn on Lineage so Hackolade and Studio 3T can work together.

Hackolade will then import the DDL file and convert it to a Hackolade model.

A Hackolade Model in Hackolade
A Hackolade model in Hackolade, ready for refining

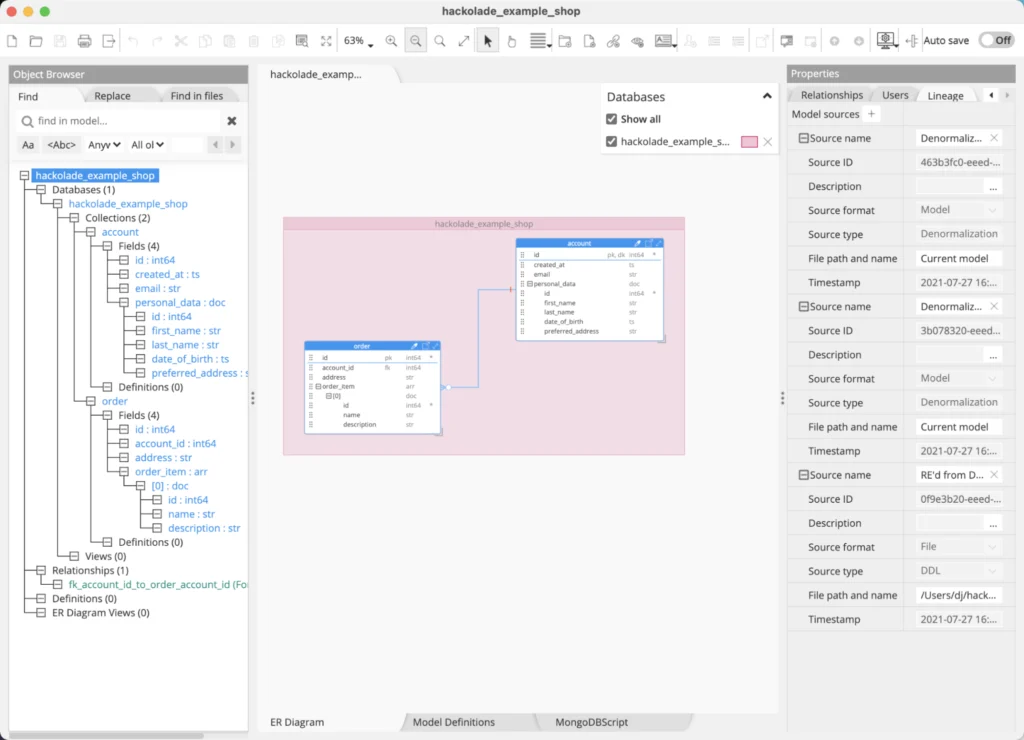
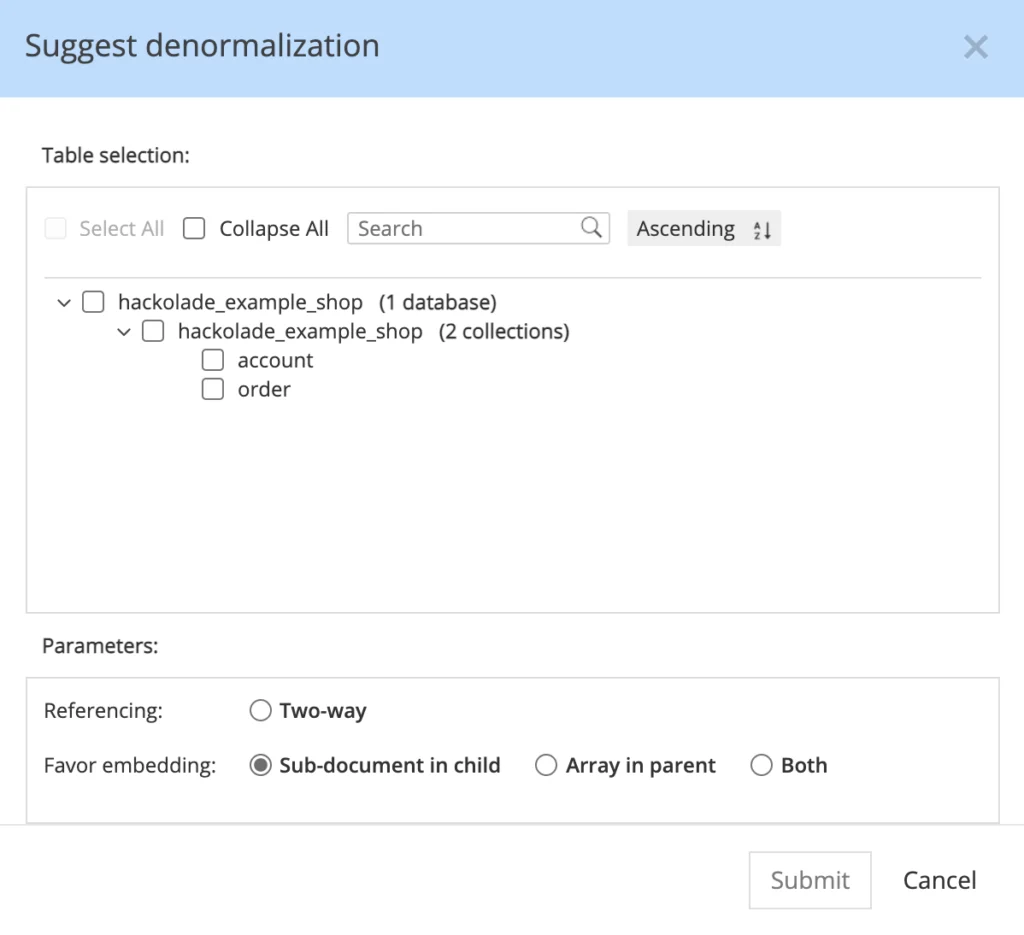
You can now continue your work with Hackolade, reorganizing and denormalizing the model. Hackolade is able to suggest denormalizations using Tools➡Suggest Denormalization. This will show which tables that can be denormalized or linked with a two way reference.

Hackolade can suggest denormalizations in this dialog
Hackolade can suggest denormalizations to your model to simplify and streamline it

Using suggested denormalization is an effective way of reducing the relational tables down to manageable documents. Hackolade provides more extensive guidance on this process and in depth examples in their SQL DDL documentation. Once your remodeling is complete, save the Hackolade model.

Running A Migration

Switch to Studio 3T and select the SQL Migration➡SQL→MongoDB Migration option from the global toolbar at the top of the screen. You may be presented with a tutorial, click on the Overview tab to dismiss it. You are now at the Migration overview tab where you can configure one or more migrations.

Starting SQL Migration, the Studio 3T view
This is a new SQL migration without any connections configured

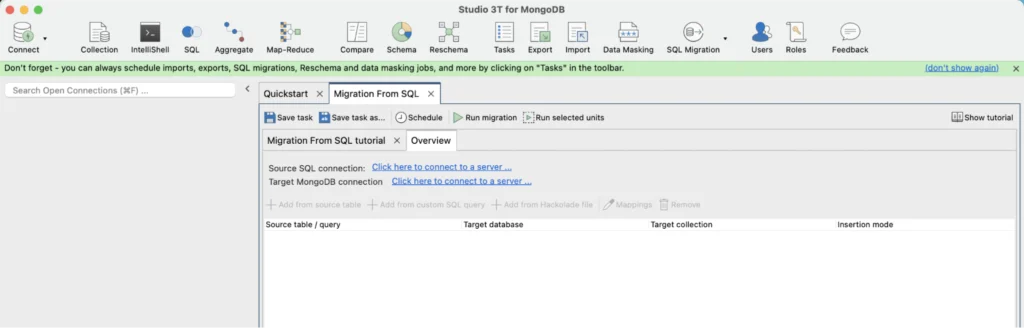
To start configuring, click on the link next to Source SQL connection: which will allow you to create a new SQL database connection or reuse an existing configuration. Connect to your source database here.

Next, select the target MongoDB database connection using the link next to the Target MongoDB connection, choosing the MongoDB database that will be the destination for the migration.

Importing A Hackolade Model

The Add Hackolade Button
The Add Hackolade Button will import a Hackolade model and use it for an SQL migration

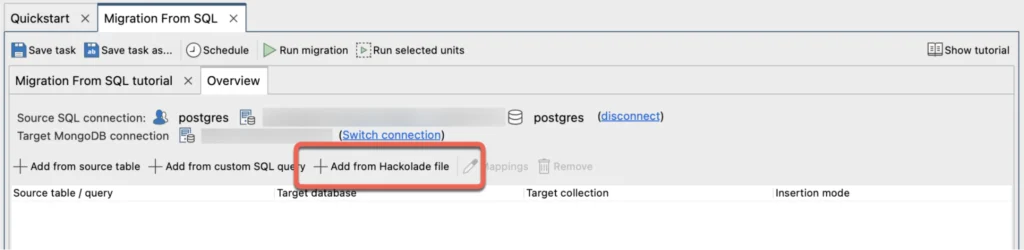
Now, click on the + Add from Hackolade button in the toolbar immediately above the migrations list and select your Hackolade model file. It will then be imported and interpreted as a set of Studio 3T SQL import sources. Once complete, the overview will display each migration source in a list. Each row of the list shows source table, target database and collection, along with the insertion mode for handling id collisions.

A Hackolade model shown previously imported into Studio 3T as sources
A Hackolade model imported into Studio 3T at the highest level (import sources)

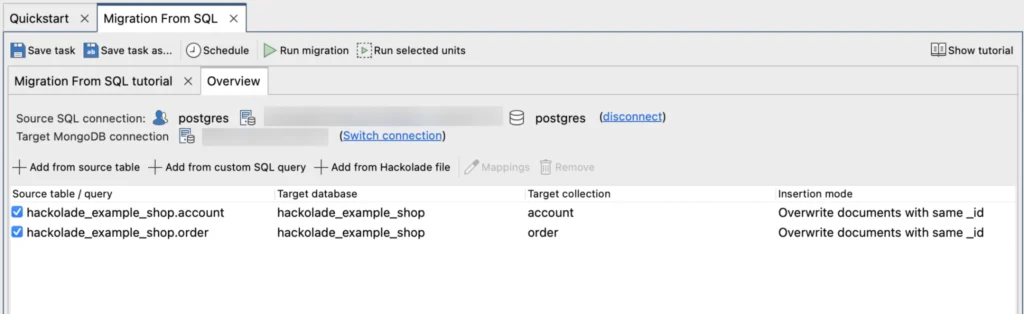
As these are now import units, you can open the mappings editor either by double clicking a unit in the list, or by selecting a unit and clicking the Mappings button.

Hackolade model translated to Studio 3T mappings
The Hackolade model, translated into Studio 3T mappings for the SQL migration

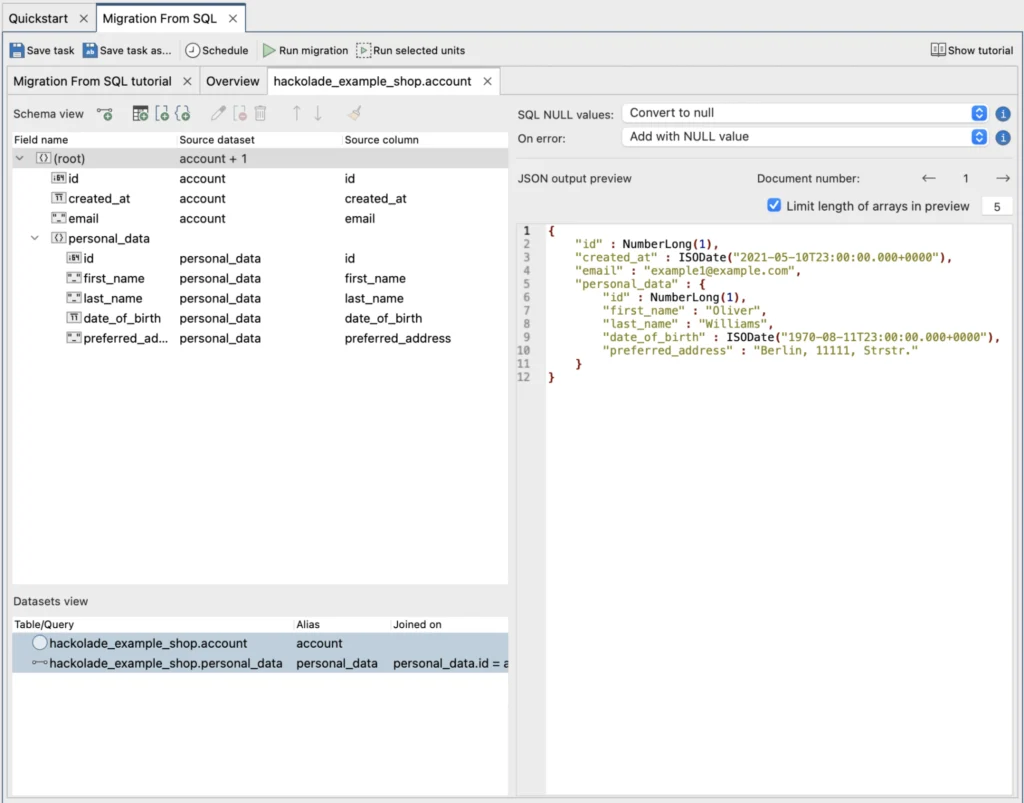
The Mappings editor shows the exact field mappings and lets the user preview the JSON which will be generated with live data. If you wish, you can also make final modifications to the migration mappings. Any changes made here are not, currently, recorded in Hackolade.

Running A Migration In Studio 3T

When you are happy with the migration, you can click Run Migration and the migration will be performed.

Run Migration Button to start the actual migration
Clicking the Run Migration button will start all the import sources configured

The Migration’s progress appears in the Operations pane.  It is also possible to save this migration as a Task, with Save Task and to use the Studio 3T Task Scheduler to run it at specific dates and times in the future.


How helpful was this article?
This article was hideous
This article was bad
This article was ok
This article was good
This article was great
Thank you for your feedback!

About The Author

DJ Walker-Morgan

Dj has been around since Commodore had Pets and Apples grew everywhere. With a background in Unix and development, he's been around the technology business writing code or writing content ever since.

Article navigation

Related articles

  • Simplifying Data Migrations From Legacy SQL To MongoDB Atlas With Studio 3T And Hackolade
  • Configure mongodump, mongorestore & mongo shell Executable Files
  • What’s New in Studio 3T 2021.7 | Incremental migrations, customizable SQL types, and more
  • What’s New in Studio 3T 2021.6 | Integrating Hackolade, code folding, and more
  • 3T Software Labs integrates with Hackolade to make Data Modernization projects easier

Studio 3T

MongoDB Enterprise Certified Technology PartnerSince 2014, 3T has been helping thousands of MongoDB developers and administrators with their everyday jobs by providing the finest MongoDB tools on the market. We guarantee the best compatibility with current and legacy releases of MongoDB, continue to deliver new features with every new software release, and provide high quality support.

Find us on FacebookFind us on TwitterFind us on YouTubeFind us on LinkedIn

Education

  • Free MongoDB Tutorials
  • Connect to MongoDB
  • Connect to MongoDB Atlas
  • Import Data to MongoDB
  • Export MongoDB Data
  • Build Aggregation Queries
  • Query MongoDB with SQL
  • Migrate from SQL to MongoDB

Resources

  • Feedback and Support
  • Sales Support
  • Knowledge Base
  • FAQ
  • Reports
  • Case Studies
  • White Papers
  • Testimonials
  • Discounts

Company

  • About Us
  • Blog
  • Careers
  • Legal
  • Press
  • Privacy Policy
  • EULA

© 2022 3T Software Labs GmbH. All rights reserved.

  • Privacy Policy
  • Cookie settings
  • Impressum
When you click "Accept", you are agreeing to cookies being on your device. They may improve site navigation, site usage analysis, or the relevance of messages. It is up to you which cookies are enabled. Read our Privacy Policy.
Manage cookies
Accept
✕

Privacy Preference Center

A cookie is a small file of letters and numbers that is downloaded on to your computer when you visit a website. Cookies are used by many websites and can do a number of things, eg remembering your preferences, recording what you have put in your shopping basket, and counting the number of people looking at a website. In the form below you can choose which cookies, except for essential cookies, to allow or disable.

Accept all cookies

Manage consent preferences

Essential cookies are strictly necessary to provide an online service such as our website or a service on our website which you have requested. The website or service will not work without them.

Performance cookies allow us to collect information such as number of visits and sources of traffic. This information is used in aggregate form to help us understand how our websites are being used, allowing us to improve both our website’s performance and your experience.

Functional cookies collect information about your preferences and choices and make using the website a lot easier and more relevant. Without these cookies, some of the site functionality may not work as intended.

Social media cookies are cookies used to share user behaviour information with a third-party social media platform. They may consequently effect how social media sites present you with information in the future.

Accept selected