Skip to content
Studio 3T - The professional GUI, IDE and client for MongoDB
  • Tools
    • Aggregation Editor
    • IntelliShell
    • Visual Query Builder
    • Export Wizard
    • Import Wizard
    • Query Code
    • SQL Query
    • Connect
    • Schema Explorer
    • Compare
    • SQL ⇔ MongoDB Migration
    • Data Masking
    • Task Scheduler
    • Reschema
    • More Tools and Features
  • Solutions
  • Resources
    • Knowledge Base
    • MongoDB Tutorials & Courses
    • Tool/Feature Documentation
    • Blog
    • Community
    • Testimonials
    • Whitepapers
    • Reports
  • Contact us
    • Contact
    • Sales Support
    • Feedback and Support
    • Careers
    • About Us
  • Store
    • Buy Now
    • Preferred Resellers
    • Team Pricing
  • Download
  • My 3T
search

Studio 3T Knowledge Base

  • Documentation
  • Tutorials
  • Workshops
Take the fastest route to learning MongoDB. Cover the basics in two hours with MongoDB 101, no registration required.
Start the free course

How to Create a MongoDB Index

Posted on: 13/07/2018 (last updated: 04/08/2021) by Thomas Zahn

In this post, we’ll take a look at how to create a MongoDB index and modify existing ones using Studio 3T’s Index Manager.

Don’t have Studio 3T on your machine yet? Download the latest version, available for Windows, Mac, and Linux.

Add a MongoDB index

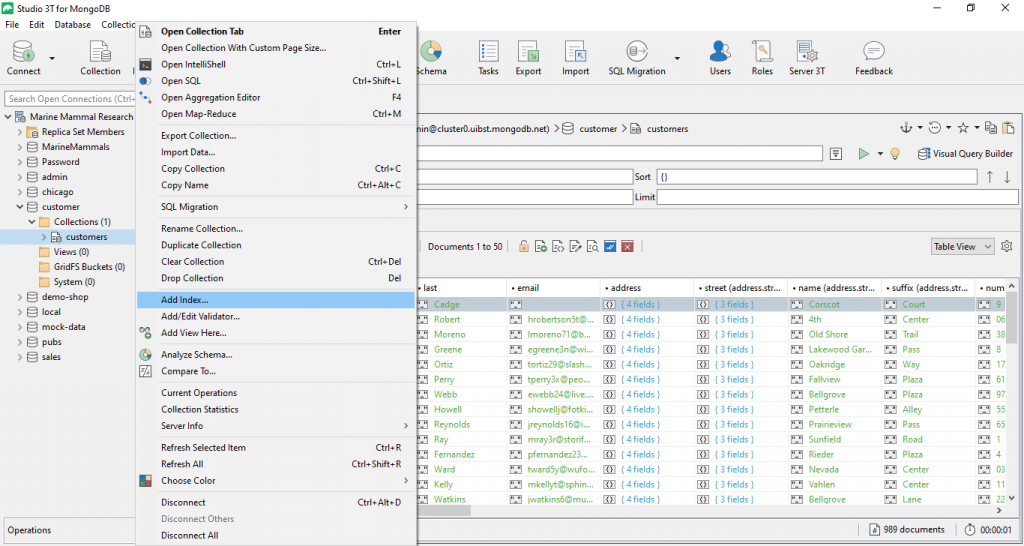
In Studio 3T, connect to your MongoDB server. You’ll then see the databases and their collections in the left-hand Collections pane. 

Simply right-click on the collection you want to create a new index for and choose “Add Index…” from the pop-up menu, as shown below.

Right-click on a collection and choose Add Index

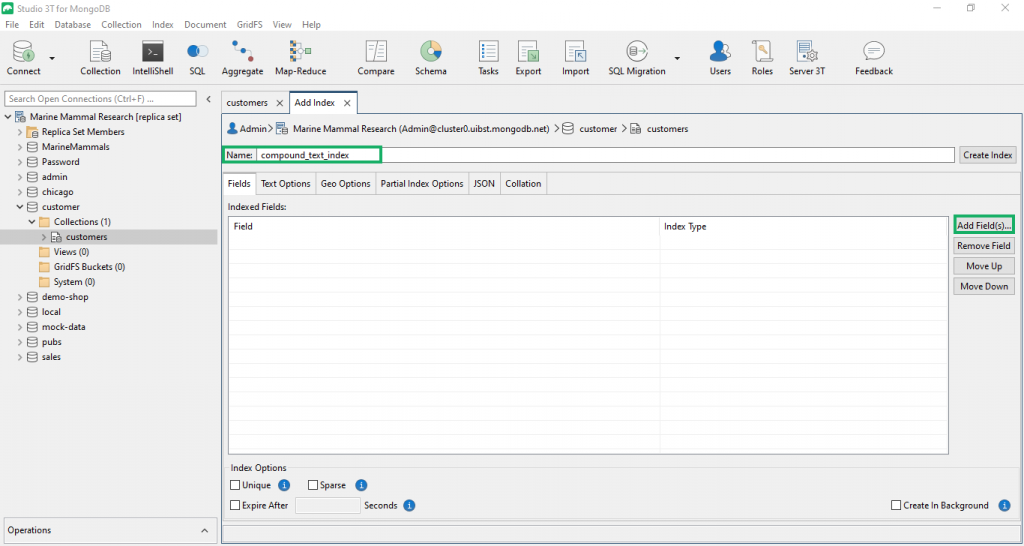
This will open the “Add Index” view.

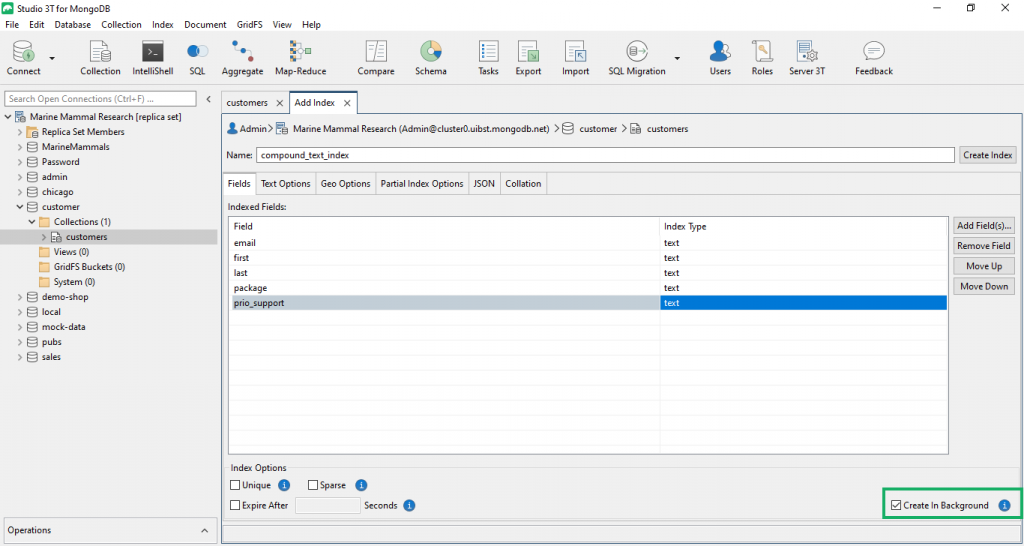
At the top, enter the name of your index (if you leave this field empty, a default index name will be generated for you out of the fields and their index types).

In the first tab, named “Fields”, you can then add the fields that you want indexed and assign to each of them the desired index type.

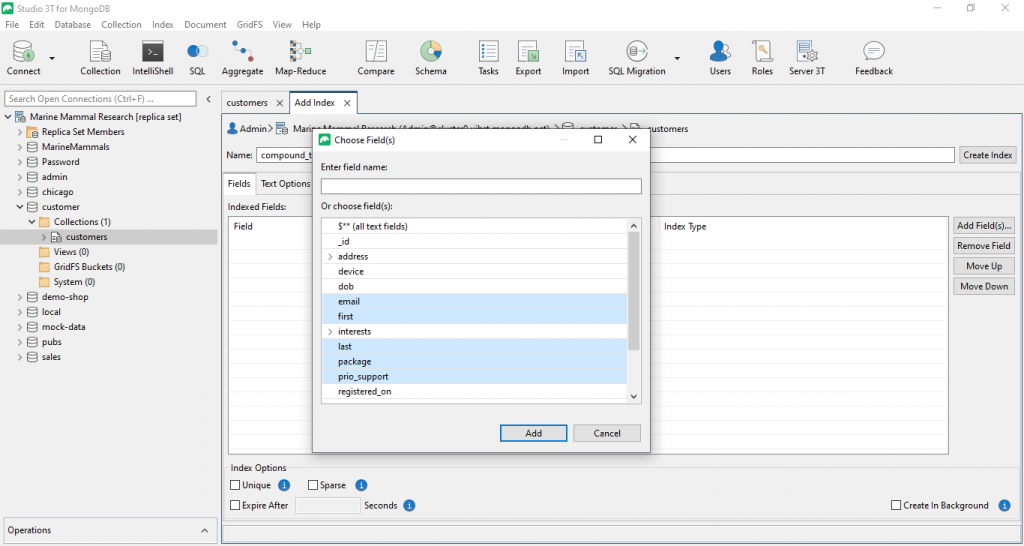
Click “Add Field(s)…” to select the index fields.

Add a name and choose the fields for your MongoDB index

Studio 3T does a quick schema scan over a small set of documents in your collection to present you with a tree of available fields in your collection.

Select the fields for your index from the tree, or, in case the schema scan didn’t cover your desired field, enter the field name directly, and click “Add”.

Choose the fields you want added to your MongoDB index

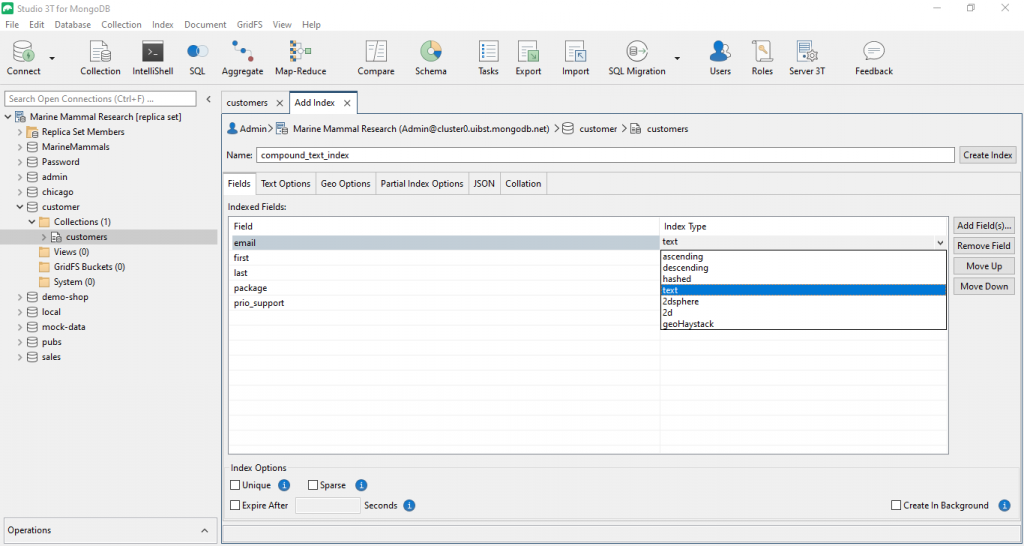
After you have added your index fields, they will appear with the default index type “ascending”.

You can easily change the index type for each field by double-clicking (or hitting ENTER) in its corresponding index type cell.

Simply choose the desired index type from the drop-down list.

In Studio 3T, you can choose the index type by clicking on the drop-down menu arrow

MongoDB index options

At the bottom of the “Fields” tab, you can select various general index options.

One of those options that you should always carefully consider is the “Create in Background” option.

By default, MongoDB will build indexes in the foreground. This will result in compact index sizes and can take significantly less time than building the index in the background.

However, the huge disadvantage of this approach is that the entire database will be locked for read and write operations while the index is building in the foreground. For any live database, this is a serious consideration.

Therefore, although background-built indexes will usually take longer to build and will initially result in less compact index sizes (they will converge over time towards the compactness of foreground-built indexes, though), we generally recommend setting the background option.

Text index options

In the “Text Options”, you can set the index options that are specific to text indexes.

For example, click the “Default Language” combo box to choose your desired default language of your text index fields.

Under Text Options, you can easily set the default language of your newly-created MongoDB index

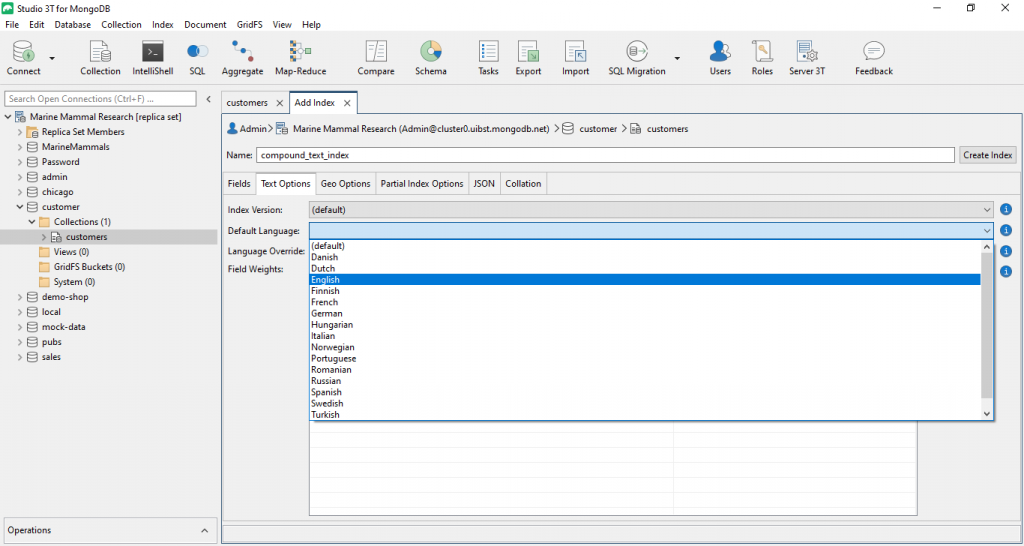
In the “Fields Weights” table, you can weigh your text index fields in relation to one another.

All text index fields will automatically be added with a default weight of “1”. To change a field’s weight, just double-click the value (or hit ENTER in the selected cell) and overwrite the weight as you see fit.

You can also manually add weight fields by clicking “Add Weight(s)…”. However, this will usually only be necessary if you have previously selected the “$**” field option to index all text fields.
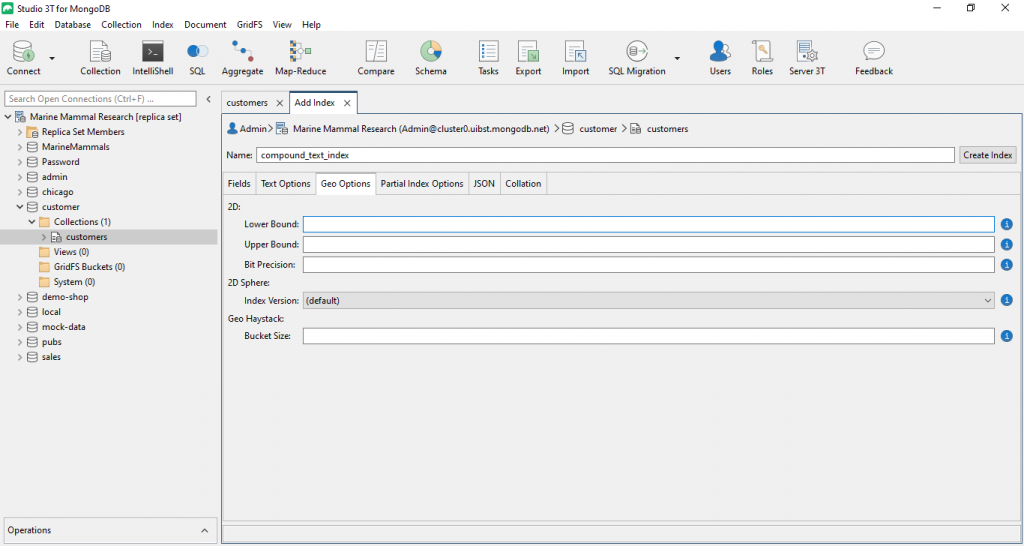
Geo index options

Analogously, in the “Geo Options” tab, you can set index options specific to the different Geo index types.

You can also set the geo options on our MongoDB GUI

Partial index options

Under “Partial Index Options” you can choose to create a partial index, so that it only indexes documents that meet your JSON filter expression.

You also get the chance to validate your JSON before creating the partial index.
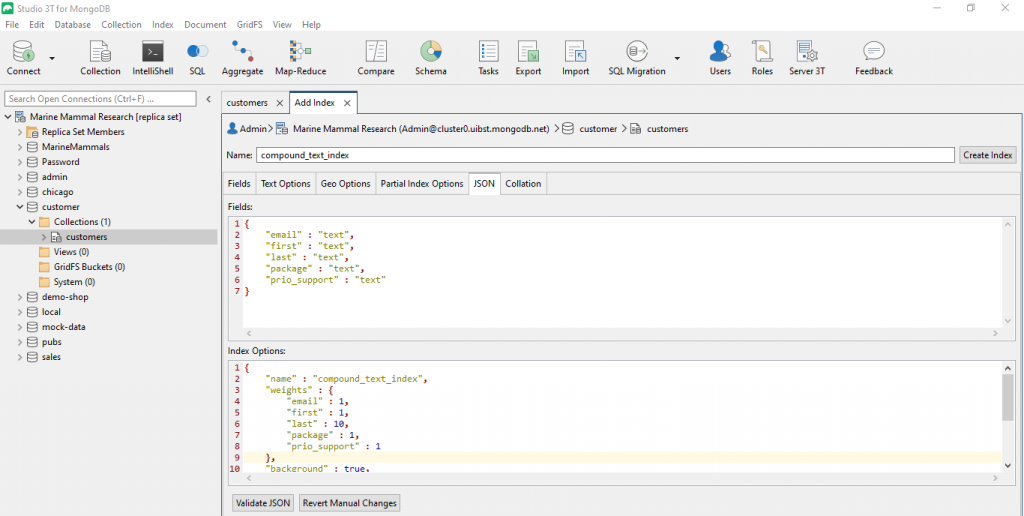
You can also set partial index options in Studio 3T, and even validate JSON before saving

Overwrite JSON code

Studio 3T also lets you – if you so desire – manually overwrite the actual JSON code that will be sent to the MongoDB server for the index creation.

Any changes you make here to the JSON code will of course be parsed and automatically set in the other tabs accordingly!

Under the JSON tab, Studio 3T also lets you overwrite the JSON code

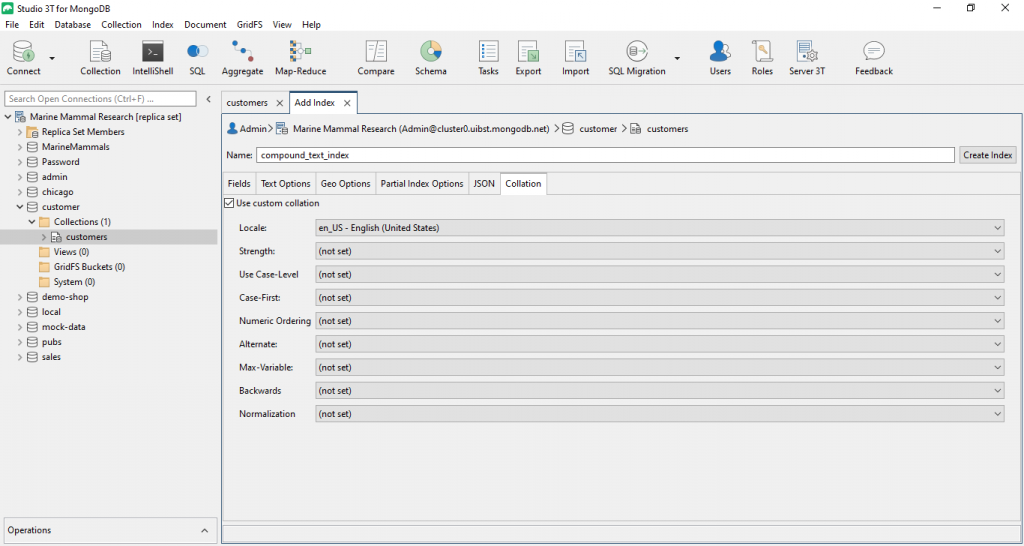
Use custom collation

Under the last tab “Collation“, you can use custom collation by choosing values for the predefined settings.

You can choose values for the predefined settings and use custom collation for your MongoDB index

What’s collation again? Read more about it here. 

Once you have configured your index, click “Create Index” and the index will be built on the server.

You may close the index view tab at any point, the index build will continue on the server.

Modify a MongoDB index

In MongoDB, it is not really possible to modify an existing index. Instead, what one essentially needs to do is drop the original index and re-create it from scratch.

Luckily, Studio 3T makes this process completely transparent for you.

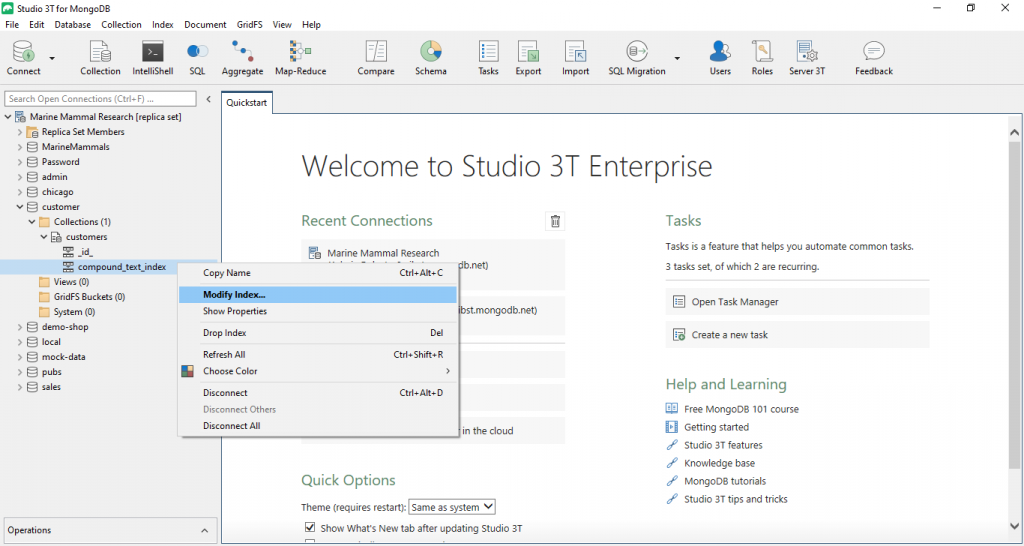
To modify an existing index, expand your collection node in your collection list to see all its indexes.

Select the index you would like to modify, right-click it and choose “Modify Index…” from the pop-up menu.

The MongoDB Studio 3T makes it very easy to modify a MongoDB index - simply right click, and done!

Studio 3T will then retrieve all information about that index and open the familiar index view with all parameters filled already filled in.

You can easily edit your MongoDB index and change the existing parameters

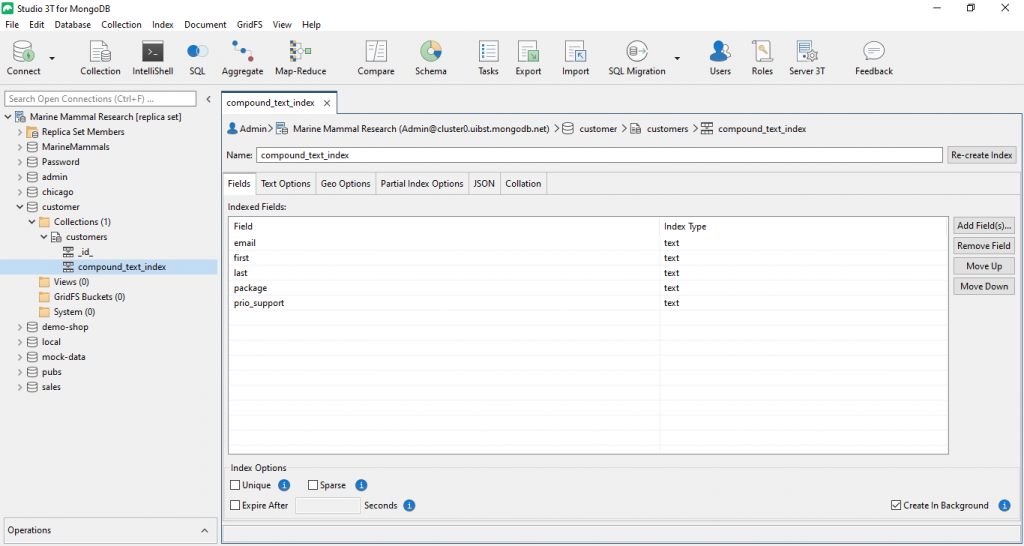
Of course, you can edit the parameters under the other tabs (e.g. Text Options, Geo Options) and also manually overwrite the JSON code again.

Once you have made your modifications, click on Re-create Index to update your MongoDB index

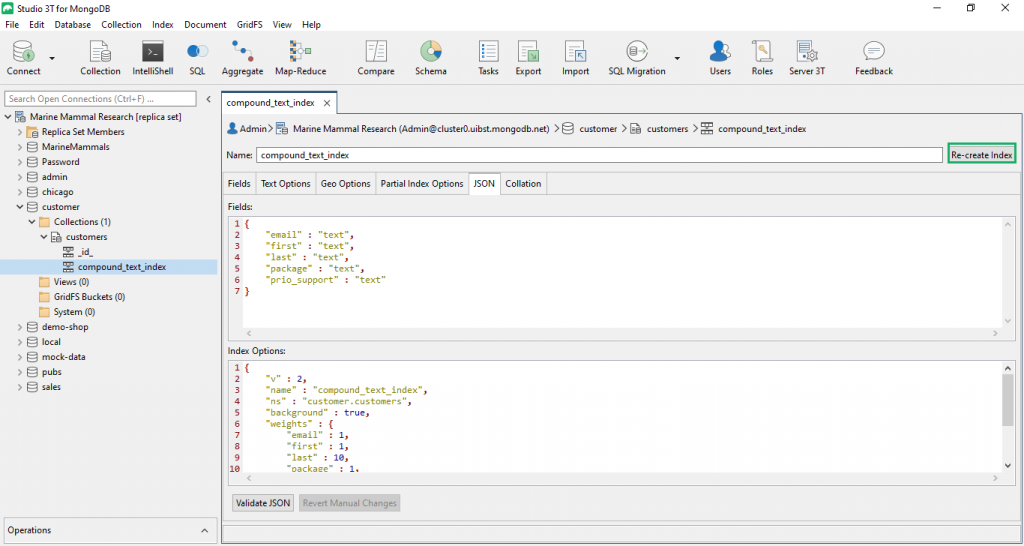
To re-create the index with the modifications you have made, simply click “Re-create Index”.

We hope that we’ve convinced you how easy it is to add and modify a MongoDB index using Studio 3T.

Download Studio 3T and be on your way to faster query performance.


Want to take indexing to another level?

  • Develop an effective MongoDB indexing strategy
  • Use indexes to spot slow, unoptimized MongoDB queries
  • Optimize query performance using the MongoDB profiler and explain() method

How helpful was this article?
This article was hideous
This article was bad
This article was ok
This article was good
This article was great
Thank you for your feedback!

About The Author

Thomas Zahn

Having grown up with a living room that was essentially the office of his mother’s software start-up in the 80s, Thomas is a dyed-in-the-wool software engineer. In the past, he has worked for large outfits such as Microsoft Research and Nokia as well as for specialised engineering shops and start-ups. He lives in Berlin with his wife and two kids, and loves tennis and hiking (though, bizarrely, he constantly seems to find no time to do much of either those two). Thomas holds a Ph.D. in Computer Science from the Freie Universität Berlin.

Article navigation

Related articles

  • What’s New in Studio 3T 2021.9 | Popup Visual Query Builder and Aggregation Index Hints
  • How to Create a MongoDB View
  • Exercise 2: Unwinding an array to create individual documents
  • Exercise 3: Adding and scheduling a task to create the target collection
  • MongoDB Tutorial: Learn MongoDB in 2 Hours

Studio 3T

MongoDB Enterprise Certified Technology PartnerSince 2014, 3T has been helping thousands of MongoDB developers and administrators with their everyday jobs by providing the finest MongoDB tools on the market. We guarantee the best compatibility with current and legacy releases of MongoDB, continue to deliver new features with every new software release, and provide high quality support.

Find us on FacebookFind us on TwitterFind us on YouTubeFind us on LinkedIn

Education

  • Free MongoDB Tutorials
  • Connect to MongoDB
  • Connect to MongoDB Atlas
  • Import Data to MongoDB
  • Export MongoDB Data
  • Build Aggregation Queries
  • Query MongoDB with SQL
  • Migrate from SQL to MongoDB

Resources

  • Feedback and Support
  • Sales Support
  • Knowledge Base
  • FAQ
  • Reports
  • White Papers
  • Testimonials
  • Discounts

Company

  • About Us
  • Blog
  • Careers
  • Legal
  • Press
  • Privacy Policy
  • EULA

© 2023 3T Software Labs Ltd. All rights reserved.

  • Privacy Policy
  • Cookie settings
  • Impressum

We value your privacy

With your consent, we and third-party providers use cookies and similar technologies on our website to analyse your use of our site for market research or advertising purposes ("analytics and marketing") and to provide you with additional functions (“functional”). This may result in the creation of pseudonymous usage profiles and the transfer of personal data to third countries, including the USA, which may have no adequate level of protection for the processing of personal data.

By clicking “Accept all”, you consent to the storage of cookies and the processing of personal data for these purposes, including any transfers to third countries. By clicking on “Decline all”, you do not give your consent and we will only store cookies that are necessary for our website. You can customize the cookies we store on your device or change your selection at any time - thus also revoking your consent with effect for the future - under “Manage Cookies”, or “Cookie Settings” at the bottom of the page. You can find further information in our Privacy Policy.
Accept all
Decline all
Manage cookies
✕

Privacy Preference Center

With your consent, we and third-party providers use cookies and similar technologies on our website to analyse your use of our site for market research or advertising purposes ("analytics and marketing") and to provide you with additional functions (“functional”). This may result in the creation of pseudonymous usage profiles and the transfer of personal data to third countries, including the USA, which may have no adequate level of protection for the processing of personal data. Please choose for which purposes you wish to give us your consent and store your preferences by clicking on “Accept selected”. You can find further information in our Privacy Policy.

Accept all cookies

Manage consent preferences

Essential cookies are strictly necessary to provide an online service such as our website or a service on our website which you have requested. The website or service will not work without them.

Performance cookies allow us to collect information such as number of visits and sources of traffic. This information is used in aggregate form to help us understand how our websites are being used, allowing us to improve both our website’s performance and your experience.

Google Analytics

Google Ads

Bing Ads

Facebook

LinkedIn

Quora

Hotjar

Functional cookies collect information about your preferences and choices and make using the website a lot easier and more relevant. Without these cookies, some of the site functionality may not work as intended.

HubSpot

Social media cookies are cookies used to share user behaviour information with a third-party social media platform. They may consequently effect how social media sites present you with information in the future.

Accept selected