In the first section of this course, you were introduced to the mongo shell aggregate method, which enables you to aggregate document data within a specific collection. The section’s exercises demonstrated how to build a basic aggregate statement in IntelliShell, using data from the customers collection in the sales database. In that statement, you filtered the documents by age, grouped the filtered documents by state, found the total number of transactions per state, and sorted the results in descending order based on the number of transactions. After you finished creating the aggregate statement, you saved it to a file named states_transactions.js.
In this section, you’ll import the file into the Aggregation Editor, or more precisely, import the aggregate statement within the file. You’ll then use the editor to modify the statement, adding two new stages and updating an existing one. In this way, you’ll be able to see how the statement in the Aggregation Editor compares with the one you created in IntelliShell and how easy it is to modify an aggregate statement in the Aggregation Editor. This section will also help you better understand how you can take different approaches to building an aggregate statement in Studio 3T, as well as how you can use multiple tools to build and modify a single statement.
By the end of this section, you will learn how to
- Import an aggregate statement into the Aggregation Editor
- Replace a field in the aggregation pipeline
- Reorder the fields in the aggregation pipeline
- Change the sort order in the aggregation pipeline
What you will need
- Access to a MongoDB Atlas cluster
- Access to the states_transactions.js file you created in the first section
Working with the Aggregation Editor
The Aggregation Editor is an intuitive graphical user interface (GUI) that simplifies the process of building and modifying aggregate statements and their pipelines. The editor breaks the stages of the aggregation pipeline into discrete steps that each have their own tab for working with that stage. On this tab, you can easily edit the expression associated with the stage’s operator, without affecting the rest of the pipeline.
A stage’s tab also lets you view the input and output data for that stage. In this way, you can see the results of your changes as soon as you make them and compare those results to the data before the changes were made. You can even assign a different operator to a stage and then modify its expression. In addition, the Aggregation Editor lets you move stages up or down, add stages at any point in the pipeline, temporarily exclude stages, or delete stages from the pipeline.
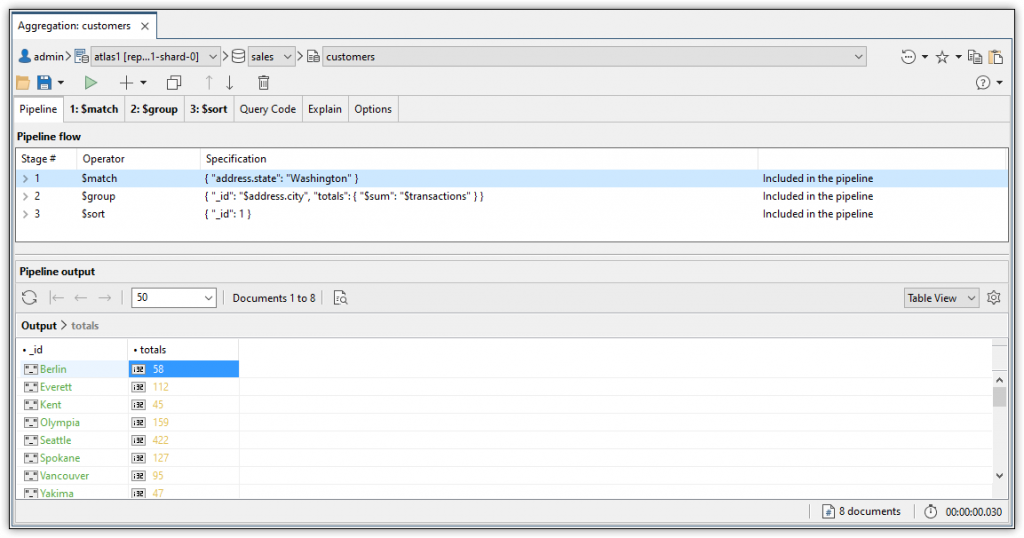
To get a sense of how an aggregate statement appears in the Aggregation Editor, we’ll start with a simple example. The following statement includes three aggregate operators, one for each stage in the aggregation pipeline:

You can think of the Pipeline tab as your best starting point for working with an aggregate statement. The tab lists all the stages in the statement’s aggregation pipeline, in the order those stages are executed. Each stage listing includes the operator and its associated expression.
On the Pipeline tab, you can move a stage up or down by selecting the stage and clicking the up or down arrow on the Aggregation Editor toolbar. In addition, you can add, delete, duplicate, exclude, or include a stage. You can also run the aggregate statement at any point and view the results in the tab’s lower pane. The interface makes each operation intuitive and easy to carry out.
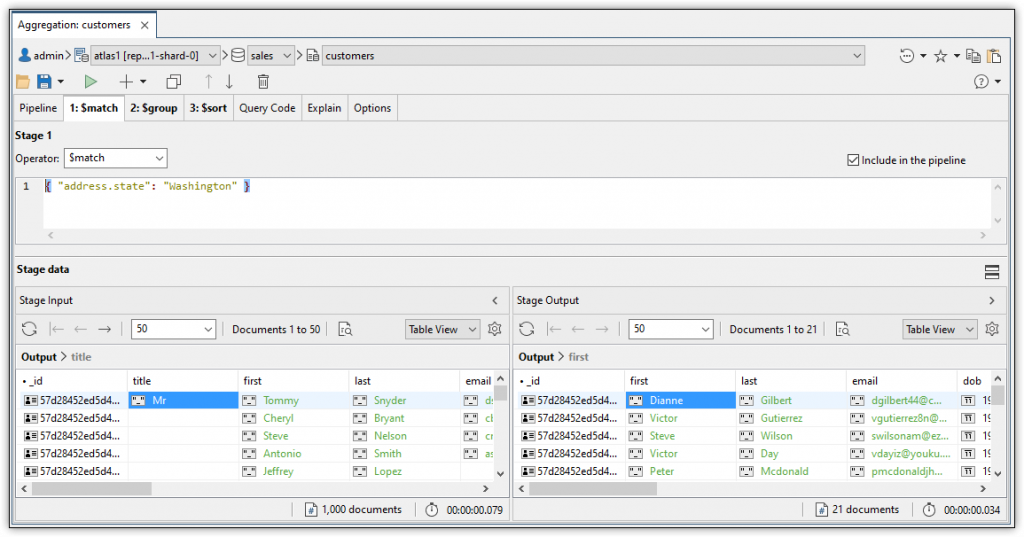
The Aggregation Editor automatically adds a tab for each stage in the pipeline. The tab’s name is based on the stage’s position within the pipeline and its associated operator. For example, the first stage uses the $match operator, so the tab is named 1: $match, as shown in the following figure.

A stage’s tab shows the name of the operator and the expression associated with that operator. You can edit the expression or switch to another operator. When working on a stage, you need only focus on the operator’s expression. The Aggregation Editor handles all other statement elements, building the statement in the background as you build your stages.
For each stage, you can also retrieve the stage’s input data and output data. When you retrieve a stage’s input data, the Aggregation Editor runs the pipeline up to but not including the current stage. When you retrieve a stage’s output data, the Aggregation Editor runs the pipeline up to and including the current stage. In this way, you can compare the before-and-after data so you can see how this stage affects your results.
For example, the figure above indicates that the input data includes 1,000 documents but the output data includes only 21 documents. The stage filters out all documents except those with an address.state value that equals Washington. In other words, the collection contains only 21 documents with an address.state value that equals Washington, so only those results are included in the stage’s output. That output is then used as input for the next stage in the pipeline (unless the current stage is the last stage).
In addition to the stage tabs, the Aggregation Editor also includes tabs for setting statement options and viewing the query code and pipeline execution plan. However, you’ll be doing most of your work on the Pipeline tab and the individual stage tabs as you refine your aggregate statements and view their results.

