When you start working with MongoDB, you will typically use the find() command for a wide range of queries. However, as soon as your queries get more advanced, you will need to know more about MongoDB aggregation.
In this article, I will explain the main principles of building aggregate queries in MongoDB and how to take advantage of indexes for speeding them up.
Furthermore, I will introduce the most important stages of the aggregation pipeline with short examples using each one, and how to apply them to the pipeline.
What is Aggregation in MongoDB?
Aggregation is a way of processing a large number of documents in a collection by means of passing them through different stages. The stages make up what is known as a pipeline. The stages in a pipeline can filter, sort, group, reshape and modify documents that pass through the pipeline.
One of the most common use cases of Aggregation is to calculate aggregate values for groups of documents. This is similar to the basic aggregation available in SQL with the GROUP BY clause and COUNT, SUM and AVG functions. MongoDB Aggregation goes further though and can also perform relational-like joins, reshape documents, create new and update existing collections, and so on.
While there are other methods of obtaining aggregate data in MongoDB, the aggregation framework is the recommended approach for most work.
There are what are called single purpose methods like estimatedDocumentCount(), count(), and distinct() which are appended to a find() query making them quick to use but limited in scope.
The map-reduce framework on MongoDB is a predecessor of the aggregation framework and much more complex to use.
How does the MongoDB aggregation pipeline work?
Here is a diagram to illustrate a typical MongoDB aggregation pipeline.
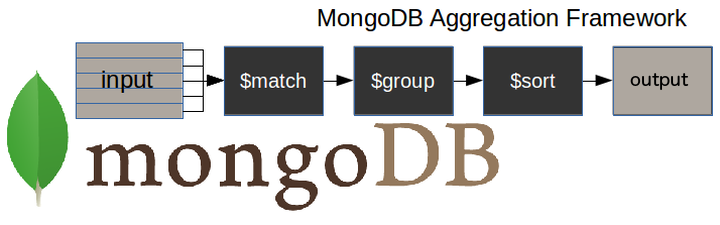
$matchstage – filters those documents we need to work with, those that fit our needs$groupstage – does the aggregation job$sortstage – sorts the resulting documents the way we require (ascending or descending)
The input of the pipeline can be a single collection, where others can be merged later down the pipeline.
The pipeline then performs successive transformations on the data until our goal is achieved.
This way, we can break down a complex query into easier stages, in each of which we complete a different operation on the data. So, by the end of the query pipeline, we will have achieved all that we wanted.
This approach allows us to check whether our query is functioning properly at every stage by examining both its input and the output. The output of each stage will be the input of the next.
There is no limit to the number of stages used in the query, or how we combine them.
To achieve optimum query performance there are a number of best practices to take into account. We will come to those later in the article.
MongoDB aggregate pipeline syntax
This is an example of how to build an aggregation query:
db.collectionName.aggregate(pipeline, options),
- where collectionName – is the name of a collection,
- pipeline – is an array that contains the aggregation stages,
- options – optional parameters for the aggregation
This is an example of the aggregation pipeline syntax:
pipeline = [
        { $match : { … } },
        { $group : { … } },
        { $sort : { … } }
       ]
MongoDB aggregation stage limits
Aggregation works in memory. Each stage can use up to 100 MB of RAM. You will get an error from the database if you exceed this limit.
If it becomes an unavoidable problem you can opt to page to disk, with the only disadvantage that you will wait a little longer because it is slower to work on the disk rather than in memory. To choose the page to disk method, you just need to set the option allowDiskUse to true like this:
db.collectionName.aggregate(pipeline, { allowDiskUse : true })
Note that this option is not always available for shared services. For example Atlas M0, M2 and M5 clusters disable this option.
The documents returned by the aggregation query, either as a cursor or stored via $out in another collection, are limited to 16MB. That is, they can’t be bigger than the maximum size of a MongoDB document.
If you are likely to exceed this limit, then you should specify that the output of the aggregation query will be as a cursor and not as a document.
Our data used for MongoDB aggregate examples
I will be showing MongoDB aggregate examples for the most important pipeline stages.
To illustrate the examples, I am going to use two collections. The first is called 'universities' and is made up of these documents (the data is not real):
{
  country : 'Spain',
  city : 'Salamanca',
  name : 'USAL',
  location : {
    type : 'Point',
    coordinates : [ -5.6722512,17, 40.9607792 ]
  },
  students : [
    { year : 2014, number : 24774 },
    { year : 2015, number : 23166 },
    { year : 2016, number : 21913 },
    { year : 2017, number : 21715 }
  ]
}
{
  country : 'Spain',
  city : 'Salamanca',
  name : 'UPSA',
  location : {
    type : 'Point',
    coordinates : [ -5.6691191,17, 40.9631732 ]
  },
  students : [
    { year : 2014, number : 4788 },
    { year : 2015, number : 4821 },
    { year : 2016, number : 6550 },
    { year : 2017, number : 6125 }
  ]
}
If you would like to test these examples on your own installation, you can insert them with the bulk command below.
use 3tdb
db.universities.insertMany([
{
  country : 'Spain',
  city : 'Salamanca',
  name : 'USAL',
  location : {
    type : 'Point',
    coordinates : [ -5.6722512,17, 40.9607792 ]
  },
  students : [
    { year : 2014, number : 24774 },
    { year : 2015, number : 23166 },
    { year : 2016, number : 21913 },
    { year : 2017, number : 21715 }
  ]
},
{
  country : 'Spain',
  city : 'Salamanca',
  name : 'UPSA',
  location : {
    type : 'Point',
    coordinates : [ -5.6691191,17, 40.9631732 ]
  },
  students : [
    { year : 2014, number : 4788 },
    { year : 2015, number : 4821 },
    { year : 2016, number : 6550 },
    { year : 2017, number : 6125 }
  ]
}
])
The second and last collection is called 'courses' and looks like this:
{
  university : 'USAL',
  name : 'Computer Science',
  level : 'Excellent'
}
{
  university : 'USAL',
  name : 'Electronics',
  level : 'Intermediate'
}
{
  university : 'USAL',
  name : 'Communication',
  level : 'Excellent'
}
Again, you can insert them in the same way, using the following code:
db.courses.insertMany([
{
  university : 'USAL',
  name : 'Computer Science',
  level : 'Excellent'
},
{
  university : 'USAL',
  name : 'Electronics',
  level : 'Intermediate'
},
{
  university : 'USAL',
  name : 'Communication',
  level : 'Excellent'
}
])
MongoDB aggregate examples
MongoDB $match
The $match stage allows us to choose just those documents from a collection that we want to work with. It does this by filtering out those that do not follow our requirements.
In the following example, we only want to work with those documents which specify that Spain is the value of the field country, and Salamanca is the value of the field city.
In order to get a readable output, I am going to add .pretty() at the end of all the commands.
db.universities.aggregate([
  { $match : { country : 'Spain', city : 'Salamanca' } }
]).pretty()
The output is…
{
"_id" : ObjectId("5b7d9d9efbc9884f689cdba9"),
"country" : "Spain","city" : "Salamanca",
"name" : "USAL",
"location" : {
      "type" : "Point",
      "coordinates" : [
            -5.6722512,
             17,
             40.9607792
       ]
},
"students" : [
		{
			"year" : 2014,
			"number" : 24774
		},
		{
			"year" : 2015,
			"number" : 23166
		},
		{
			"year" : 2016,
			"number" : 21913
		},
		{
			"year" : 2017,
			"number" : 21715
		}
	]
}
{
	"_id" : ObjectId("5b7d9d9efbc9884f689cdbaa"),
	"country" : "Spain",
	"city" : "Salamanca",
	"name" : "UPSA",
	"location" : {
		"type" : "Point",
		"coordinates" : [
			-5.6691191,
			17,
			40.9631732
		]
	},
	"students" : [
		{
			"year" : 2014,
			"number" : 4788
		},
		{
			"year" : 2015,
			"number" : 4821
		},
		{
			"year" : 2016,
			"number" : 6550
		},
		{
			"year" : 2017,
			"number" : 6125
		}
	]
}
MongoDB $project
It is rare that you ever need to retrieve all the fields in your documents. It is good practice to return only those fields you need so as to avoid processing more data than is necessary.
The $project stage is used to do this and to add any calculated fields that you need.
In this example, we only need the fields country, city, and name.
In the code that follows, please note that:
- We must explicitly write
_id : 0when this field is not required - Apart from the
_idfield, it is sufficient to specify only those fields we need to obtain as a result of the query
This stage …
db.universities.aggregate([
  { $project : { _id : 0, country : 1, city : 1, name : 1 } }
]).pretty()
..will give the result …
{ "country" : "Spain", "city" : "Salamanca", "name" : "USAL" }
{ "country" : "Spain", "city" : "Salamanca", "name" : "UPSA" }
MongoDB $group
With the $group stage, we can perform all the aggregation or summary queries that we need, such as finding counts, totals, averages or maximums.
In this example, we want to know the number of documents per university in our ‘universities’ collection:
The query …
db.universities.aggregate([
  { $group : { _id : '$name', totaldocs : { $sum : 1 } } }
]).pretty()
..will produce this result …
{ "_id" : "UPSA", "totaldocs" : 1 }
{ "_id" : "USAL", "totaldocs" : 1 }
MongoDB $group aggregation operators
The $group stage supports certain expressions (operators) allowing users to perform arithmetic, array, boolean and other operations as part of the aggregation pipeline.
| Operator | Meaning |
| $count | Calculates the quantity of documents in the given group. |
| $max | Displays the maximum value of a document’s field in the collection. |
| $min | Displays the minimum value of a document’s field in the collection. |
| $avg | Displays the average value of a document’s field in the collection. |
| $sum | Sums up the specified values of all documents in the collection. |
| $push | Adds extra values into the array of the resulting document. |
Check out MongoDB operators and learn more about other operators.
MongoDB $out
This is an unusual type of stage because it allows you to carry the results of your aggregation over into a new collection, or into an existing one after dropping it, or even adding them to the existing documents.
The $out stage must be the last stage in the pipeline.
For the first time, we are using an aggregation with more than one stage. We now have two, a $group and an $out:
db.universities.aggregate([
  { $group : { _id : '$name', totaldocs : { $sum : 1 } } },
  { $out : 'aggResults' }
])
Now, we check the content of the new ‘aggResults’ collection:
db.aggResults.find().pretty()

{ "_id" : "UPSA", "totaldocs" : 1 }
{ "_id" : "USAL", "totaldocs" : 1 }
Now we’ve produced a multi-stage aggregation, we can go on to build up a pipeline.
MongoDB $unwind
The $unwind stage in MongoDB is commonly found in a pipeline because it is a means to an end.
You cannot work directly on the elements of an array within a document with stages such as $group. The $unwind stage enables us to work with the values of the fields within an array.
Where there is an array field within the input documents, you will sometimes need to output the document several times, once for every element of that array.
Each copy of the document has the array field replaced with the successive element.
In the next example, I am going to apply the stage only to the document whose field name contains the value USAL.
This is the document:
{
  country : 'Spain',
  city : 'Salamanca',
  name : 'USAL',
  location : {
    type : 'Point',
    coordinates : [ -5.6722512,17, 40.9607792 ]
  },
  students : [
    { year : 2014, number : 24774 },
    { year : 2015, number : 23166 },
    { year : 2016, number : 21913 },
    { year : 2017, number : 21715 }
  ]
}
Now, we apply the $unwind stage, over the student’s array, and check that we get a document for each element of the array.
The first document is made up of the fields in the first element of the array and the rest of the common fields.
The second document is made up of the fields in the second element of the array and the rest of the common fields, and so on.
db.universities.aggregate([
  { $match : { name : 'USAL' } },
  { $unwind : '$students' }
]).pretty()
{
	"_id" : ObjectId("5b7d9d9efbc9884f689cdba9"),
	"country" : "Spain",
	"city" : "Salamanca",
	"name" : "USAL",
	"location" : {
		"type" : "Point",
		"coordinates" : [
			-5.6722512,
			17,
			40.9607792
		]
	},
	"students" : {
		"year" : 2014,
		"number" : 24774
	}
}
{
	"_id" : ObjectId("5b7d9d9efbc9884f689cdba9"),
	"country" : "Spain",
	"city" : "Salamanca",
	"name" : "USAL",
	"location" : {
		"type" : "Point",
		"coordinates" : [
			-5.6722512,
			17,
			40.9607792
		]
	},
	"students" : {
		"year" : 2015,
		"number" : 23166
	}
}
{
	"_id" : ObjectId("5b7d9d9efbc9884f689cdba9"),
	"country" : "Spain",
	"city" : "Salamanca",
	"name" : "USAL",
	"location" : {
		"type" : "Point",
		"coordinates" : [
			-5.6722512,
			17,
			40.9607792
		]
	},
	"students" : {
		"year" : 2016,
		"number" : 21913
	}
}
{
	"_id" : ObjectId("5b7d9d9efbc9884f689cdba9"),
	"country" : "Spain",
	"city" : "Salamanca",
	"name" : "USAL",
	"location" : {
		"type" : "Point",
		"coordinates" : [
			-5.6722512,
			17,
			40.9607792
		]
	},
	"students" : {
		"year" : 2017,
		"number" : 21715
	}
}
MongoDB $sort
You need the $sort stage to sort your results by the value of a specific field.
For example, let’s sort the documents obtained as a result of the $unwind stage by the number of students in descending order.
In order to get a lesser output, I am going to project only the year and the number of students.
db.universities.aggregate([
  { $match : { name : 'USAL' } },
  { $unwind : '$students' },
  { $project : { _id : 0, 'students.year' : 1, 'students.number' : 1 } },
  { $sort : { 'students.number' : -1 } }
]).pretty()
This gives the result …
{ "students" : { "year" : 2014, "number" : 24774 } }
{ "students" : { "year" : 2015, "number" : 23166 } }
{ "students" : { "year" : 2016, "number" : 21913 } }
{ "students" : { "year" : 2017, "number" : 21715 } }
MongoDB $limit
What if you are only interested in the first two results of your query? It is as simple as:
db.universities.aggregate([
  { $match : { name : 'USAL' } },
  { $unwind : '$students' },
  { $project : { _id : 0, 'students.year' : 1, 'students.number' : 1 } },
  { $sort : { 'students.number' : -1 } },
  { $limit : 2 }
]).pretty()

{ "students" : { "year" : 2014, "number" : 24774 } }
{ "students" : { "year" : 2015, "number" : 23166 } }
Notice that when you need to limit the number of sorted documents, you must use the $limit stage just after the $sort.
Now we have a full pipeline.
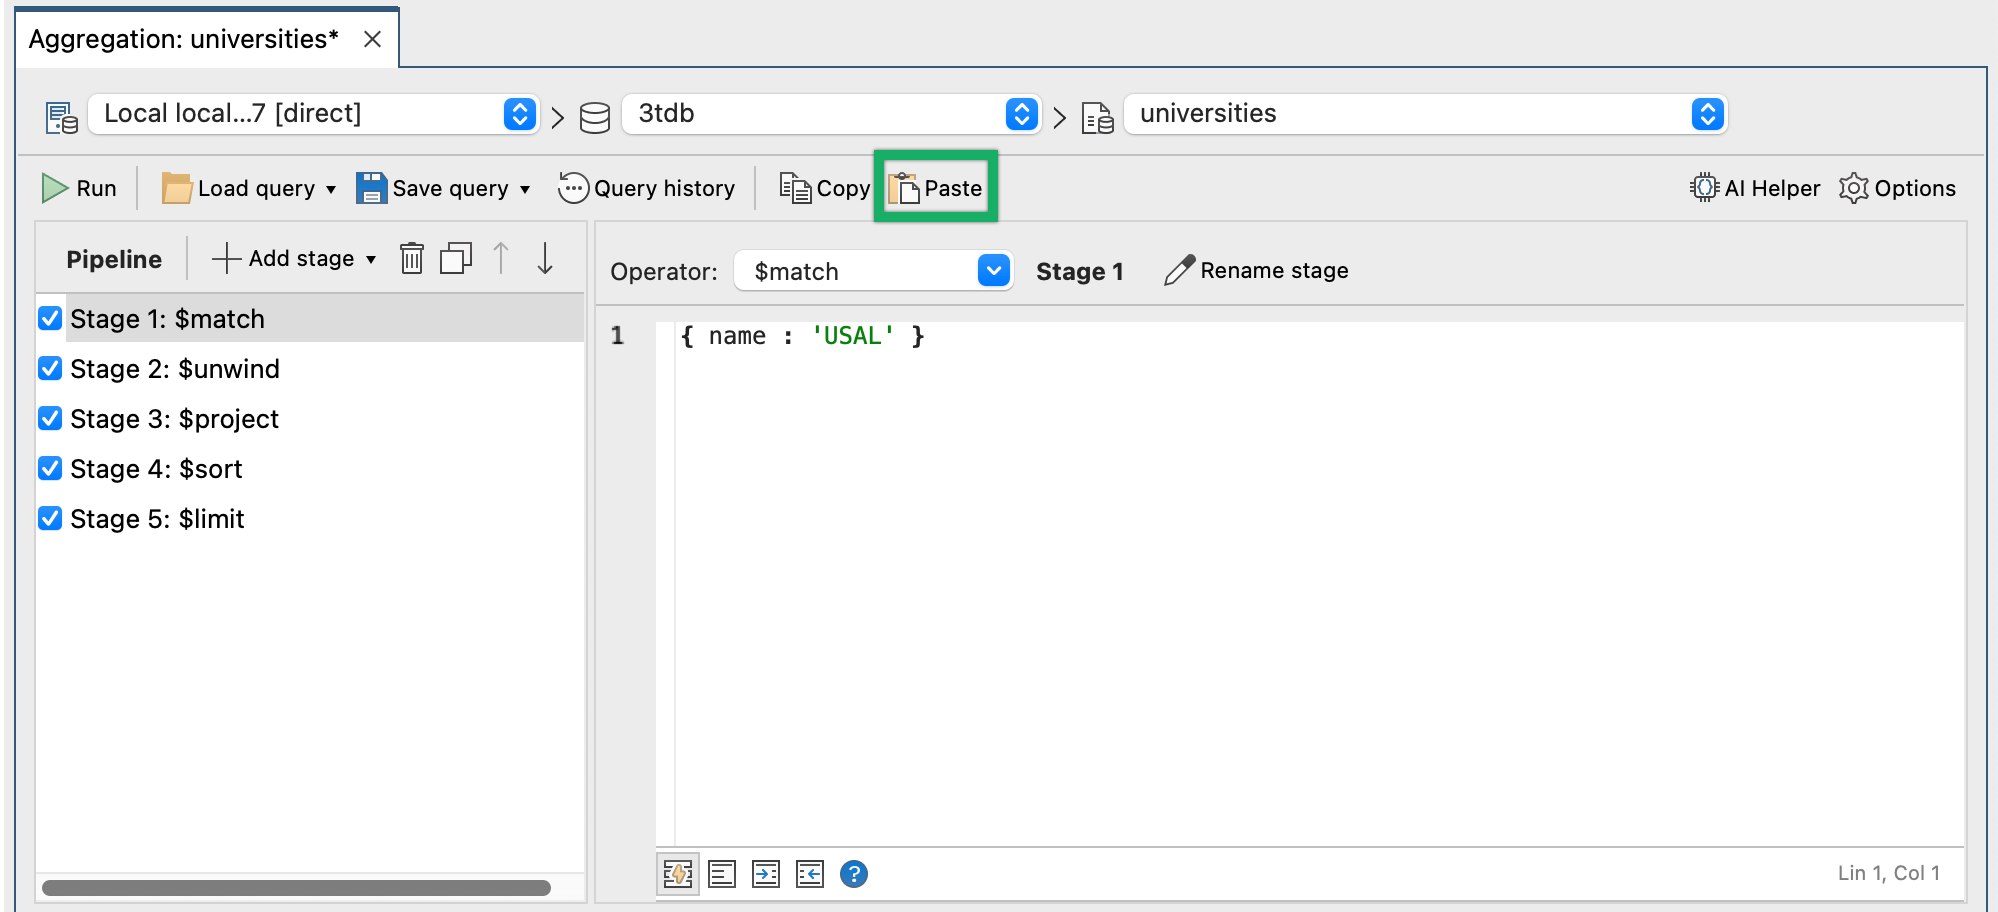
We can paste this whole MongoDB aggregate query and all its stages straight into the Aggregation Editor in Studio 3T.
Just the part shown below is copied and pasted in:
db.universities.aggregate([
  { $match : { name : 'USAL' } },
  { $unwind : '$students' },
  { $project : { _id : 0, 'students.year' : 1, 'students.number' : 1 } },
  { $sort : { 'students.number' : -1 } }
])
It is pasted in by copying it and clicking on the Paste button as shown.
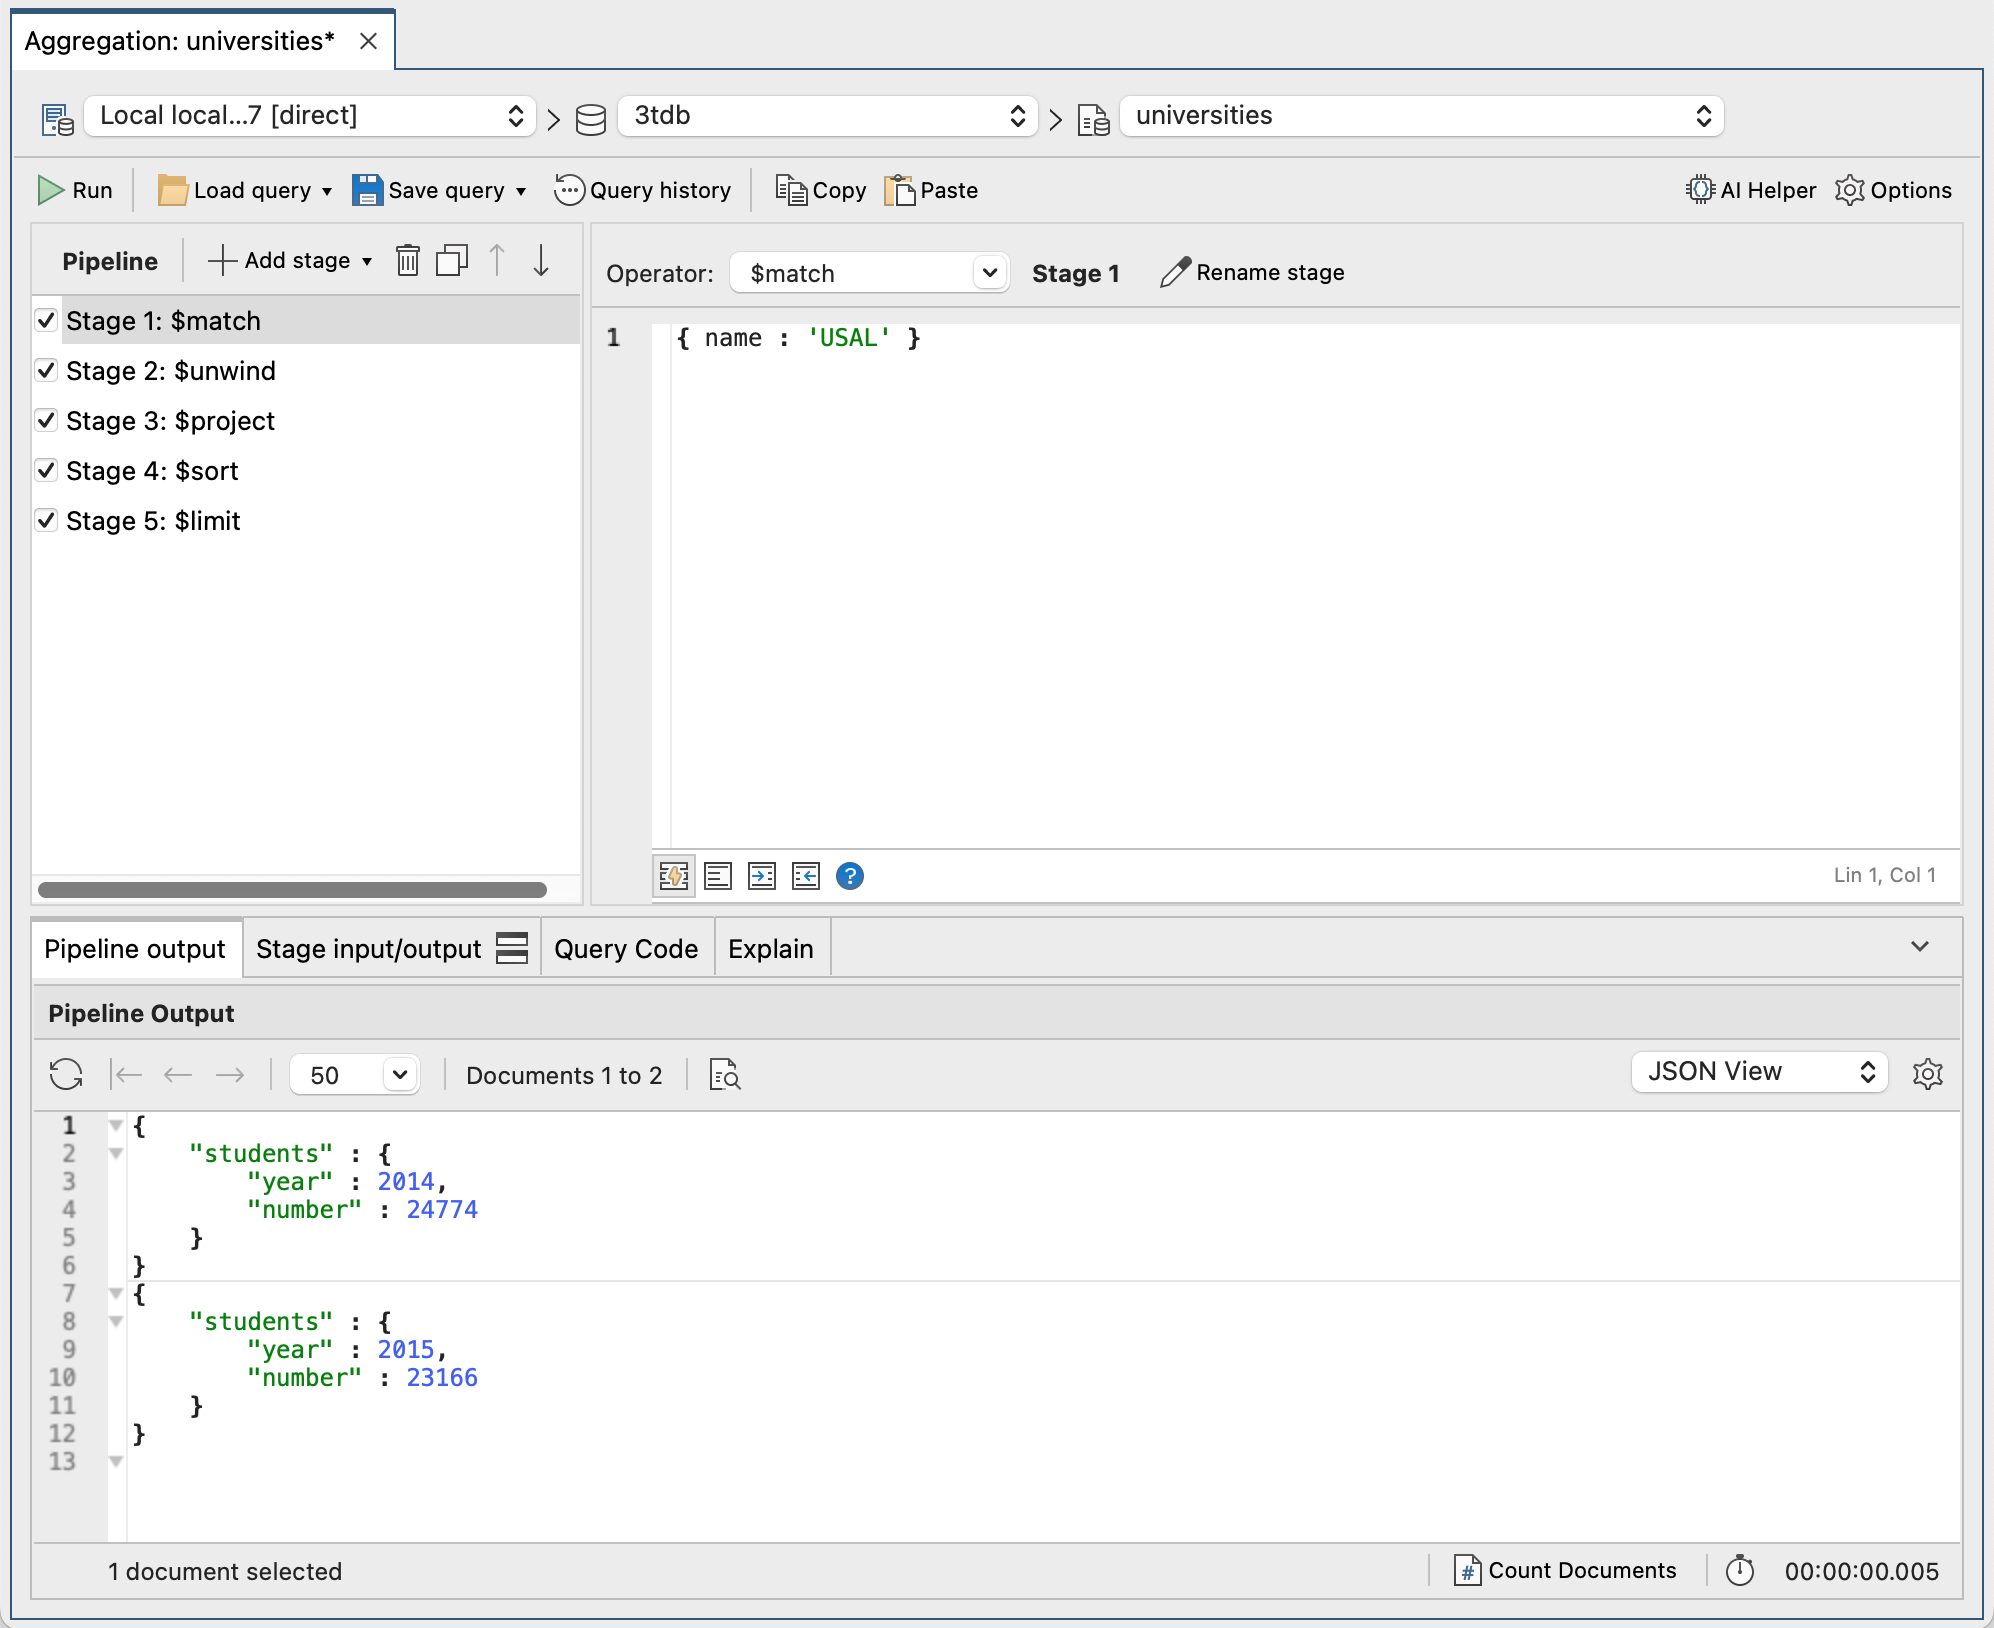
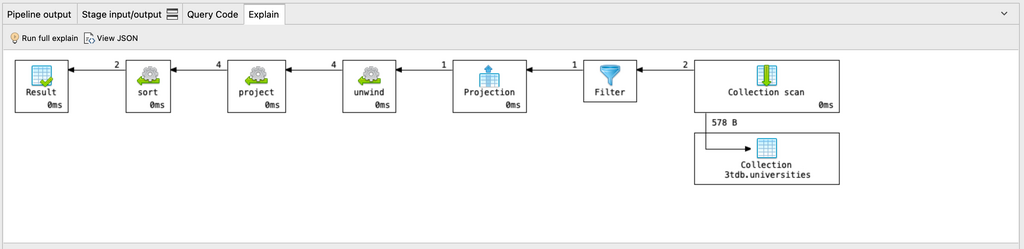
In the next screenshot, we can see the full pipeline in Studio 3T and its output.
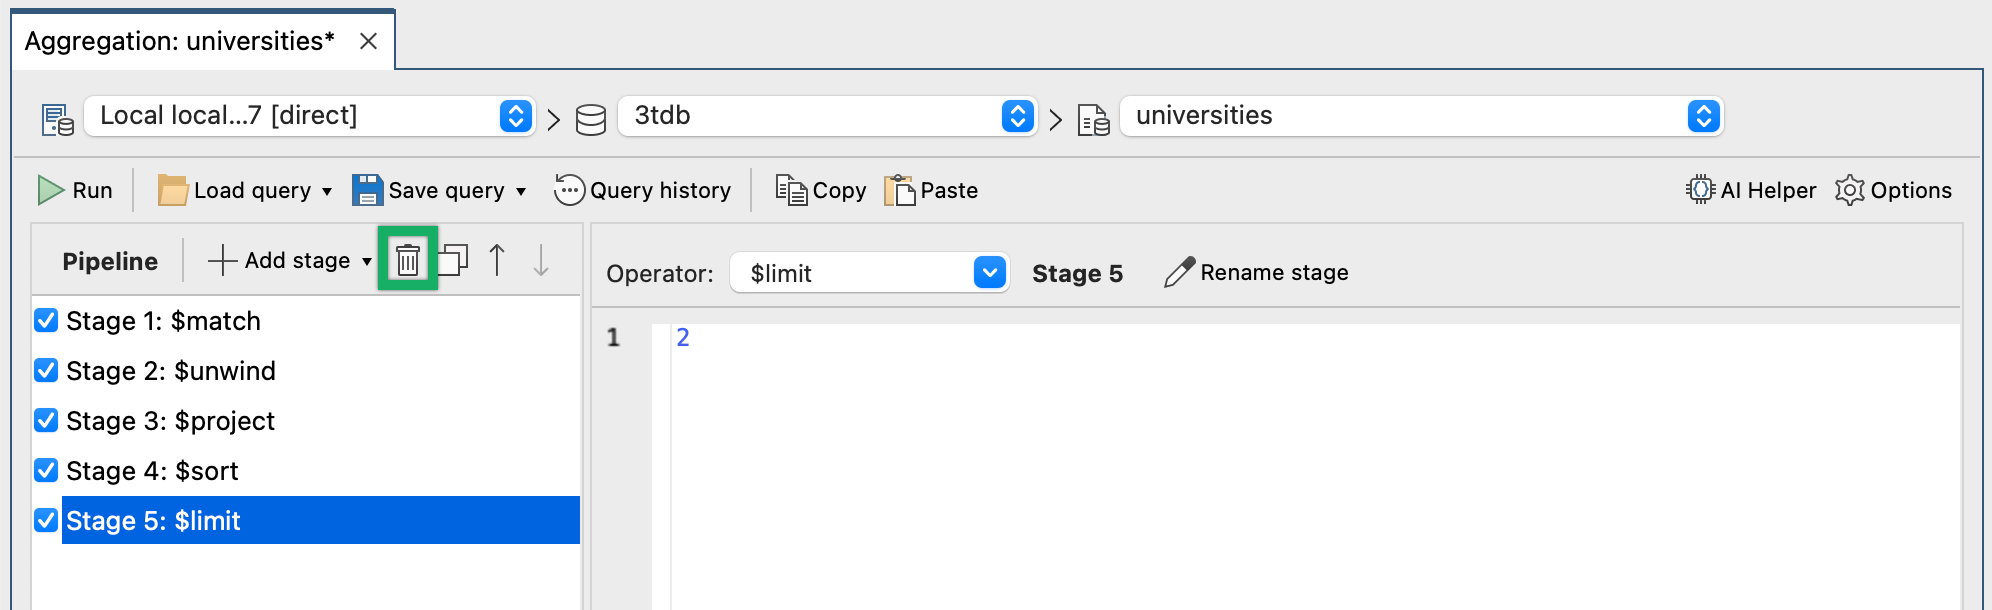
Removing stages in Studio 3T is a simple matter of selecting the stage and using the button shown in the next screenshot.
$addFields
Sometimes you may need to make changes to your output in the way of new fields. In the next example, we want to add the year the university was founded.
db.universities.aggregate([
  { $match : { name : 'USAL' } },
  { $addFields : { foundation_year : 1218 } }
]).pretty()
This gives the result …
{
	"_id" : ObjectId("5b7d9d9efbc9884f689cdba9"),
	"country" : "Spain",
	"city" : "Salamanca",
	"name" : "USAL",
	"location" : {
		"type" : "Point",
		"coordinates" : [
			-5.6722512,
			17,
			40.9607792
		]
	},
	"students" : [
		{
			"year" : 2014,
			"number" : 24774
		},
		{
			"year" : 2015,
			"number" : 23166
		},
		{
			"year" : 2016,
			"number" : 21913
		},
		{
			"year" : 2017,
			"number" : 21715
		}
	],
	"foundation_year" : 1218
}
MongoDB $count
The $count stage provides an easy way to check the number of documents obtained in the output of the previous stages of the pipeline.
Let’s see it in action:
db.universities.aggregate([
  { $unwind : '$students' },
  { $count : 'total_documents' }
]).pretty()
This provides the total of those years for which we know the number of students at the University.
{ "total_documents" : 8 }
MongoDB $lookup
Because MongoDB is document-based, we can shape our documents the way we need. However, there is often a requirement to use information from more than one collection.
Using the $lookup, here is an aggregate query that merges fields from two collections.
db.universities.aggregate([
  { $match : { name : 'USAL' } },
  { $project : { _id : 0, name : 1 } },
  { $lookup : {
      from : 'courses',
      localField : 'name',
      foreignField : 'university',
      as : 'courses'
  } }
]).pretty()
If you want this query to run fast, you are going to need to index the name field in the universities collection and the university field in the courses collection.
In other words, do not forget to index the fields involved in the $lookup.
{
	"name" : "USAL",
	"courses" : [
		{
			"_id" : ObjectId("5b7d9ea5fbc9884f689cdbab"),
			"university" : "USAL",
			"name" : "Computer Science",
			"level" : "Excellent"
		},
		{
			"_id" : ObjectId("5b7d9ea5fbc9884f689cdbac"),
			"university" : "USAL",
			"name" : "Electronics",
			"level" : "Intermediate"
		},
		{
			"_id" : ObjectId("5b7d9ea5fbc9884f689cdbad"),
			"university" : "USAL",
			"name" : "Communication",
			"level" : "Excellent"
		}
	]
}
MongoDB $sortByCount
This stage is a shortcut for grouping, counting and then sorting in descending order the number of different values in a field.
Suppose you want to know the number of courses per level, sorted in descending order. The following is the query you would need to build:
db.courses.aggregate([
  { $sortByCount : '$level' }
]).pretty()
This is the output:
{ "_id" : "Excellent", "count" : 2 }
{ "_id" : "Intermediate", "count" : 1 }
MongoDB $facet
Sometimes when creating a report on data, you find that you need to do the same preliminary processing for a number of reports, and you are faced with having to create and maintain an intermediate collection.
You may, for example, do a weekly summary of trading that is used by all subsequent reports. You might have wished it were possible to run more than one pipeline simultaneously over the output of a single aggregation pipeline.
We can now do it within a single pipeline thanks to the $facet stage.
Take a look at this example:
db.universities.aggregate([
  { $match : { name : 'USAL' } },
  { $lookup : {
      from : 'courses',
      localField : 'name',
      foreignField : 'university',
      as : 'courses'
  } },
  { $facet : {
      'countingLevels' :
      [
         { $unwind : '$courses' },
         { $sortByCount : '$courses.level' }
      ],
      'yearWithLessStudents' :
      [
         { $unwind : '$students' },
         { $project : { _id : 0, students : 1 } },
         { $sort : { 'students.number' : 1 } },
         { $limit : 1 }
      ]
  } }
]).pretty()
What we have done is to create two reports from our database of university courses: countingLevels and yearWithLessStudents.
They both used the output from the first two stages, the $match and the $lookup.
With a large collection, this can save a great deal of processing time by avoiding repetition, and we no longer need to write an intermediate temporary collection.
{
	"countingLevels" : [
		{
			"_id" : "Excellent",
			"count" : 2
		},
		{
			"_id" : "Intermediate",
			"count" : 1
		}
	],
	"yearWithLessStudents" : [
		{
			"students" : {
				"year" : 2017,
				"number" : 21715
			}
		}
	]
}
Exercise
Now, try to resolve the next exercise by yourself.
How do we get the total number of students that have ever belonged to each one of the universities?
db.universities.aggregate([
  { $unwind : '$students' },
  { $group : { _id : '$name', totalalumni : { $sum : '$students.number' } } }
]).pretty()
The output:
{ "_id" : "UPSA", "totalalumni" : 22284 }
{ "_id" : "USAL", "totalalumni" : 91568 }
Yes, I have combined two stages. But, how do we build a query that sorts the output by the totalalumni field in a descending order?
db.universities.aggregate([
  { $unwind : '$students' },
  { $group : { _id : '$name', totalalumni : { $sum : '$students.number' } } },
  { $sort : { totalalumni : -1 } }
]).pretty()
Right, we need to apply the $sort() stage at the output of the $group().
Checking our aggregation query
I mentioned earlier that it is very easy, and indeed essential, to check that the stages of our query are performing the way we need them to perform.
With Studio 3T, you have two dedicated panels to check the input and output documents for any particular stage.
Performance
The aggregation pipeline automatically reshapes the query with the aim of improving its performance.
If you have both $sort and $match stages, it is always better to use the $match before the $sort in order to minimize the number of documents that the $sort stage has to deal with.
To take advantage of indexes, you must do it in the first stage of your pipeline. And here, you must use the $match or the $sort stages.
We can check whether the query is using an index through the explain() method.
pipeline = [...]
db.<collectionName>.aggregate( pipeline, { explain : true })
You can always view the explain() plan of any aggregation query as a diagram or in JSON by clicking on the Explain tab.
Conclusion
I’ve introduced the MongoDB aggregation pipeline and demonstrated with examples how to use only some stages.
The more that you use MongoDB, the more important the aggregation pipeline becomes in allowing you to do all those reporting, transforming, and advanced querying tasks that are so integral to the work of a database developer.
With the more complex pipeline processes, it becomes increasingly important to check and debug the input and output of every stage.
There is always a point at which you need to paste the growing aggregation pipeline into an IDE for MongoDB such as Studio 3T, with a built-in Aggregation Editor, so you can debug every stage independently.