In MongoDB, data records are stored as documents, specifically in BSON format, and these documents are grouped together within collections.
Each database in MongoDB can contain one or more collections, with each collection acting as a container for related documents. This document-oriented approach allows for flexible and scalable data storage, enabling efficient organization and retrieval of data based on the specific needs of an application or system.
MongoDB collections provide a flexible and scalable approach to organizing and managing data in a NoSQL database. With their schema-less nature and support for complex document structures, collections empower developers to adapt their data models on the fly and handle diverse data types efficiently. Whether you’re building a modern web application, processing big data, or working with semi-structured data, MongoDB collections offer a powerful and intuitive way to store, retrieve, and manipulate data.
A collection in MongoDB is akin to a table in a relational database, but with a key difference: collections do not enforce a schema. This means that documents within the same collection can have different structures, allowing for a high degree of flexibility in how data is stored and managed. This schema-less nature enables developers to iterate quickly and adapt their data models as requirements change, making MongoDB collections especially well-suited for dynamic and rapidly evolving applications.
Create a MongoDB collection – db.createCollection()
In the mongo shell, creating a collection is done through the db.createCollection() method.
A collection can be created with or without set parameters, which include size (maximum size of a document in bytes).
Without parameters:
db.createCollection(
          "sea_mammals",
)
With parameters, in this case “max” (maximum number of documents):
db.createCollection(
          "sea_mammals",
       {
         max: 300,
       }
)
In Studio 3T, you can create a collection by right-clicking on the target database’s Collections folder from the Connection Tree and choosing Add Collection.

This will open a wizard where you can configure collation, validation, storage engine options, maximum number of documents, and more.

Drop a MongoDB collection – drop()
Removing a collection from the database is done through the drop() method. Leaving the field blank deletes the entire collection, like so:
db.manatees.drop(
)
In Studio 3T, the same can be done by right-clicking on the collection and choosing Drop Collection or pressing Del (Fn + Del).

Rename a MongoDB collection – renameCollection()
Use the renameCollection() method in the mongo shell, specifying the target name in brackets:
db.sea_mammels.renameCollection(
          "sea_mammals",
)
Or right-click on the target collection and choose Rename Collection in Studio 3T:

View a collection’s size – totalSize()
To determine a collection’s size, use the totalSize() method:
db.sea_mammals.totalSize(
)
It returns the collection’s total storage size, plus the total size of each of the collection’s indexes in bytes.
View a collection’s document count – count()
To count the number of documents in a collection, or the number of documents a find query would return, use the count() method.
Total document count:
db.sea_mammals.count(
)
Count for documents matching manatee:
db.sea_mammals.count(
          {
             pet: "manatee",
          }
)
View a collection’s stats – stats()
To view a collection’s overall stats (including size and document count), use the stats() method. Size data by default is returned in bytes but can be modified with the scale value, in this case kilobytes at by specifying 1024:
db.sea_mammals.stats(
          {
             scale: 1024,
          }
)
In Studio 3T, you can view all these collection statistics at a glance by right-clicking on the target collection and selecting Collection Statistics, which will display the information in tree view.

View multiple MongoDB collections side-by-side
Very frequently, you probably encounter one of these use cases:
- You want to easily compare test and production data sets.
- You simply want to look at and quickly compare result sets of different queries.
Let’s focus on the second use case and look at two separate views of the same collection.
This will result in two different tabs displayed one after the other like this:

With the Split Vertically / Split Horizontally feature, Studio 3T allows you to quickly see, in a single glance, multiple tabs side by side. You can choose to display the two datasets side by side vertically or horizontally.
Split vertically
Start by right clicking on any of the tabs and choose Split Vertically.

Now your two tabs will be shown side-by-side like this:

Split tabs horizontally
Or you could choose to split your view horizontally. Again, start by right clicking one of your tabs and now choose Split Horizontally.

Drag and drop tabs
You can now even drag-and-drop tabs and reorder them in case you have multiple tabs open and you want a quick way to compare them more easily.

Sort MongoDB collections
While in Studio 3T’s Table View, tap on a column header once to sort your view based on the data in that column in ascending order.
If you click on the header again, the view will be sorted in descending order. Another tap will restore the original (unsorted) order.

Limit MongoDB collection size
By default, Studio 3T loads the first 50 documents of a collection (i.e. dbCursor.find({}).limit(50)) when first opening a collection view.
As MongoDB documents can be up to 16MB in size, this can amount to serious traffic, so we’ve introduced a convenient way of limiting this initial number of documents either for all or specific collections.
Limit number of documents loaded for all collections
- Go to Studio 3T > Preferences.
- By default, you’ll land on the General tab.
- The first field you’ll see is Initial page size when showing result documents. Change the number as needed.
This will be the initial page size for all collections.

4. Click OK.
Limit number of documents loaded for specific collections
You can also limit the initial number of documents loaded for particular collections, which could come in handy when opening collections with exceptionally large documents, for example.
- Right-click on the collection you’d like to open in the Open Connections Tree.
- Choose the second option: Open Collection with Custom Page Size.

3. Enter the number of documents or initial page size you’d like to load initially.
4. Click OK.
Once you’ve defined your initial page size, explore your collections in Tree, JSON or Table View. Or for better data analysis, compare your MongoDB collections and spot differences in documents and fields.
Working with the Collection tab
The Collection Tab is the starting point for all MongoDB data exploration and analysis in Studio 3T. Here, access can be found to the Visual Query Builder, the Main Query Bar, and the other features associated with the current collection.
The Collection Tab shows the contents of a MongoDB collection. It’s made up of the Visual Query Builder, the Main Query Bar, the Results Tab, the Results Tab Toolbar, the Query Code tab, and the Explain tab.

In the above screenshot, Customers is a collection whose documents are shown in the Collection Tab. Download the Customers collection to follow along the tutorial.
Visual Query Builder
The Visual Query Builder lets users create MongoDB queries via drag and drop. Simply drag the desired field(s) to the query builder, drop it, set the operators, and run the query. It supports all MongoDB operators and field values.
As the query is built in the Visual Query Builder, the equivalent query will be displayed in the Main Query Bar in the mongo shell syntax
Main Query Bar

The Main Query Bar mirrors the query being built in the Visual Query Builder in JSON format which users can edit. It includes the Query, Projection, Sort, Skip, and Limit fields.
This tool is especially useful for the experienced developer, but also helps new users gain familiarity with reading and using JSON to build queries.
The Query Bar supports four short-hand query options to search by _id:
- ObjectId (either single or double quoted). If the user enters
57d28452ed5d4d54e8686f9d
into the query text field, it will be auto-expanded to
{ "_id" : ObjectId("57d28452ed5d4d54e8686f9d") }
- UUID (either single or double quoted). If the user enters
C37E3CBA-8FAF-4923-818A-09D92AB56182
into the query text field, it will be auto-expanded to
{ "_id" : UUID("C37E3CBA-8FAF-4923-818A-09D92AB56182") }
- Integer. If the user enters
9876543210
into the query text field, it will be auto-expanded to
{ "_id" : 9876543210 }
- A single or doubled quoted string. If the user enters
"2020-12-12"
into the query text field, it will be auto-expanded to
{ "_id" : "2020-12-12" }
The Query JSON Editor (“Multi-line Editor Tool”)
While the Main Query Bar only shows parts of a query, the Query JSON Editor displays the entire query in JSON. Here users can edit queries exactly how it would be done in the mongo shell.
To open the Query JSON Editor, click the button to the left of the ‘play’ symbol in the Main Query Bar.

The Run Query Button (“Play”)
Sitting directly to the right of the Query JSON Editor button, the Run (‘Play’) button runs the query on the respective collection. Additionally, this button contains a dropdown menu housing two other operations:
- “findOne(..)” – returns a single entry matching query
- “count(…)”. – will return the number of documents matching the query

Next to the Run button you’ll find a broom icon in the Query Bar. This will clear the query, projection, sort, skip, and limit parameters in one click.
Just above the Run Query and Query JSON Editor buttons are three additional buttons: Search Query History, Bookmark Query Manager, and Copy Query to Clipboard.
Search Query History
Shows all previous that have been run. Queries are shown in JSON view.
Bookmark Query Manager
Saves oft-used queries and eliminates the need to repeatedly enter queries manually.
Copy Query to Clipboard
Copies the query automatically to the users’ clipboard.
Results Tab
The Results Tab offers three different options to view results and edit data: Tree View, Table View, and JSON View.

Tree View
Tree View allows for users to see the hierarchies in the data. Additionally, data can be edited in-place. Read more about Tree View.
Table View
Table View sorts data into columns and rows similar to a spreadsheet and enables custom views of embedded fields and sub-fields. As with Tree View, in-place editing is also available. Find full documentation of Table View here.
JSON View
JSON View shows the data as JSON documents.
Drag-and-drop query building is not available while in JSON View. However, for fast in-place editing, select the target value and Cmd-J will bring up the JSON editor panel. Read about JSON view here.
In-Place Data Editing
In-place editing is available throughout Studio 3T. All three views – Table, Tree, and JSON – allow for data editing in real-time.
In Tree and Table View, this is done by double-clicking on any field. Additionally, a multi-line editor can be opened by clicking on the ellipsis icon.
In JSON View, right-click anywhere in the Results Tab and choose Document > Edit Document. This will open the Document JSON Editor.

The Results Tab Toolbar

Use the arrow keys to flip through various results pages.
Choose to see 1, 10, 20, 50, or 100 results per page
Click the refresh/recycle symbol to refresh results.
Creates a new object and allows users to input new data for the corresponding field.
Opens the current document in JSON view.
Opens the document in JSON editor.
Opens a dialog screen where users can edit update settings.
Removes documents/fields matching a certain criteria.
To count results, click the Count Documents button on the bottom right hand corner. This returns the number of documents which match the query, in one click.
Update Dialog
The Update Dialog is a pop-up editor within the Collection Tab that allows you to modify several documents at once. It is equivalent to the db.collection.updateMany() command in MongoDB.
To access the Update Dialog, right-click on any cell in Table View or Tree View and choose Update Dialog.
It has two tabs: Query and Update.
The Query tab is where you write the query to find the documents you want to update.
You can choose to apply one of three predefined queries (all documents in the collection, selected documents in the collection, or the current results from the Collection View), but you can customize the query as needed in the editor.

The Update tab is where you write the command that you want to run against your target documents, which you defined in the Query tab.

Once done, click Validate JSON to debug, and click Update to finalize.
Query Code
The Query Code tab allows user to convert queries into several different languages. The copy query to clipboard button will copy the code in the target language, thus allowing users to paste driver code easily into their desired application. Currently the languages supported are: mongo Shell, JavaScript (Node.js), Java (2.x driver API), Java (3.x driver API), C#, and Python.

Explain Tab
The Explain tab is one of the most powerful methods of fine-tuning query performance – it reveals how the query executes at the line level.
Older Studio 3T versions showed the query plan and execution statistics in this tree view:

With the release of Studio 3T 2018.6 came Visual Explain, a feature which outlines the same information in an easier-to-follow diagram format.

Learn more about Visual Explain in full here, and how you can use it to optimize MongoDB query performance.
Working with the Collection History
To turn on the Collection History, in the Preferences dialog, on the Collection History page, select the Enable Collection History option. To store deleted documents on your computer, select Record document deletion. To store updated documents on your computer, select Record document update.
The Collection History page also tells you how much local disk space is being used to store deleted or updated document files. There are purge options to automatically delete document files that are older than a specified period or when file storage exceeds a specified size. You can delete all the stored document files using the Clear all Collection History items button.
To override the global Collection History settings at the connection level, in the Edit Connection dialog in the Connection Manager, select the Collection History tab. You can specify if document files are stored for that particular connection and choose to store delete operations or update operations (or both).
Restore deleted MongoDB documents
When you delete documents, if you add them to the Collection History, you can restore them.
The Collection History is stored locally on your computer, so you can only restore documents that you deleted.
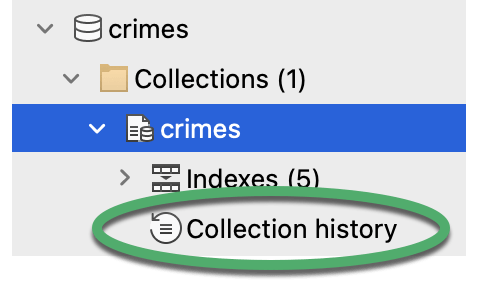
To restore documents, in the Connection tree, locate the target collection and double-click Collection history.

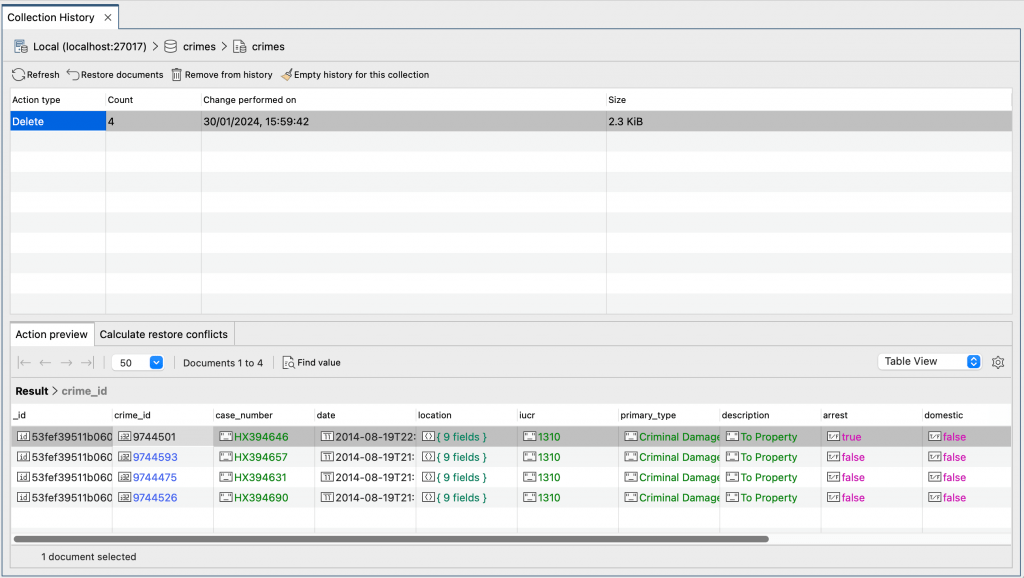
The Collection History tab displays a list of operations for the current collection. For example, if you deleted 4 documents in one operation, this is displayed as a single Delete action.

You can view all the documents in the delete operation in the Action preview tab. The Calculate restore conflicts tab shows you if it is safe to restore your documents.
The Change performed on column shows you when you deleted the documents. You can remove the document files from your computer using Remove from history or Empty history for this collection to clear the Collection History.
To restore documents, select the delete operation in the list and click Restore documents or press Enter.
If there are conflicts, for example if the document already exists in the collection, the Resolve restore conflicts dialog allows you to apply a resolution strategy to all documents or individual documents in the delete operation. You can delete the documents from the Collection History, overwrite the documents, or insert the documents as new documents with a unique identifier.
Restore updated MongoDB documents
When you update documents, if you add them to the Collection History, you can restore them. You can restore values, deleted fields, field names, and field types.
The Collection History is stored locally on your computer, so you can only restore documents that you updated.
To restore documents, in the Connection tree, locate the target collection and double-click Collection history.

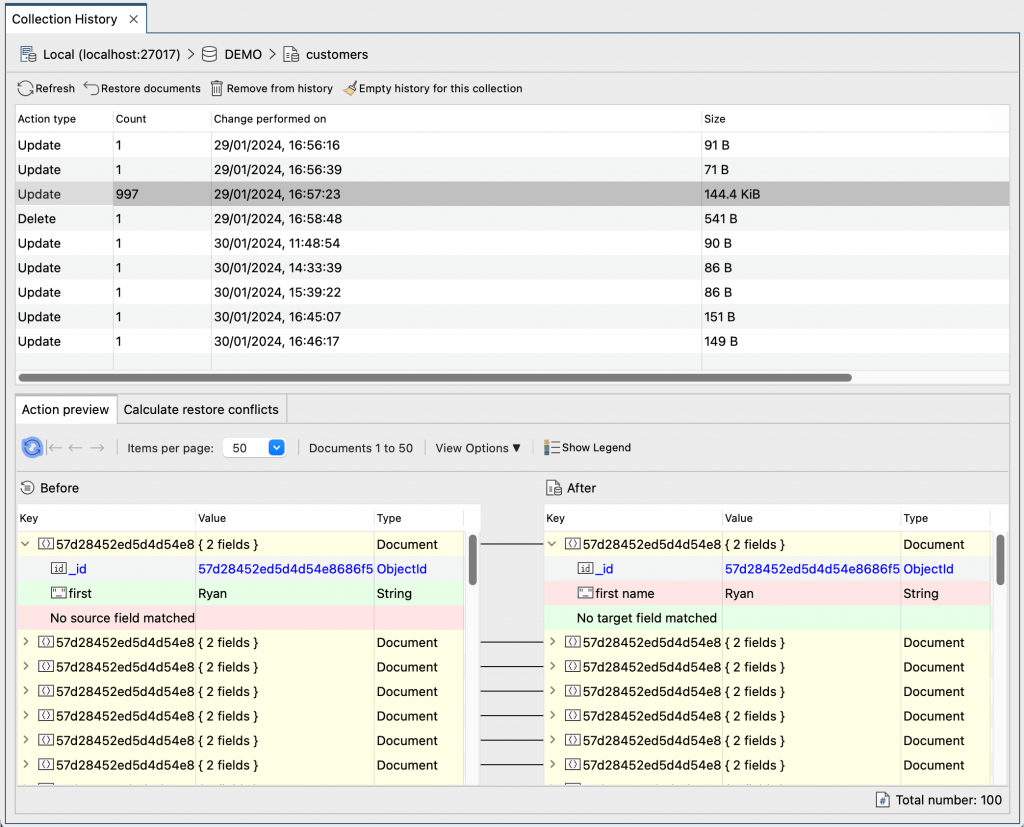
The Collection History tab displays a list of operations for the current collection. For example, if you updated 997 documents in one operation, this is displayed as a single Update action.

The Action preview tab shows a color-coded comparison of the updated fields in the documents before and after the changes you made.
The Calculate restore conflicts tab displays information about conflicts that may occur when you restore the documents. On the left side, Virtual document shows the document as it will be when it’s restored. The right side shows the current document.

The Change performed on column shows you when you updated the documents. You can remove the document files from your computer using Remove from history or Empty history for this collection to clear the Collection History.


